

Last night saw the second game in our campaign taken from Rob Avery's excellent "Vyazma or Bust" campaign supplement, written and available from Too Fat Lardies for their WW2 rules, "I Ain't Been Shot Mum".
After failing to successfully control the highway and capture the village of Izdeshkovo in game 1 the action moves to Belyj.
Jez's Germans this time essentially had to cut their way through my Soviets and exit the southern table edge. My Soviets were tasked with engaging the Germans and ensuring their unit Commissar ended up at the farm on the northern table edge.
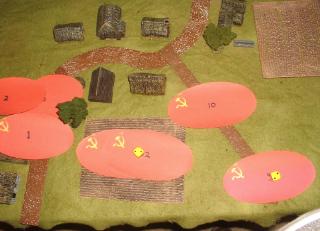
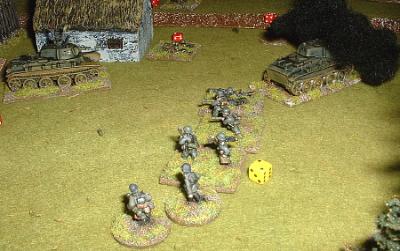
Terrain consisted largely of the lightly wooded, gentle rolling variety with patches of scrub and a few low loose hedges and fences. My Soviets were to enter on the Southern table edge and the action would be fought lengthways along the table. Two Infantry Platoons each of three 10-man sections, plus two 8-man scout sections and a truck-mounted weapons platoon of two Maxims and two 50mm Mortars were to enter on the main dirt road, whilst a supporting Platoon of five BT-7's were to enter on the adjacent dirt track. The scenario called in actuality for T-26's but I don't own any so I changed to BT-7's.
As I had proof read the scenario supplement for Rob, I was only too aware that the scenario was a bit different from the norm. I decided that to ensure that I was fixated with attacking the enemy, rather than sitting and defending the southern table edge, I would be forced to spend the first two initiative dice, per unspotted blind, or first die when the units were actually deployed on table, on movement towards the enemy. This would mean that my Soviets would keep to their briefing of pushing on against all odds. Once the enemy were at close range I was free to do any action.


The German blinds came up first and advanced rapidly down the table. Due to the nature of the terrain, when the Soviet forces appeared on blinds, the intervening features prevented any effective spotting. By using their first two dice for movement only, my blinds raced forward with very little opportunity to do any spotting. Usually I would have advanced quite cautiously until the enemy were spotted but my hands were tied....
I sent the scout platoon up the centre of the table, supported on either flank by the two other infantry platoons. The weapons platoon were in reserve with the tanks entering via the dirt track and covering the woods to the east of the centre.
The Germans were spread to the west with a strong concentration of blinds coming down the road from the farm located on the north table edge.
Spotting effectively Jez managed to identify most of my infantry heading in his direction. My AT rifle was spotted hiding in the woods to the east, but my tanks were as yet unspotted, though I informed him of the sound of many tank engines!
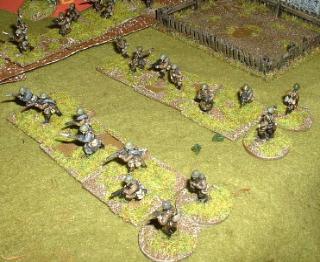

My support Platoon was still on blinds and hadn't yet cleared the village, but things didn't bode well as the majority of my infantry had failed to reach any cover and were caught in the open ground south of the woods. I raced forward with my scout platoon, gaining a toe hold in the woods in the centre and then occupied the woods to the west also.
The German blinds advanced until they were so close that it was evident that at 'Tea Break' they would become automatically spotted.

An SdKfz 222 was heading south down the road leading a Panzerjager I . Infantry platoons were found behind the woods to the east and occupying the hill to the west of the main road. The thud of the rapid fire cannon of the armoured car resounded and proved its worth by causing a stream of casualties upon the hapless Soviets who continued to advance with their first initiative die each turn.
Disconcertingly the Panzerjager I's Czech 4.7cm gun, with its accompanying Big Man, proved to be incredibly accurate in an anti-personnel role. The scout platoon in particular picking up many 'wounds'.
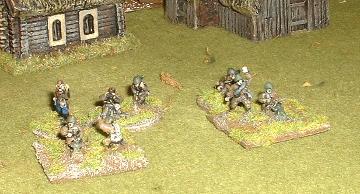
The German infantry managed to occupy the woods to the east just in time. My infantry platoon suffered greatly from the close range small arms fire and decided to hit the dirt.
My Support Platoon was spotted by the Germans as it moved from the village. Consisting of two light mortars and two HMGs, with a Big Man and proving to be a magnet for the attentions of the armoured car and Panzerjager. The German HQ now drove down the road and de-bussed; two sections of infantry lead by a Big Man with an accompanying MG34 and an AT rifle.

The infantry occupied the central woods and began to advance towards the scout platoon whose last few men were grimly hanging on to the woods, determined to sell their lives dearly to the invading fascist vipers. The MG34 set up behind a low hedge and fired upon the Soviet Maxims and mortars whilst the AT rifle crew headed to the eastern woods to support the infantry platoon.
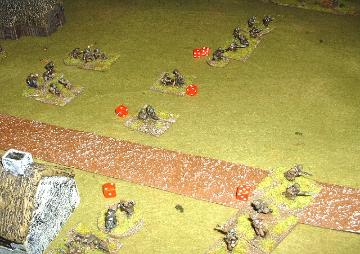
I decided that now was the time to spring my tanks on the Germans who seemed to have grabbed the initiative. The BT-7's used their MGs to hose down the woods in front of them containing the German infantry.


'Uhraieee' sounded from the throats of the Soviet infantry as, lead by their Big Man, a platoon assaulted the woods. Unfortunately they were already down to two initiative dice and only two reduced sections managed to get into close combat with the Germans.
A furious but short melee ensued. Sharpened entrenching tools, knives, bare hands and teeth were all brought into play, as the Germans threw back the enemy leaving the BT-7's dangerously exposed. On the western side of the table very little had occurred. Early on in the game a burst of long range fire from Jez had despatched the Soviet Big Man in this section of the table However, the relevant chips were failing to be drawn each successive turn and the with the forces not being at close range, there was not even any fire at 'Tea Break'.
This changed however when Jez launched a textbook effective attack on the Soviet held woods. Using one section to provide a base of fire support, thereby pinning my valiant troops, he close assaulted wiping out my defending section. With the remaining section he advanced into the woods and fired close range into another Soviet section which was hanging onto the extreme southern edge of the wood, pinning it and inflicting many 'wounds'.
In the centre, the remaining German blinds had advanced and were sitting behind the armoured car and Panzerjager I.
Things were now looking desperate for my forces. 'Wounds' were causing my whole force to lose cohesion. Unable to remove them without a 'Rally' chip and with limited Big Men, my movement and firing were badly affected. Killing in IABSM is not always as important as causing the negative cohesion reflected in the 'wounds' system. The Soviets in particular display this Achilles heel of loss in command and control.
The Germans now had occupied all the significant cover across the table, whilst my forces were largely hugging the earth and trying to find some cover hiding in the folds in the ground.
My tanks were the only positive aspect of my play so far. Their MG fire had halted the German infantry opposite them but now the BT-7's exposed position, without infantry support was their downfall.
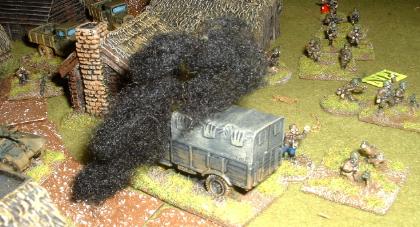
Jez's Germans used their grenades to permanently disable one vehicle and cause engine damage to another. He then revealed a Panzer II and an Panzer IV supporting them, which fired albeit ineffectively at the BT-7's. I was actually forced to withdraw the tanks to preserve them, something I seldom do lightly...

Jez's Panzerjager then turned on its tracks 45 degrees, the Big Man urging caution and accuracy from its crew, and hit another BT-7. The crew burst into loud cheers as the Panzerjagers 4.7cm shell detonated the ammunition of the Soviet tank. Burning chunks of metal were still descending as the German AT rifle crew disabled a fourth BT-7!
Once again, as in our first game the 'Tea Break' chip came up very quickly for several turns imposing something of a lull on the action. As both sides were within close range of each other however, the fire was unstinting the Soviet suffered heavy casualties. It was now a case of mopping up for the Germans and getting their Artillery HQ unit of a Horsch, Radio vehicle and truck off the southern table edge.
My last BT-7 managed to hit the Panzerjager twice, causing an engine fire and its gun to be disabled, before it withdrew with its last dice. As my other Tank chips appeared the crews wisely decided to abandon their vehicles and leg it.
Jez's MG34 and his HQ sections continued to pour forth a hail of fire toward the Soviet lines. Both Maxim crews were finally wiped out. Jez now had some bad luck. His SdKfz 222 became bogged down as it tried to take advantage of the ensuing chaos by advancing along the road, his Panzerjager I wisely decided to withrdaw from the action trailing smoke as the Big Man screamed at the crew to turn round to no avail.
Jez's infantry in the eastern woods now tried to mop up the Soviets but upon leaving the woods one section was badly shot up by Soviet infantry and all but wiped out.

The eastern woods proved to be a graveyard for German infantry. Only seven survivors, in two sections, were all that remained of the twenty six men that had entered the woods.
Jez's Panzers now crashed through the woods using their MGs to ward off the Soviet infantry, who were all but spent and down to one iniative dice.
His armoured car freed itself too and began to advance albeit cautiously as its rapid fire cannon spat forth its fury.
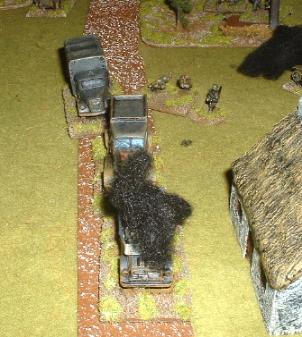
At last Jez's Artillery HQ vehicles were revealed as they raced at full speed along the road towards the southern edge.
It seemed that nothing could stop them until my last BT-7, turret jammed, potential engine breakdown too, skirted the village and fired a shot at point blank range into the Horsch which exploded instantly.
The jig was up! Pobieda! Jez was quite gutted.
Victory was further sealed when a section of Soviet infantry, lead by their last Big Man, which had withdrawn from the western woods fired their small arms into the accompanying truck which promptly also burst into flames. The German troops remaining would escape as the Soviets has little to stop them exiting the Southern table edge. However the important Artillery HQ was all but destroyed and therefore the Germans had lost.
The game had proven to be great fun. The Soviets had been prevented from advancing to their objective and had stopped the Germans at practically the very last throw of the dice.
What a game. Soviet casualties ran to four of their five BT-7's and a whopping 65% of their infantry, whilst the Germans suffered just under 25%.
Jez agreed that my insistence that Soviet troops on blinds use two initiative dice for movement, and those deployed on the table, unless at close range, use one die for movement, had been a fair compromise in view of the fact that I knew what the German objective was. What it actually meant was that my troops largely failed to make it to cover and were badly shot up by the Germans with their fire superiority.
Jez had played a very good game and really deserved to win. His infantry had outfought me everywhere on the table. He was really unlucky, as my BT tank which delivered the coup de grace, had to first pass its test see if its crew stayed on board, roll enough score to move to a firing position and then hit a fast moving vehicle. We worked it out as a ten needed to hit. I scored an eleven. Gun 8 (gun 6 + 2 effects for short range) Vs no armour, I rolled four fives. Ka-boom. End of story.
Next action sees a disgraced Jez sent to occupy two hamlets, close to Smolensk, to stem the Soviet counter-offensive which will undermine the whole of Barbarossa.....
Kev