


The past weekend we took a rest from the eastern front and moved our forces to the beaches of Normandy in June 1944. We played this time "Battle for Neuville" from the IABSM companion book Where the Hell Have You been Boys?, a collection of 21 scenarios of the battles around Omaha and Utah beaches in Normandy. And those were not the only news this week end: the remarkable one was that I finally played a game, after several weeks acting as umpire... so last Sunday "I was happy as a dog with twin tails", as the saying goes in Spain, commanding a German kampfgruppe.
How did I fare? That's for the last part of this post... and then you can leave your thoughts and comments about my performance.
Background
Morning June 6, 1944. Confusing reports hitting the local German command posts indicate that Allied parachutists fighting in a wide area behind the first coast line since last night. In particular St Mere Eglise seems to be in American hands, controlling an area as far as the north of Neuville-au-Plain. The German command orders a kampfgruppe to move south, passing Neuville and to regain control of the critical cross roads at St Mere Eglise.
Forces Involved and Initial Deployment
I was given the German side this time. My kampfgruppe included three infantry platoons, an 80mm mortar section (playing a critical role in the game) and two HMGs, supported by a platoon of three Stug IIIs tanks. Moving off-table from the road at the north edge, the German player had to clear the road south at the end of the game with as many units as possible.

Initial American Deployment
The Americans (I later knew) were a Para platoon (elite) heavily armed with bazookas and reinforced with 2 x 57mm AT guns; their mission was to retain control of the village of Neuville. If under overwhelming pressure, they could call a reinforcement (another platoon) to cover their retreat and leave south.

Game table - View from the South
The Germans had to enter under Blinds, at a rate of one after each tea break on their activation. My plan was to introduce first an infantry platoon and the AFVs in recon role, to survey the area and to uncover as many American units as possible; they will followed by the mortars, to be placed hidden in one of the orchards to my right to provide fire and smoke support to the forces with the help of a FOO.

German Infantry Platoon and Blind (Stugs Platoon)
The vanguard will be followed by the senior Big Man with the HMGs unit (to be deployed only after having a decent picture of the American positions and strength following the recon effort), while leaving the 2 remaining infantry platoons as a reserve in the northern end of the causeway.
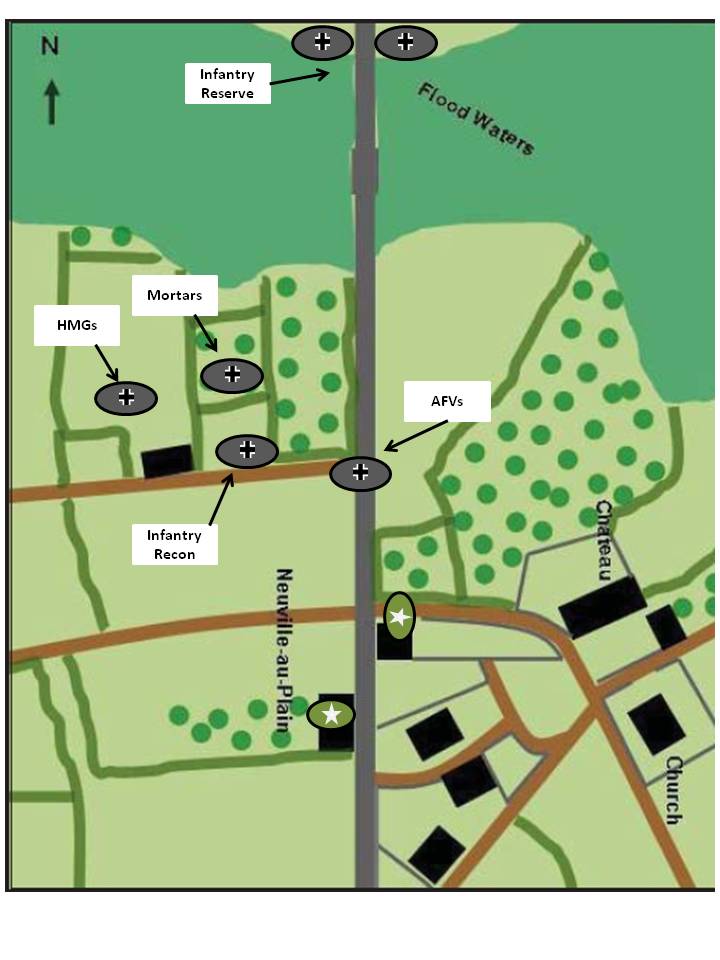
German Deployment Plan
After the first few turns, my infantry unit was spotted as well as the AFVs (not too difficult with the three steel beasts roaming wildly and unopposed in the open)...

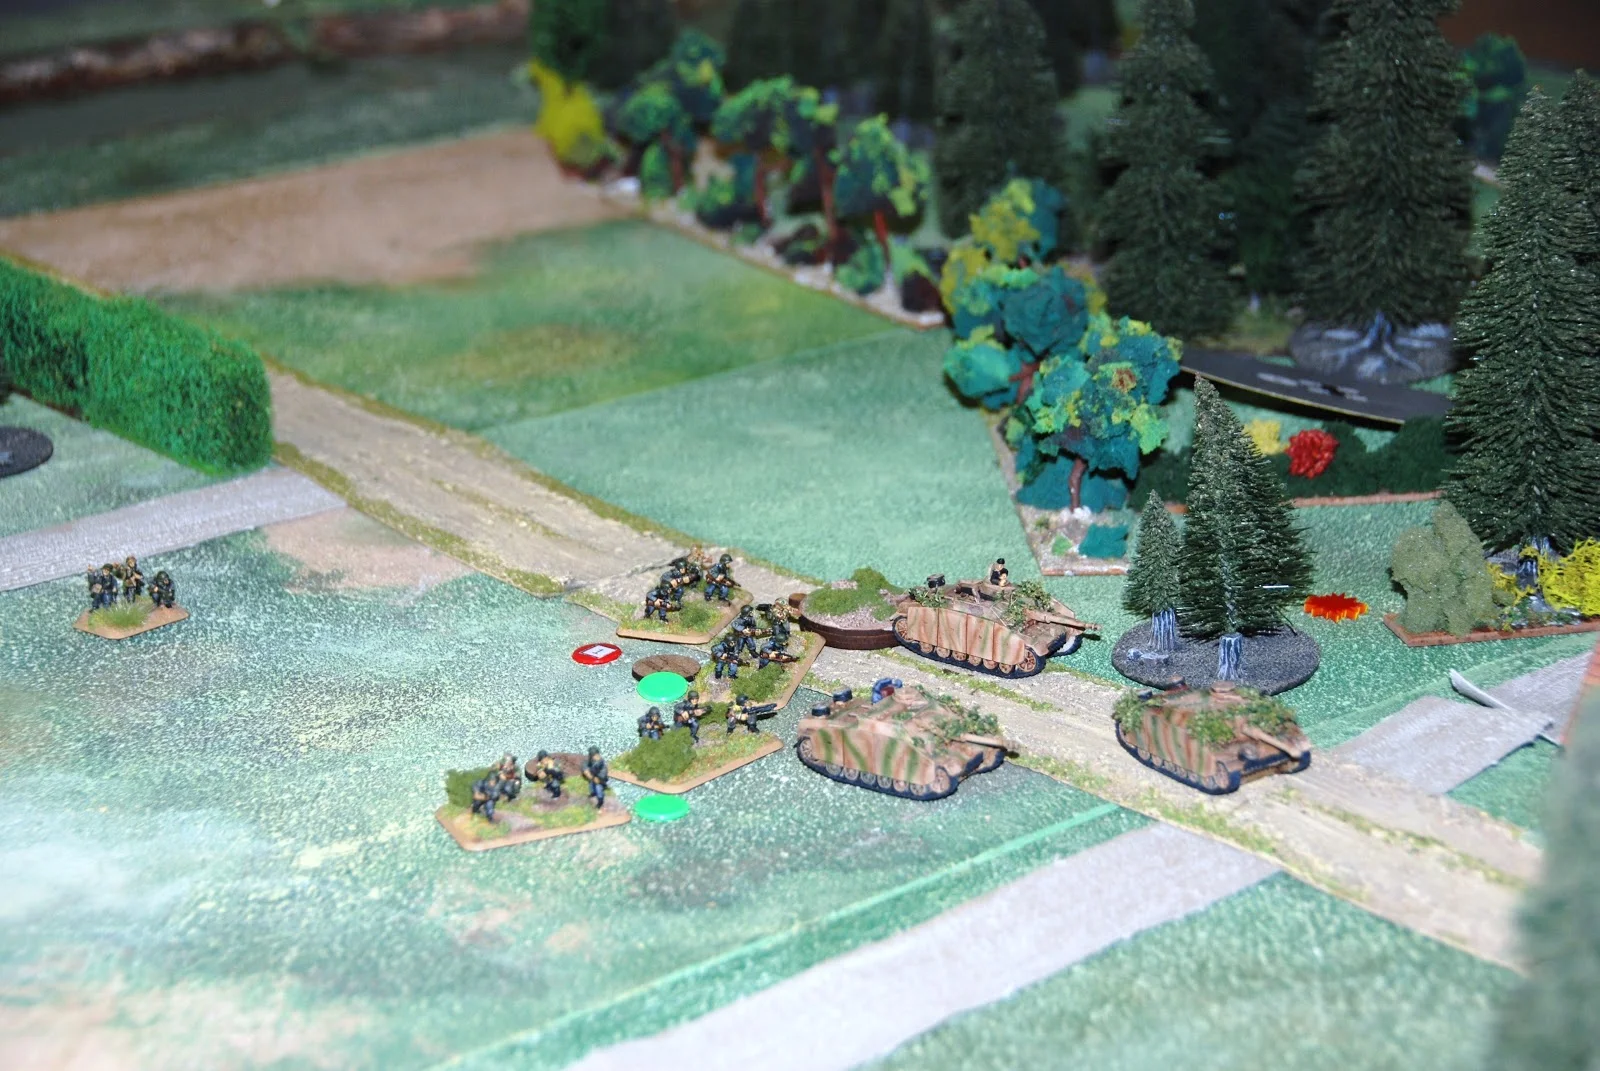
Panzer March!!
...triggering the first reaction from the US Para forces...

Fire!!
... unveiling the location of one ATG, the mortars and two infantry squads in the following turns.
Unluckily, the AT Gun crew failed to hit the German Stug the first time they fire, and I proceed to methodically saturate with rifle, mortar, MMG and HE explosive fire until wiping it out of the table.

I gave orders then to one of the Stugs to move forward cautiously along the road, only to be almost immediately attacked by a US infantry squad lying hidden in a hedgerow, fighting my tank at close quarters and supported with a bazooka team and a second AT Gun.
Despite the surprise, the tank could disengage soon with just a couple of shocks and some minor damage to the gun sights and engine.

These US units were now subject to another rain of lead and fire, breaking away and leaving almost no survivors and an abandoned AT gun. It was time now to move and finish the last pockets of resistance...

El Alamo?
... so I decided to activate the two infantry platoons in reserve, crossing the river and moving under cover through the woods on my left flank. In the meantime, the HMG section was sent south leaving the battlefield unopposed, in order to start putting units out of the table.
All forces forward!!
It was then that a new US Blind emerged from the road's south edge, taking a defensive position in the house closest to the table edge. What to do now? ...Well, stop the game because to was close to 2PM and lunch time in Spain ... and to my surprise the umpire called it a draw, because the victory conditions of the Americans were to hold the village at the end of the game but I at least cleared one unit south at the same time.
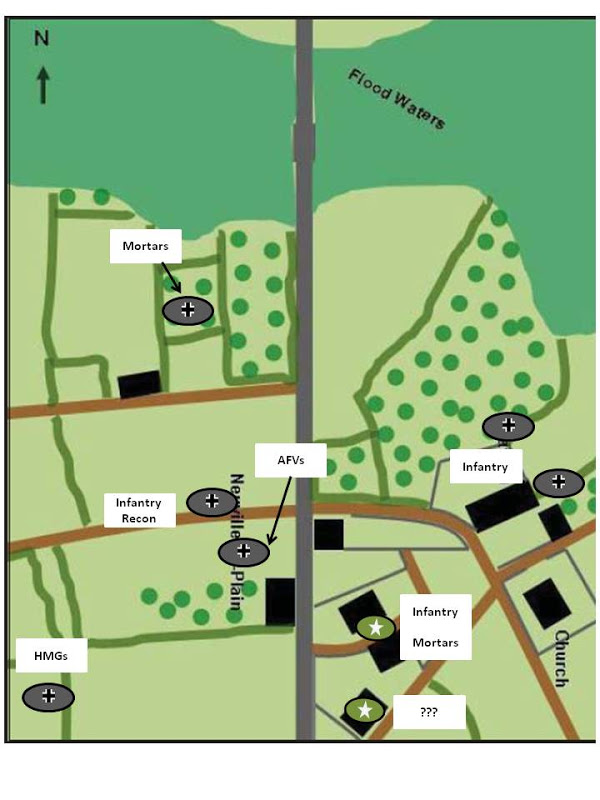
Positions at the end of the game
That was odd: the victory conditions could produce a draw outcome easily, as the Americans did not have enough forces to cover the whole table edge and therefore the German units could break south bypassing the US strongholds.
A faulty scenario design? Here comes the irony: in fact I was DEFEATED despite a clear superior tactical performance (or at least I think so) in the game. Once at home, I read the full scenario text and realize that my orders were NOT to leave the table through the south edge BUT TO EXIT BREAKING THE ROAD SOUTH.
Therefore the brave Americans paratroopers held the village (although with high casualties and suffering) and St Mere Eglise eventually remained in the Allied hands. The actual historical battle outcome was not very different, as the Americans could hold the village for a longer period than expected before being forced to retire south with 70% casualties.
Kudos for IABSM, showing again the potential to fight historical scenarios and being a winner despite losing the battle. Next weekend, back to Russia autumn 1941 with another decisive engagement of the Vyazma or Bust campaign
Benito