| . |
Chinese |
Allies |
| Foot |
4800 |
4080 |
| Horse |
960 |
0 |
| Guns |
16 |
0 |
ReportThis was an attempt by the Allies to destroy one of the Taku forst: holding up the attempt to reach the Chinese capital. The Chinese set up with their right flank anchored on the fort. Their guns were either in (the gingals) or next to (Imperial Battery) the fort, followed, running left, by their infantry and, on the far left, their cavalry. The Allies set up in a long line of mixed line and column formations. The order, from the right, was: the 66th, the French, the Naval Brigade, the 2nd Bengal Foot, the 57th, and the 1st Bengal Foot. The battle opened with the Chinese advancing their whole cavalry force, in column, to threaten the British 66th Regiment. These fine troops halted their advance, and both sides spent the next 30 minutes hoping the other would advance and show some weakness. Meanwhile, on the other side of the field, the 57th Regiment sped forward in column and charged, unsupported, straight at the Chinese artillery. This turned out to be a little over-enthusiastic: as even these strong British troops couldn’t get through the hail of canister resulting from the combined fire of 16 guns and a unit of Tigermen. Back on the Allied right, the French Marines had allowed a gap to appear between their main line, three companies, and another line of three companies perpendicular to their comrades and tasked to protect their flank. Seeing this, the Chinese commander charged a unit of Tigermen and all their cavalry onto the exposed flank of the first line of Marines. These countercharged, but were unable to resist the Tigerman, no doubt inspired by opium, and so fell back, shaken and disordered. The Chinese cavalry, despite the loss of the CinC to spectacular death, charged these shaken Marines and, despite taking casualties from fire, made them rout, along with their support. The situation looked desperate for the Allies: with the Chinese now in a position to turn their flank: rolling them up from Naval Brigade onwards. The Gods smiled on the Allies: suddenly two Chinese units turned and ran for no reason. Unfortunately, the commander of the Naval Brigade, unused perhaps to dry land, ordered his men to disengage rather than fall back in an ordered fashion. This proved fatal: as the Tartar skirmishers smashed into their rear, driving them from the field. Unfortunately, immediately after this success, another crisis of confidence caused another two Chinese units to flee: and it looked as if, despite looking as if they could win, the whole of the Chinese left flank had collapsed. Meanwhile in the centre, the 2nd Bengal Foot had been advancing slowly forward in line: taking casualties from the Chinese artillery. Seeing their Naval Brigade support, they halted, shaken: and were charged by three units of Chinese foot. They broke and ran, chased by the Chinese hatchetmen!
On the Chinese right, by the fort, the 1st Bengal Foot were finally in a position to assault the guns. Unfortunately, the charge fell short, and they were peppered by the artillery. As the battle ended, the entire Chinese left flank had collapsed, but they had broken the British right and centre. However, the 66th and the rallied French Marines were now advancing forward, and the artillery had yet to break the Bengalis, although infantry were rushing to their support. CasualtiesThe British lost 300 infantry (mostly the 57th); 300 Sepoys; and one 2inC suffered a light wound. Total 600 casualties. The Chinese lost 160 Imperial Foot; 240 Horse; and 140 Village Levies. Total 540 casualties. Their CinC was also killed. At the end of the battle, the following units were routed: the British 57th and 2nd Bengal Foot; the Chinese 1st Spearmen, 2nd Tigermen, 1st & 2nd Lancers and 1st & 2nd Tartar Skirmishers. ResultsThe battle was declared a draw. AnalysisAny tactical errors that the British might have made (the charge of the 57th, the gap in the French Marine line and the disengaging of the Naval Brigade) were more than made up for by the appalling morale rolling of the Chinese. Their whole left flank went through “old snake eyes” whilst rallying troops from shaken! At the end of the day, the British were coming back strong from their earlier disappointments: and it may have been that the Chinese no longer had the morale to withstand their renewed attacks.
|
Battle
Report: 6th August 1998
Early
Chinese
~vs~ Early British Indian & French
(Rupert
Avery ~vs~ Robert Avery)
|
|
.
|
|
Early Chinese
|
| Brigade |
Unit
|
Fig.'s |
Org. |
Class |
Weapons |
Pts/Fig |
Points |
| |
CinC |
1 |
|
|
|
|
100 |
| 1st
Imperial |
2inC |
1 |
|
|
|
|
50 |
| Brigade |
Tigermen |
25 |
1x25 |
IrregC |
sbm,
sw |
|
165 |
| |
Musketeers |
25 |
1x25 |
IrregC |
sbm,
sw |
|
165 |
| |
Spearmen |
25 |
1x25 |
IrregC |
sbm,
sw |
|
165 |
| |
Archers |
25 |
1x25 |
IrregC |
sbm,
sw |
|
165 |
| Unbrigaded |
Tigermen |
25 |
1x25 |
IrregD |
sbm,
sw |
|
165 |
| Troops |
Musketeers |
25 |
1x25 |
IrregD |
sbm,
sw |
|
165 |
| Horse |
Imperial
Lancers |
12 |
1x12 |
IrregC |
sp,
sw, sh, mlr |
|
147 |
| |
Imperial
Lancers |
12 |
1x12 |
IrregC |
sp,
sw, sh, mlr |
|
147 |
| |
Tartar
Skirmishers |
12 |
1x12 |
IrregD |
sp,
sw, sh, mlr |
|
111 |
| |
Tartar
Skirmishers |
12 |
1x12 |
IrregD |
sp,
sw, sh, mlr |
|
111 |
| Artillery |
2inC |
1 |
|
|
|
|
50 |
| |
Imperial
Battery |
4 |
1x4 |
IrregD |
light
mlsb FA |
|
287 |
| |
Gingals |
4 |
1x4 |
IrregD |
mountain
guns |
|
233 |
| |
Ammo
Wagon |
1 |
|
|
|
|
50 |
| Villagers |
One
Spot Flag |
30 |
1x30 |
IrregD |
sp/sw,
sh |
|
105 |
| |
Two
Spot Flag |
30 |
1x30 |
IrregD |
sp/sw,
sh |
|
105 |
| |
Three
Spot Flag |
30 |
1x30 |
IrregD |
sp/sw,
sh |
|
105 |
| |
|
|
|
|
|
|
2581 |
|
|
.
|
|
Early
British Indian & French
|
|
Brigade
|
Unit
|
Fig.'s
|
Org.
|
Class
|
Weapons
|
Pts/Fig
|
Points
|
|
.
|
CinC
|
1
|
|
|
|
|
100 |
| 1st |
2inC |
1 |
|
|
|
|
50 |
| (British) |
57th
Regt |
40 |
10x4 |
RegB |
mlr |
|
500 |
| Brigade |
66th
Regt |
40 |
10x4 |
RegB |
mlr |
|
500 |
| |
Naval
Brigade |
24 |
6x4 |
RegB |
mlr |
|
300 |
| 2nd |
2inC |
1 |
|
|
|
|
50 |
| (British) |
1st
Bengal Foot |
32 |
8x4 |
RegC |
sbm |
. |
304 |
| Brigade |
2nd
Bengal Foot |
32 |
8x4 |
RegC |
sbm |
. |
304 |
| |
Ammo
Wagon |
1 |
|
|
|
. |
50 |
| 3rd |
2inC |
1 |
|
|
|
|
50 |
| (French) |
Legion
Etrangere |
36 |
6x6 |
RegC |
mlr |
|
384 |
| Brigade |
|
|
|
|
|
|
|
| |
|
|
|
|
|
|
2592 |
|
|
.
|
| . |
Chinese |
Allies |
| Foot |
4800 |
4080 |
| Horse |
960 |
0 |
| Guns |
16 |
0 |
|
ReportForces were identical to the previous battle: with a single unit swap - the French Marines were replaced by an identical unit of Legion Etrangere. The terrain was also identical, as were the objectives. The British placed their troops in columns in line facing the fort: with their British troops on the right, the Sepoys in the middle, and the FFL and Naval Brigade on the left. The Chinese placed their Lancers on the left, supported by a unit of infantry; their Tartar skirmishers on the right, also supported by a unit of infantry; with the rest of their force in the centre. The village levies and artillery would hold the ford; three units of infantry would attack. On the Allied right, their British troops advanced towards the enemy, but halted in good time to deploy into line and square to face the expected cavalry charge. All four charging horse units were either repulsed or halted (the Imperial Lancers wbeing totally destroyed) and, as the battle ended, the British troops were preparing to advance again. In the centre, two Sepoy battalions faced two units of Chinese infantry. Both Sepoy battalions deployed into line but, unwisely, their commander decided to charge half of one battalion in column into a unit of Tigermen to cover a further advance into range with their smoothbores. The column charged forward, but was blown off the field by the Tigermen. Lesson learnt: soften them up more before you charge in! This proved, however, a temporary setback, as the rest of the Sepoy battalion were able to move forward and rout the Tigermen with fire. On the British left, the Naval Brigade and half the FFL successfully destroyed or routed the Tartar skirmishers and Archers that charged them. However, the rest of the FFL unwisely decided to charge a unit of chinese musketeers without softening them up first. A melee developed, and this half of the FFL were overwhelmed. This left the slightly bemused chinese infantry right in the middle of the Allied line not sure what to do next! Unfortunately, with 8 units routing, the morale of the Chinese was broken, and they retreated: leaving the victorious Allies free to move into the fort and clear the way to Peking.
Casualties The Allies lost 300 Sepoys; 80 French Foreign Legion and had two sub-Generals lightly wounded. The Chinese lost 660 infantry and 580 cavalry. ResultA win for the Allies. ConclusionA good, if short, battle: with the Allies using their firepower to good effect, and regretting closing with a mass of good morale swordsmen!
|
|
|
Battle
Report: 13th August 1998
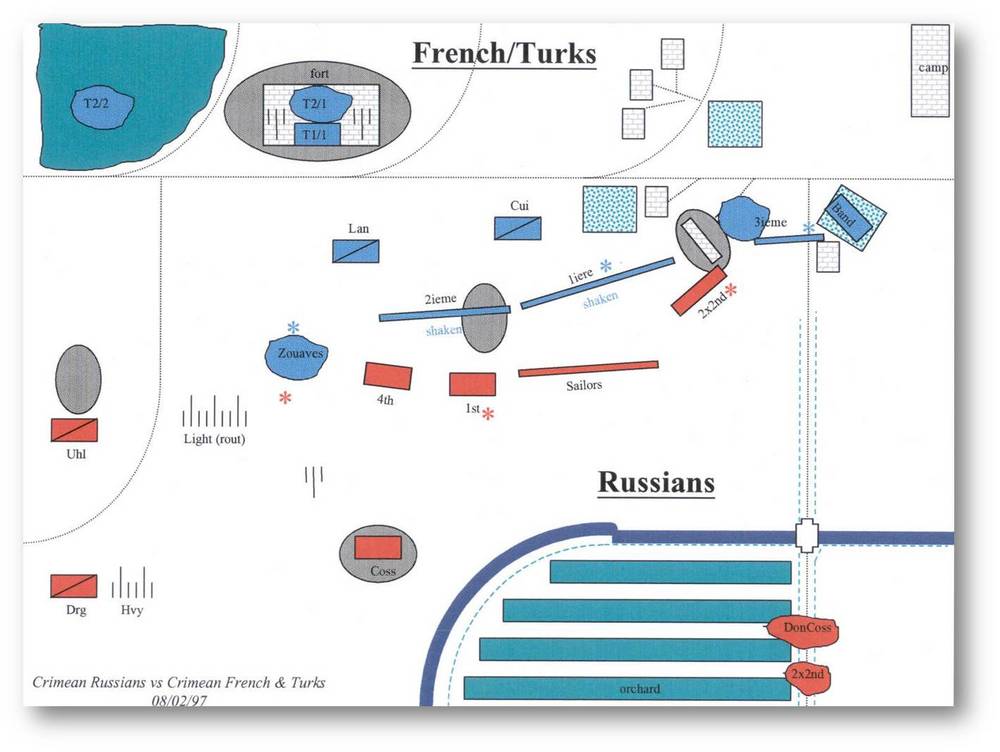
Crimean
British
~vs~ Crimean Russian
(Robert
Avery ~vs~ Rupert Avery)
|
|
.
|
|
Crimean British
|
| Brigade |
Unit
|
Fig.'s |
Org. |
Class |
Weapons |
Pts/Fig |
Points |
| |
CinC |
1
|
. |
.. |
. |
|
100 |
| Infantry |
2inC |
1 |
|
|
|
|
50 |
| Brigade |
Grenadier
Guards |
40 |
10x4 |
RegA |
sbm |
|
500 |
| |
57th
Regt |
40 |
10x4 |
RegB |
sbm |
|
420 |
| |
66th
Regt |
40 |
10x4 |
RegB |
sbm |
|
420 |
| |
Extra
for Light Co's |
|
|
|
|
|
48 |
| |
Rifles |
16 |
4x4 |
LightsA |
mlr |
|
280 |
| Cavalry |
Light
Dragoons |
10 |
2x5 |
RegA |
s,
mlc |
|
190 |
| Brigade |
17th
Lancers |
10 |
2x5 |
RegA |
s,
l |
|
190 |
| |
Heavy
Dragoons |
10 |
2x5 |
RegA |
s,
mlc |
|
190 |
| Artillery |
1st
Battery |
3 |
3x1 |
RegB |
light
mlsb FA |
|
249 |
|
Brigade
|
2nd
Battery |
2 |
2x1 |
RegA |
light
mlsb HA |
|
216 |
| |
|
|
|
|
|
|
2853 |
|
|
.
|
|
Crimean
Russian
|
|
Brigade
|
Unit
|
Fig.'s
|
Org.
|
Class
|
Weapons
|
Pts/Fig
|
Points
|
|
.
|
CinC
|
1
|
|
|
|
|
100 |
| Moscva |
2inC |
1 |
|
|
|
|
50 |
| Regt |
1st
Bttn |
12 |
1x12 |
LightsB |
mlr |
|
|
| |
|
36 |
3x12 |
RegB |
sbm |
|
460 |
| |
2nd
Bttn |
12 |
1x12 |
LightsB |
mlr |
|
|
| |
|
36 |
3x12 |
RegB |
sbm |
|
460 |
| |
3rd
Bttn |
12 |
1x12 |
RegC |
mlr |
|
|
| |
|
36 |
3x12 |
RegC |
sbm |
|
388 |
| |
4th
Bttn |
12 |
1x12 |
RegC |
mlr |
|
|
| |
|
36 |
3x12 |
RegC |
sbm |
|
388 |
| Cavalry |
2inC |
1 |
|
|
|
|
50 |
| Brigade |
Uhlans |
12 |
2x6 |
RegB |
s,
l |
|
234 |
| |
Hvy
Dragoons |
12 |
2x6 |
RegB |
s,
armour |
|
234 |
| Artillery |
1st
Battery |
3 |
3x1 |
RegB |
light
mlsb FA |
|
249 |
| |
2nd
Battery |
2 |
2x1 |
RegB |
medium
mlsb FA |
|
200 |
| |
Ammo
Wagon |
1 |
|
|
|
|
50 |
| |
|
|
|
|
|
|
2863 |
|
|
.
|
| . |
Crimean British |
Crimean Russian |
| Foot |
2720 |
3840 |
| Horse |
600 |
480 |
| Guns |
10 |
10 |
|
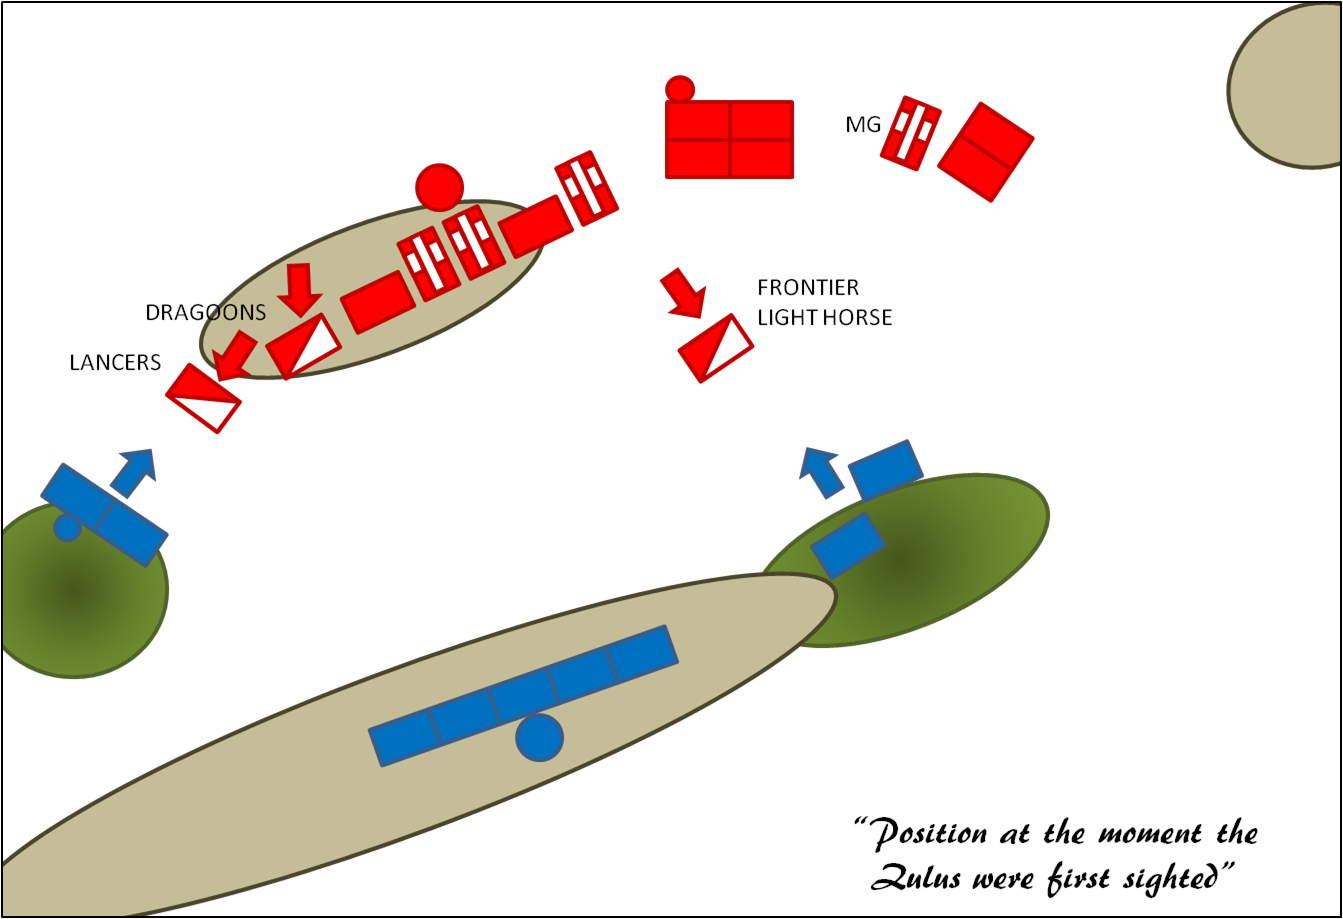
ReportThe Russians were outscouted and set up first: choosing a traditional formation of infantry in the centre with mixed units of cavalry on the wings. The British concentrated all their infantry in a column aimed at the Russian left flank, supported by the Light Dragoons and the RHA, with the RA and other cavalry covering their own, exposed, left flank. As battle commenced, the British doubled forward and very wquickly threatened the still deploying Russians. It was then, however, that the flaw in the British plan became apparent: the British commander had failed to take into account a large, dense, thick, heavy wood protecting the Russian line. For the rest of the battle, the main British strike force, although succeeding in some local skirmishes, could not extricate themselves from the woods and take an active part in the battle. Meanwhile, the Russian CinC deployed two infantry battalions to hold the British in the wood whilst he moved to outflank them with the rest of his force. The British cavalry moved to intercept the Russians but, just as they moved towards a mutual charge with the Russian cavalry, were hit in the flank by some cunningly placed Russian artillery. This shook them so much that they were forced to receive the Russian cavalry charge at a halt, and were smashed from the field. This obviously left the entire British flank exposed and, despite desperately trying to extricate his infantry from the terrain on the right flank, the British CinC seemed unable to counter the Russian outflanking manoeuvre. The British started to take fire on their flank as well as their front and, within a short time, began to crumble. A brave effort by the RHA was not enough, and the British fled the field.
CasualtiesThe British lost 60 Riflemen; 140 of the 57th Foot; 20 Guards; 40 Light Dragoons; 40 artillerymen; 20 Lancers and 20 Heavy Dragoons: for a total of 340 men. The entire British cavalry, the RA and the Rifles were routed off the field. The Russians lost 640 infantry, 200 cavalry, and had their CinC lightly wounded. ResultsA victory for the Russians. AnalysisIn the early stages of the battle, it looked as if the British tactic of smashing a flank and rolling the Russians up might work. Unfortunately, the British CinC just couldn’t get his men through the heavy woods before the Russians threatened to outflank, and lost his covering cavalry in a typically stupid way. In all, an excellent victory for the Russians: although it must be said that their force was an example of an elite Russian army! This was, however, partially countered by the luck being on the British side throughout the battle.
|
Battle
Report: 15th August 1998
Prussian
~vs~ Late Afghan
(Nathanial
Norgren ~vs~ Robert Avery)
|
|
.
|
|
Prussian
|
| Brigade |
Unit
|
Fig.'s |
Org. |
Class |
Weapons |
Pts/Fig |
Points |
| |
CinC |
1
|
. |
.. |
. |
|
100 |
| 1st |
2inC |
1 |
|
|
|
|
50 |
| Brigade |
Guards |
48 |
4x12 |
RegA |
blr |
|
664 |
| |
Jaegers |
48 |
4x12 |
LightsB |
blr |
|
664 |
| 2nd |
1st
Foot |
24 |
2x12 |
RegC |
blr |
|
260 |
| Brigade |
2nd
Foot |
48 |
4x12 |
RegC |
blr |
|
520 |
| Cavalry |
2inC |
1 |
|
|
|
|
50 |
| Brigade |
Uhlans |
24 |
4x6 |
RegB |
s,
p, l |
|
376 |
| |
Cuirassiers |
24 |
4x6 |
RegA |
s,
armour, blc |
|
448 |
| |
Heavy
Dragoons |
16 |
4x4 |
RegB |
s,
blc |
|
296 |
| Artillery |
1st
Battery |
3 |
3x1 |
RegA |
light
blrb HA |
|
384 |
| |
Ammo
Wagon |
1 |
|
|
|
|
50 |
| |
|
|
|
|
|
|
3812 |
|
|
.
|
|
Late
Afghan
|
|
Brigade
|
Unit
|
Fig.'s
|
Org.
|
Class
|
Weapons
|
Pts/Fig
|
Points
|
|
.
|
CinC
|
1
|
|
|
|
|
100 |
| 1st |
2inC |
1 |
|
|
|
|
50 |
| Tribal |
1st
Marksmen |
18 |
1x18 |
FanA |
sw/sp,
sh, mlr |
|
231 |
| Group |
1st
Ghazi |
36 |
1x36 |
FanB |
sw/sp,
sh |
|
267 |
| |
2nd
Ghazi |
36 |
1x36 |
FanB |
sw/sp,
sh |
|
267 |
| 2nd |
2inC |
1 |
|
|
|
|
50 |
| Tribal |
1st
Marksmen |
18 |
1x18 |
FanA |
sw/sp,
sh, mlr |
|
231 |
| Group |
1st
Waziris |
32 |
1x32 |
IrregB |
sw/sp,
sh, mlr |
|
249 |
| |
2nd
Waziris |
32 |
1x32 |
IrregB |
sw/sp,
sh, mlr |
|
249 |
| |
3rd
Waziris |
32 |
1x32 |
IrregB |
sw/sp,
sh, mlr |
|
249 |
| 3rd |
2inC |
1 |
|
|
|
|
50 |
| Tribal |
3rd
Marksmen |
18 |
1x18 |
FanA |
sw/sp,
sh, mlr |
|
231 |
| Group |
4th
Waziris |
32 |
1x32 |
IrregB |
sw/sp,
sh, mlr |
|
249 |
| |
5th
Waziris |
32 |
1x32 |
IrregC |
sw/sp,
sh, mlr |
|
207 |
| |
6th
Waziris |
18 |
1x18 |
IrregC |
sw/sp,
sh, mlr |
|
123 |
| Tribal |
2inC |
1 |
|
|
|
|
50 |
| Horse |
1st
Horse |
10 |
1x10 |
FanA |
sp,
sw, sh, mlr |
|
185 |
| |
2nd
Horse |
10 |
1x10 |
FanA |
sp,
sw, sh, mlr |
|
185 |
| |
3rd
Horse |
10 |
1x10 |
FanB |
sp,
sw, sh, mlr |
|
105 |
| |
4th
Horse |
10 |
1x10 |
FanB |
sp,
sw, sh, mlr |
|
105 |
| Artillery |
1st
Battery |
3 |
1x3 |
IrregC |
light
mlsb FA |
|
291 |
| |
Ammo
Wagon |
1 |
|
|
|
|
50 |
| |
|
|
|
|
|
|
3901 |
|
|
.
|
| . |
Prussian |
Late Afghan |
| Foot |
3360 |
6080 |
| Horse |
1280 |
800 |
| Guns |
6 |
6 |
|
|
.
|
ReportThe Afghans were outscouted, so set up first: palcing their three infantry groups in the centre, with two horse units on either flank. The Prussians, however, replied by compressing their force into a small box on the left hand side of the field, witht he Uhlans and Cuirassiers massed in a huge column on their left flank. The battle opened with the Afghans advancing strongly: particularly keen to get their marksmen into action. The Prussian CinC, likewise, deployed the Jaegers: using this skirmish screen to advance in columns. The second phase of the battle saw two decisive actions. The first was some superb counter-battery fire by the Afghan gunners: knocking out two sections of Prussian HA. The second was the charge of the combined Prussian cavalry column onto the far right of the Afghan line. as they thundered forward, the Afghan Purple Flag marksmen, despite the presence of their 2inC, scattered in fron tof them: leaving only a unit of Ghazis between the Prussian horse and the Afghan flank. The Ghazis, bolseterd by the presence of their CinC, waited until the last moment, then devastated the cavalry with a hail of well-placed spears. At the same time, the Afghan guns, again firing superbly, hit the germanic horse in the flank. This hail of fire proved too much for even the Cuirassiers and Lancers: and those that survived were unable to make contact, and bounced back several hundred yards. In the centre, meanwhile, the Afghan skirmishers and Jaegers were sniping somewhat ineffectually at each other. Seeing a need to quickly recover from the the disappointments of the last phase, the Prussian commander ordered the Guard forward: charging them into the heart of the Afghan line. The Guard was met by a hail of fire from Afghan jezzails and captured Martini-Henry rifles, as well as a unit of charging Afghan tribesmen. Despite brave efforts, the casualties they had taken took the heart out of the Guard, and they were sent back to the Prussian lines shaken and in disorder. Meanwhile, the Afghans had been advancing towards the Prussian right flank, and were now in a position to start sniping at the Prussian forces there. After softening them up, another unit of Afghan tribesmen charged from the centre of the field into the flank of the right flank forces who, already distressed by sniper fire, broke and ran. With his cavalry and artillery largely destroyed, the Guard, Jaegers and Line Infantry shaken and routed, the Prussian commander conceded defeat. CasualtiesThe Afghans lost 320 tribesmen. The Prussians lost 80 Jaegers; 760 Cuirassiers; many Uhlans; 120 Guard; two artillery sections and about 140 line infantry. ResultsA win for the Afghans. AnalysisThe Prussians never really managed to get into a position where they could deliver a significant weight of fire into the advancing Afghans. They remained closely bunched and in multiple lines.
|
Battle
Report: 17th November 1998
Egyptian
~vs~ Late
British
(Robert
Avery ~vs~ Rupert Avery)
|
|
.
|
|
Egyptian
|
| Brigade |
Unit
|
Fig.'s |
Org. |
Class |
Weapons |
Pts/Fig |
Points |
| |
CinC |
1 |
|
|
|
|
100 |
| 1st
Brigade |
1st
Bttn |
20 |
4x5 |
RegC |
blr |
|
280 |
| |
2nd
Bttn |
24 |
4x6 |
RegD |
blr |
|
256 |
| |
3rd
Bttn |
24 |
4x6 |
RegD |
blr |
|
256 |
| |
Lancers |
12 |
2x6 |
RegC |
l,
s, blc |
|
200 |
| |
Attached
Art. |
2 |
2x1 |
RegC |
light
blrb FA |
|
198 |
| 2nd
Brigade |
1st
Bttn |
24 |
4x6 |
RegC |
blr |
|
240 |
| |
2nd
Bttn |
24 |
4x6 |
RegC |
blr |
|
280 |
| |
3rd
Bttn |
24 |
4x6 |
RegC |
blr |
|
280 |
| |
Lancers |
12 |
2x6 |
RegC |
l,
s, blc |
|
200 |
| |
Attached
Art. |
2 |
2x1 |
RegC |
light
blrb FA |
|
198 |
| |
|
|
|
|
|
|
2488 |
|
|
.
|
|
Later
British
|
|
Brigade
|
Unit
|
Fig.'s
|
Org.
|
Class
|
Weapons
|
Pts/Fig
|
Points
|
|
.
|
CinC
|
1
|
|
|
|
|
100 |
| |
2inC |
1 |
|
|
|
|
50 |
| 1st |
43rd
Foot |
20 |
4x5 |
LightsB |
lbl |
|
340 |
| Brigade |
95th
Highlanders |
40 |
8x5 |
RegB |
lbl |
|
600 |
| |
Naval
Brigade |
24 |
6x4 |
RegB |
lbl |
|
392 |
| Cavalry |
17th
Lancers |
10 |
2x5 |
RegB |
s,
p, blc, l |
|
200 |
| Brigade |
Camel
Corps |
8 |
2x4 |
RegC |
s,
p, blc |
|
140 |
| Artillery |
Battery |
3 |
3x1 |
RegB |
light
blrb HA |
|
372 |
| |
Naval
Brigade |
1 |
1x1 |
RegB |
gatling
gun |
|
98 |
| |
|
|
|
|
|
|
2342 |
|
ReportThis was an encounter battle: with both sides starting in column and suddenly realising that the other was there! As battle opened, the Egyptian commander rushed his 1st Brigade infantry to the town in the centre of the field, covering their left flank with the 1st artillery and their right flank with the combined cavalry. The 2nd Brigade infantry, although delayed as they let their guns through, were also sent to the left flank. The British elected to send their Highlanders around the town, with their centre being held by the Naval Brigade and 43rd Foot. They also sent the horse artillery, supported by the Camel Corps and a squadron of Lancers, around in an attempt to outflank the Egyptian left. Although the Egyptians peppered the British infantry with artillery fire from their 1st Battery, they were unable to do more than minimal damage before being scattered to the winds as the British outflanking RHA came into play. The RHA, however, although routing the 1st Battery of Egyptian guns, then lost two of its own sections to counter-battery fire from the 2nd Egyptian Battery. Meanwhile, the Egyptian infantry were approaching the town, supported by the combined Lancers. The commander of the Lancers suddenly spotted a column of Highlanders and, thinking to destroy them before they deployed, launched a charge against them. Unfortunately, the Highlanders were more than able to cope with this: snapping smartly into line and just about destroying the Lancers with fire from their Martini-Henry’s. Things did not look to hot for the Egyptians: they had lost two units of cavalry, one battery of guns and a battalion of infantry (2nd/1st) - routed by the outflanking squadron of British Lancers. However, the Egyptian commander invested the town and, lying prone, the 1st/1st began a firefight with the British 43rd Foot and Naval Brigade. Casualties amongst the 1st/1st and 43rd were minimal, as both sides were lying prone and either skirmishing or behind cover, but the Naval Brigade took some damage. It should be noted at this point that the Naval Brigade Gatling Gun had jammed: and had therefore done no casualties in the battle so far! It was now, however, that the British commander managed to snatch defeat from the jaws of victory! Keeping the Egyptian 1st/1st pinned down with fire from the 43rd Foot, his plan was to charge them with the Naval Brigade: the sailors taking full advantage of the opportunity of bayoneting the prone Egyptians! Unfortunately, the Naval Brigade, as they were preparing for their battle-winning charge, were hit by more fire from the 1st/1st that, combined with their previous casualties, was enough to shake their morale! No battle-winning charge this turn. Worse, however, was the fact that the 43rd Foot, eager to get maximum firepower onto the town, had exposed their flank. Seizing the opportunity, the Egyptian CinC charged this open flank with the Regular D 2nd/3rd: who crashed into the prone, skirmishing foot with devastating effect! The 43rd broke and ran: taking the shaken Naval Brigade and their supporting Lancers with them! Now with only the Highlanders and Camel Corps undamaged (and these on opposite sides of the field), and with the Egyptians not only safe in the town but also pursuing his routed men, the British commander had no choice but to order a retreat. CasualtiesThe Egyptians lost 180 infantry, 40 artillerymen, and 360 cavalry. The British lost 2 sections of artillery, 120 sailors, 20 lancers and a smattering of regular infantry. ResultsA win for the Egyptians. AnalysisAs the battle came to its climax, the Egyptian CinC had just about given up hope: as he had thrown away his cavalry and half his artillery unnecessarily. The British commander, however, has split his force and allowed the Egyptians to invest the town. It was the failure of the Naval Brigade to charge that caused the British defeat: something that was somewhat due to bad luck. With that charge going in, the Egyptians would have collapsed before their own, flanking charge went in. In all, a narrow escape for the Egyptians.
|