

Designing the Scenario
Of all the British operations designed to attack in the Caen area in 1944 possibly the least talked about is Operation Charnwood which somehow seems to get lost among the Epsoms, Goodwood, Bluecoats and the likes. This is particularly odd as Charnwood was successful in at last seizing the northern part of the city right up to the banks of the Orne and Odon rivers. What is more, Charnwood was the battle that finally broke both the morale and the fighting power of the 12 SS Hitlerjugend Division. Reading of both Kurt Meyer’s own (highly propagandised) and Hubert Meyer’s (excellent) accounts make clear that the battle was one too many for a Division that had already been battered by previous Commonwealth operations.
As a wargamer the battles fought by the British and Canadians in Normandy offer some great gaming opportunities to refight historical actions. In the past we have games several mini-campaigns of linked battles set in Epsom, Bluecoat and Goodwood and all have proved to be memorable in the extreme. From a scenario design perspective they are a dream. Firstly they are well documented, secondly they are easily accessible from the UK which has allowed me to walk a good many of them in order to understand the lie of the land. A by-product of this is that I have the superb Institut Geographique National 1:25,000 “blue series” maps covering the whole of Normandy on my shelves as well as numerous period tactical maps produced by the Allies and the Germans. As a starting point for any scenario this is of great value, as we will see.
Thirdly the battles are well documented. British unit diaries give a terse yet informative on-the-spot flow of data that makes following the battle very easy. Information in German is harder to come by normally, but we have one rather odd advantage here. The Waffen SS. There does seem to be a serious number of whacky weirdos who just love the whole SS thing. Those of us at Salute a few years ago saw what was probably the ultimate embodiment of that, indeed I had several words with one rune-wearing pillock that left him in little doubt as to my own opinion regarding their behaviour. That said, the reaction of normal gamers to this uber-SS mentality can often involve throwing the baby out with the bath water. I know quite a few games who will NEVER game with SS troops on the table, and for 95% of the war I think they could probably muddle through following that policy. However, if you want to fight the major British and Canadian actions in Normandy I don’t think that is really a viable proposition.
So, as a result I DO own and occasionally game with SS forces, and in doing so I can benefit from the general obsession with all-things-Nazi as it gives me access to Hubert Meyer’s history of the 12th SS; an excellent work which provides an incredible amount of detail, Meyer being the senior Staff Officer in the Division and present throughout its entire existence. Kurt Meyer’s own work Grenadiers is also available readily in English and if you look through the unfortunate veneer of self-promotion and thinly disguised veneration of a defunct credo you do get a very raw feel for the intensity of the fighting and the building exhaustion and attrition levels that ultimately mounts to the point where the Division simply falls apart as a coherent fighting unit.
So, armed with reports from the British and German side I was looking for a nice discrete action that typified the first day of Charnwood. The one I settled on was the battle for the small hamlet of Galmanche where one British Company from the 2/6th South Staffordshire Regiment assisted by two troops of tanks of the East Riding Yeomanry attacked a position held by elements of II/25 Panzergrenadier Regiment. The British attacked with an initial bombardment followed up by a combined infantry and tank attack. The fighting continued all day and ended with the British only half in control of the hamlet, the Germans still defending the local “chateau”. In many respects this typifies the battles for Normandy, and can be seen in all of the other major offensives, with the British and Germans fighting over the outpost line where the Germans are defending village strongpoints according to their doctrine of “hedgehogs” and the British attack actually being made up of a plethora of small individual company sized engagements.
As an aside, this is one of the reasons that I favour a company size action as this actually typifies the experience of 99% of those involved in war. Only the high command could actually see the ”big battle” picture, and their ability to influence the battle once the operation began was in truth still almost as limited as had been the case in the Great War. At Army level the truth is you plan, and then you sit and hope while others do the fighting. Yes, you attempt to process information as rapidly as possible to allow reserves or reinforcements to be committed in a timely manner, but the truth is that you are reliant on others to make your plan work. At company level the commander has an intimate involvement in the action and can influence every aspect of the battle. However, enough of that. Back to planning the scenario.
So, my first step was to scan the maps, 1944 vintage and 2000 vintage. Here’s what I got:

Above is the British GSGS map of the area with Galmanche at centre and below is the modern map of the same area.
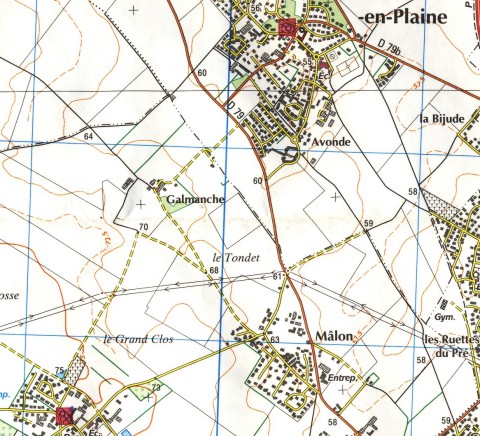
The first thing I noticed was that the contour lines on the 1944 edition are very different from those on the modern map. Interestingly Galmanche is private property today so the hamlet itself has barely changed in the location of its buildings, but a significant amount of orchards have been removed as have some of the smaller strip fields. This is pretty typical of what has happened across Normandy in the last 65 years, the main field boundaries still exist but smaller fields have in many cases been merged together to make larger ones.
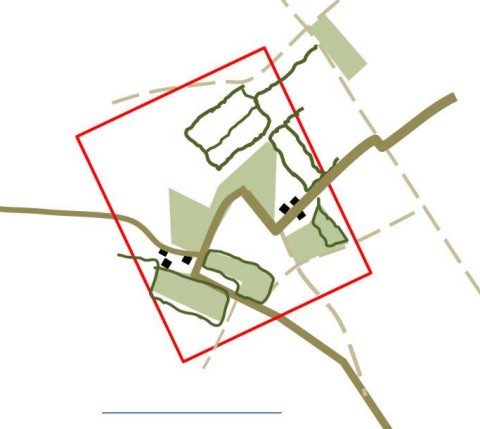
The next step was to create a map of the tabletop according to the ground scale in the rules. I chose an area 500m by 600m, transferring the image of the 1944 map into Powerpoint and then sketching the map on top of that. The result was as follows:
This gave me a very simple view of the table with all of the pertinent terrain features shown on there. My assumption is that the ground hasn’t changed that much, if at all, in the intervening time. Had the road layout changed significantly or the area been heavily built upon it could be possible that major landscaping works had been undertaken, but it seems clear that no such thing has happened here. So adding the 2000 contours which gives me a complete picture of the ground as it really would have been in 1944. The blue line at the bottom was my original scaling tool that gave me 500m on the original map. What I also knew from accounts of the battle was that the buildings had been damaged by bombardment, both aerial and artillery, but that they had very strong cellars so provide excellent defensive positions.
So, now I have the map I needed to get the forces right. No matter how detailed Regimental histories or battalion diaries are you are always going to be left with some guess work, or at least educated guess work, at this stage. Much of what you need to know can be gleaned from reading accounts of the action (”tactical snippetting” once again for regular readers of Lard Island News).
I knew specifically that one company and two troops of tanks had been deployed to attack Galmanche and I could find out pretty easily that the East Riding Yeomanry had been equipped with Shermans at that time. From accounts I could ascertain that the British had suffered badly under mortar fire during their attack. In neighbouring sectors of the battlefield the attackers had been bombarded by Nebelwerfers and pinned down my concentrated machine gun fire, but neither of those were mentioned here. Apparently nearly all of the German anti-tank guns had been knocked out in the initial British barrage, but a single anti-tank gun held up the advance and then the armour had met stiff resistance from Panzerfaust armed troops, one Hauptsturmfuhrer knocked out three Shermans single-handedly but was killed while taking on a fourth. During the morning a German platoon of five Panzer IVs counter-attacked from the west and later in the day the British deployed AVRE Churchills and Crocodiles in an attempt to clean out the village.
So, what did this add up to? For the British I allowed a heavy pre-game Stonk to precede an attack by a whole infantry company plus two tank Troops. The British had little in the way of bonus cards but they did get an armoured bonus move and they also got an artillery card and a Forward Observer card in the deck. No artillery was actually available but the occasional appearance of those cards was designed to keep the German player wary of the potential force that could be brought to bear against them. They also got a Hesitant Troops card to reflect the “sticky” nature of troops during that campaign. This was pretty much Britain’s last draught of men to feed into the military machine, the nation exhausted by five years of war, so it is unsurprising that officers and men could be inclined towards self-preservation.
The Germans got a full company of infantry which represented the remnants of two companies that had been reduced in numbers. They got a Tank Killer bonus card to reflect their willingness to close with enemy armour. A platoon of 8cm mortars off-table controlled by a Forward Observer gave them a bit of historical muscle, and I also treated them as stubborn troops. I am never inclined to treat troops as uber-men, so an elite status is a rarity in my games. I did not feel inclined to give it to a force that had been beaten around the head for the past month and, as history tells us, would dissolve only two days later. However stubborn they indeed were, so a stubborn rating they got along with a Rally card which makes them a bit more resilient.
After Action Report: Operation Charnwood
Following on from our piece the other day when we looked briefly at how we put our scenario together for the Operation Charnwood game, we can now look at the battle and how it played out. Rather than the usual narrative I thought we’d look at the decision making process that we involved for both sides.
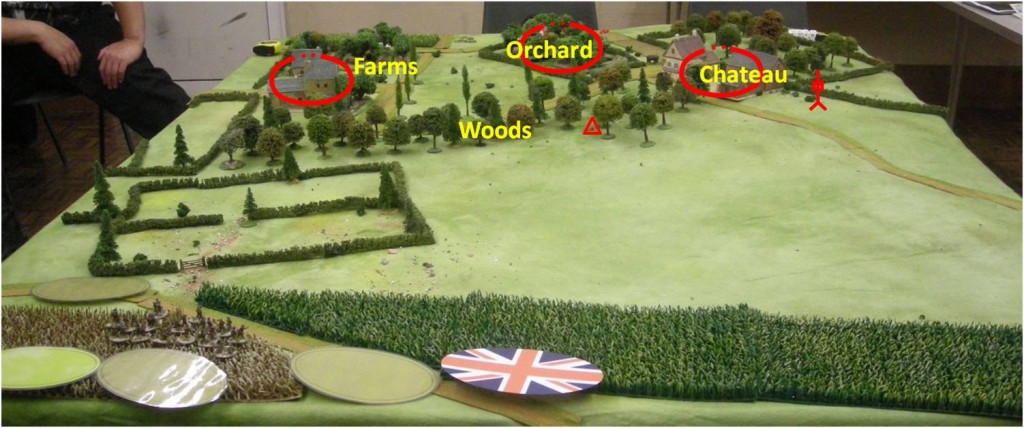
The terrain was unusual in that most of the hamlet of Galmanche was covered across its northern front by a swathe of woodland that allowed very little room for Allied armour to advance. They basically had two points at which they could enter the village, on the right by the Chateau where the road cut through the trees or on their left by crossing several fields and passing the smaller fame there. For the Germans this allowed them the option of a forward position along the line of the woods and a second line behind that. In German parlance this would have made a classic position with a Gefechtsvorposten outpost line and then a Hauptkampflinie main position behind it, albeit somewhat squashed up due to the nature of the terrain.
The British Plan. The first thing the British needed to consider was where to attack and how to prepare for that. Neither route into the hamlet was appealing for armour; on the left the terrain was close and German AT teams could easily be hiding among the hedgerows (this is NOT boccage country, but there are plenty of hedges here), whereas on the right the gentle slope across hundreds of yards of exposed ground made perfect tank killing terrain for any Paks in that area.
As a result the British decided that their infantry should push up through the fields while their tanks stood back on Engage orders ready to take on any Germans in the treeline who showed their faces. To support the attack the British had a sizeable preparatory bombardment that would occur immediately before the game began, hopefully shaking up the defenders and reducing their ability to defend. This “Stonk” could be focussed on four 12” square areas of the table, and the Brits put two on the main woods to their front, one on the smaller farm and one on the orchard to the rear of the hamlet.
The German Defences This was July 1944 and the Germans were, by now, used to the impressive amount of firepower that the British could deploy to precede any attack. As mentioned they had an almost perfect position of two lines to defend, but in the end they did not take the obvious option. Knowing that any troops put forward in the woods would likely be pulverised by a British bombardment the Germans deployed their force further back, ready to “seize the belt buckle” of any attackers, engaging them at close range and thereby avoiding the worst of the British artillery. They occupied the main Chateau with one platoon, a second platoon in the smaller farms down the hill and a third platoon in the orchard to the rear. Up front they limited themselves to a well dug-in Pak on the hill overlooking the sloping plain, a tank hunter team on the rear side of the woods where they could use a farm track to move to whichever flank was under threat whilst remaining hidden and a Forward Observer in a heavily strengthened bunker on the treeline up the slope towards the Chateau. Their plan was to disrupt the British advance, allow themselves time to recover from any bombardments before the enemy got up close and then fight a close quarter battle against an enemy they believed to be tactically inferior.
The Bombardment
The game began with the British bombardment which missed completely in two areas due to the Germans not taking the predictable options, but which did some serious damage elsewhere. In the small farms the German platoon lost its Panzerschreck and took some significant Shock across all three squads as well as two men dead. In the orchard the losses were less, but the Shock effect was still high. That said, the German player was confident enough that they were far enough back to lose one point of Shock per turn (as Blinds can now do) before the British arrived.
Phase One
The German anti-tank gun and FOO were more than able to spot the early British movements, and whilst the Pak decided to sit tight in its hiding place the FOO was much busier. A platoon of four 8cm mortars was located off-table and he quickly called for fire on the field where the British infantry were advancing cautiously.

One of the disadvantages of having two clear routes of advance was that it created a de facto defile, and it was onto this that the German mortars began falling. This saturated that area, causing significant damage to the lead platoon and disrupting some units still on Blinds. The situation was exacerbated by the German FOO carefully walking his barrage as the British attempted to move out of the kill zone, and this really did some serious damage. Over the course of three or four turns the British lost about a dozen men, with losses being spread across most of their sections and weapons teams, thereby really reducing their effectiveness.
The chief objective of the British officers and NCOs at this stage was to try to keep rallying their men and where possible move forward towards their initial objective, the farm.
Phase Two
This began with first contact with the Germans in the small farm. The platoon there had deployed in a classic “two forward, one back” formation and when the British advanced cautiously towards them they let them know of their presence at close range, literally slaughtering the two squads in front of them. The British 2” mortars now were deployed, but their effectiveness against troops in buildings is limited to say the least.
Now the British were really under the cosh. Two of their three platoons had been badly handled by the German mortars, now thankfully no longer firing, and their initial attack on the farm had been literally shot down. The frustration was palpable, and the desire to get things moving saw them throw their third platoon forward in to close assault the farm. The numerical odds in their favour were more than countered by the force multipliers in the Germans’ favour. They were defending a position, they were stubborn troops, the British were advancing across open ground to attack them. The result was predictably bloody. The British platoon was repulsed with very heavy casualties, the German losses were minimal.
Phase Three
Now the British were in a complete mess. Many of their sections were so shocked as to be ineffective and it was clear that an immediate advance would be impossible. The British officers and NCOs, the Big Men of the rules, set about rallying their troops and getting them into shape. Meanwhile one Troop of tanks was bought forward to engage the farm with direct fire while the 2” mortars saturated the area behind it to discourage any withdrawal.
The effect of the High Explosive shells on the farm was sufficient to worry the Germans. They abandoned the building to occupy the yard behind, only to reoccupy it when the British advanced forward to try to take the position. They successfully drove the Tommies off, but the resulting shelling from the tanks pretty much destroyed them along with the farm. This allowed the British to finally push into the ruins with their re-organised infantry and make some headway.
Phase Four
On their right the British had spotted the German platoon in the Chateau during Phase Three and a few well aimed shells had been sufficient to see the Germans pull back into the main farmhouse. Now the second platoon of Shermans advanced forwards intent on getting a decent shot into the main building and closing the range to increase accuracy. They had previously spotted all across the ridge but failed to see the camouflaged Pak 40 in the hedgerow. This would now cost them dearly.
The Pak 40 first immobilised and then took out the Firefly before turning its attentions to the 75mm Shermans. H.E. fire was sufficient to Shock the gun crew but not kill anyone and a subsequent round in which the Pak 40 fired once, taking out a Sherman with a catastrophic damage, turned and then took out a second Sherman with a snap shot was sufficient to send the fourth Sherman reversing back into the wheatfield.

On the British left the Shermans were assisting the infantry to clear the final small cottage to secure the lower part of the hamlet. Now, however, the arrival of a platoon of Panzer IVs behind the chateau orchard presented a new threat. Fortunately the Firefly was able to destroy the lead German tank blocking the road junction, and at this point a stand-off ended the game.
Postscript
This was an interesting action as the Germans played very much to their own strengths in their deployment and the way they then fought. The sought to avoid contact until the critical moment and then maximise the damage they inflicted. At the end of the game the British had secured one small part of the hamlet but the Germans were still in control of the orchard and the Chateau.
Historically the British were held up on the morning of the attack and were only able to gain a foothold in Galmanche. In the afternoon they committed more infantry and a number of AVRE and Crocodile Churchill tanks to try to clear the Germans out. In our game the British achieved pretty much exactly what their historical counter-parts did and the Germans certainly succeeded in playing an intelligent game that obliged the British to fight on their terms.
My thanks must go to Thomas and Henrik from Penguin Force playtest group in Sweden who had flown over to join us for this last playtest game, their contributions were invaluable. Thomas was pleased to be able to go home having gained a reputation as a dead eye with the Pak 40, as the photo above shows. Unfortunately we neglected to get a picture of Thomas and Henrik while they were here. But using the latest crime scene technology we have been able to recreate the scene using stand-ins to show you what fun we had:

Rich Clarke