Vis Lardica
  • New & Updated
  • Introduction & Details Scorecard 2025 Gallery: Burt, Steve Gallery: Cooper, Nick Gallery: Douglas, Mervyn Gallery: Emmett, John Gallery: Flint, Carole Gallery: Helliwell, Andrew Gallery: Luther, Mark Gallery: Plowman, Ralph Gallery: Sapper Gallery: Stumpy Gallery: Vis Bellica
  • Introduction to IABSM Video: How To Play IABSM, Part One Video: How to Play IABSM, Part Two Video: How to Play IABSM, Part Three After Action Reports (IABSM) Army Galleries (IABSM) Buy IABSM Scenario Packs Buy IABSM Theatre Supplements Figure Manufacturers (IABSM) Figure Reviews (IABSM) Game Aids (IABSM) IABSM Facebook Group
  • Introduction to CDS After Action Reports (CDS) Army Galleries (CDS) The Arab-Israeli Six Day War The Arab-Israeli Yom Kippur War After Action Reports (Arab-Israeli Wars) Army Galleries (Arab-Israeli Wars) After Action Reports (Moderns)
  • Introduction to Q13 After Action Reports (Q13) Army Galleries (Q13) Army Lists for Q13 Buy Q13 and/or Five Planets Figure Manufacturers (Q13) Figure Reviews (Q13) Points System Spreadsheets
  • Introduction to 19th Century Army Galleries (19th Century) Army Lists After Action Reports Articles & Essays Quick Guide to the Wars of the 19th Century
  • Introduction and AAR FK&P: The Eastern Front
  • Introduction to Vis Bellica The Rules: Amendments The Rules: Frequently Asked Questions The Rules: Optional Rules After Action Reports (Vis Bellica) Army Lists Articles about Vis Bellica Scenarios for Vis Bellica Other After Action Reports: WRG 6th Other After Action Reports: TTS
  • The Rules: Optional Rules After Action Reports
  • Scorecard 2024 Gallery: Burt, Steve Gallery: Cooper, Nick Gallery: Darkin, Des Gallery: Davenport, Jonathan Gallery: Douglas, Mervyn Gallery: Emmett. John Gallery: Flint, Carole Gallery: Helliwell, Andrew Gallery: Kay, Chris Gallery: Luther, Mark Gallery: Plowman, Ralph Gallery: Sapper Gallery: Scott, David Gallery: Slade, Matt Gallery: Stumpy Gallery: Vis Bellica
  • Scorecard 2023 Gallery: Bowler, Lloyd Gallery: Burt, Steve Gallery: Cooper, Nick Gallery: Douglas, Mervyn Gallery: Emmett, John Gallery: Flint, Carole Gallery: Helliwell, Andrew Gallery: Hodge, Derek Gallery: Kay, Chris Gallery: Luther, Mark Gallery: Plowman, Ralph Gallery: Pollard, Ashley Gallery: Sapper Gallery: Scott, David Gallery: Slade, Matt Gallery: Stumpy Gallery: Vis Bellica
  • Scorecard 2022 Gallery: Bowler, Lloyd Gallery: Burt, Steve Gallery: Cooper, Nick Gallery: Douglas, Mervyn Gallery: Emmett, John Gallery: Flint, Carole Gallery: Goodrick, Pete Gallery: Haines, John Gallery: Helliwell, Andrew Gallery: Hodge, Derek Gallery: Kay, Chris Gallery: Luther, Mark Gallery: Plowman, Ralph Gallery: Pollard, Ashley Gallery: Sapper Gallery: Scott, David Gallery: Slade, Matt Gallery: Stumpy Gallery: Vis Bellica
  • Scorecard 2021 Gallery: Anzani, Joe Gallery: Bowler, Lloyd Gallery: Burt, Steve Gallery: Cooper, Nick Gallery: Douglas, Mervyn Gallery: Duffell, Andy Gallery: Emmett, John Gallery: Flint, Carole Gallery: Haines, John Gallery: Helliwell, Andrew Gallery: Hiett, Travis Gallery: Hodge, Derek Gallery: Kay, Chris Gallery: Luther, Mark Gallery: McGinn, Joe Gallery: Melville, Doug Gallery: Plowman, Ralph Gallery: Pollard, Ashley Gallery: Ralls, Jason Gallery: Sapper Gallery: Scott, David Gallery: Slade, Matt Gallery: Stoesen, Chris Gallery: Stumpy Gallery: Vis Bellica
  • Scorecard 2020 Gallery: Bloggs, Fred Gallery: Bluemoose Ken Gallery: Bowler, Lloyd Gallery: Burt, Steve Gallery: Cornwell, Chris Gallery: Douglas, Mervyn Gallery: Duffell, Andy Gallery: Emmett, John Gallery: Flint, Carole Gallery: Haines, John Gallery: Helliwell, Andrew Gallery: Hiatt, Travis Gallery: Hodge, Derek Gallery: Hooge, Neil Gallery: Kay, Chris Gallery: Luther, Mark Gallery: McGinn, Joe Gallery: Melville, Doug Gallery: Plowman, Ralph Gallery: Pollard, Ashley Gallery: Ralls, Jason Gallery: Sapper Gallery: Scott, David Gallery: Slade, Matt Gallery: Stoesen, Chris Gallery: Stumpy Gallery: Vis Bellica
  • Scorecard 2019 Gallery: Bloggs, Fred Gallery: Blue Moose Ken Gallery: Bowen, Ed Gallery: Bowler, Lloyd Gallery: Burt, Steve Gallery: Clarke, Richard Gallery: Cornwell, Chris Gallery: Davenport, Jon Gallery: Douglas, Mervyn Gallery: Duffell, Andy Gallery: de Terre Neuve, John Gallery: Emmett, John Gallery: Fat Wally Gallery: Flint, Carole Gallery: Haines, John Gallery: Helliwell, Andrew Gallery: Hiett, Travis Gallery: Hodge, Derek Gallery: Hooge, Neil Gallery: Johnston, Owen Gallery: Kay, Chris Gallery: Luther, Mark Gallery: McGinn, Joe Gallery: Melville, Doug Gallery: Plowman, Ralph Gallery: Ralls, Jason Gallery: Sapper Gallery: Scott, David Gallery: Slade, Matt Gallery: Stoesen, Chris Gallery: Stumpy Gallery: Vis Bellica Gallery: Yuengling, Jon
  • Scorecard 2018 Gallery: Bloggs, Fred Gallery: Blue Moose Ken Gallery: Bowen, Ed Gallery: Bowler, Lloyd Gallery: Burt, Steve Gallery: Cornwell, Chris Gallery: Davenport, Jonathan Gallery: de Terre Neuve, John Gallery: Douglas, Mervyn Gallery: Duffell, Andy Gallery: Fat Wally Gallery: Flint, Carole Gallery: Freerange Egg Gallery: Haines, John Gallery: Helliwell, Andrew Gallery: Hiett, Travis Gallery: Hodge, Derek Gallery: Hooge, Neil Gallery: Johnston, Owen Gallery: Kay, Chris Gallery: Lampon, Steven Gallery: Luther, Mark Gallery: McGinn, Joe Gallery: Melville, Doug Gallery: Plowman, Ralph Gallery: Ralls, Jason Gallery: Sapper Gallery: Scott, David Gallery: Slade, Matt Gallery: Stoesen, Chris Gallery: Stumpy Gallery: Treadhead Gallery: Vis Bellica Gallery: Yuengling, Jon
  • Scorecard Gallery: Bond, Geoff Gallery: Bowen, Edward Gallery: Bowler, Lloyd Gallery: Burt, Steve Gallery: Cabey Cabey Gallery: Catchpole, Jim Gallery: Davenport, Jon Gallery: Davies, Keith Gallery: de Smedt, Kohn Gallery: de Terre Neuve, John Gallery: Douglas, Mervyn Gallery: Duffell, Andy Gallery: Fat Wally (Kev) Gallery: Flint, Carole Gallery: Freerange Egg Gallery: Gatzemeyer, Garrett Gallery: Gilbride, Chris Gallery: Haines, John Gallery: Helliwell, Andrew Gallery: Hodge, Derek Gallery: Hooge, Neil Gallery: Humm, Dave Gallery: Kay, Chris Gallery: Lampon, Steven Gallery: Luther, Mark Gallery: MacNeill, Craig Gallery: McCarthy, Andrew Gallery: The Mad Padre Gallery: McGinn, Joe Gallery: Melville, Doug Gallery: Naylor, Richard Gallery: Nissvik, Thomas Gallery: Old Pivot Gallery: Owen Gallery: Pollard, Ashley Gallery: Plowman, Ralph Gallery: Ralls, Jason Gallery: Sapper Gallery: Scott, David Gallery: Slade, Matt Gallery: Stoesen, Chris Gallery: Stumpy Gallery: Treadhead Gallery: Vis Bellica Gallery: Weathersby, Brian Gallery: WillieB Gallery: Yuengling, Jon
  • Scorecard 2016 Gallery: Baldwin, Paul Gallery: Blankenship, Paul Gallery: Bloggs, Fred Gallery: Bond, Geoff Gallery: Bowen, Ed Gallery: Bowler, Lloyd Gallery: Burt, Steve Gallery: Catchpole, Jim Gallery: Clarke, Richard Gallery: Davenport, Jon Gallery: Davies, Keith Gallery: de Smedt, Koen Gallery: Douglas, Mervyn Gallery: Duffell, Andy Gallery: Egg Gallery: Fitch, Doug Gallery: Flint, Carole Gallery: Gatzemeyer, Garrett Gallery: Gilbride, Chris Gallery: Helliwell, Andrew Gallery: Hodge, Derek Gallery: Hooge, Neil Gallery: Humm, Dave Gallery: I Am Bruce Gallery: Lowth, Kev (Fat Wally) Gallery: Luther, Mark Gallery: The Mad Padre Gallery: McCarthy, Andrew Gallery: Melville, Doug Gallery: Naylor, Richard Gallery: Nissvik, Thomas Gallery: Oracle Gallery: Owen Gallery: Plowman, Ralph Gallery: Pollard, Ashley Gallery: Ralls, Jason Gallery: Sapper Gallery: Slade, Matt Gallery: Stoesen, Chris Gallery: Stumpy Gallery: Treadhead Gallery: Vis Bellica Gallery: Willie B Gallery: Yuengling, Jon
  • Scorecard 2015 Gallery: AJH Gallery: Bairos, Vidal Gallery: Baldwin, Paul Gallery: Bax, Dick Gallery: Blankenship, Paul Gallery: Bloggs, Fred Gallery: Bond, Geoff Bond Gallery: Bowler, Hat Gallery: Burt, Steve Gallery: Corbett, Wulf Gallery: Danziger, Richard Gallery: Davies, Keith Gallery: de Smedt, Koen Gallery: de terre neuve, john Gallery: Douglas, Mervyn Gallery: Duffell, Andy Gallery: Egg, Freerange Gallery: Eggman Glass Gallery: Eriksson, Leif Gallery: Fat Wally Gallery: Flint, Carole Gallery: Gilbride, Chris Gallery: Hedglin, Nils Gallery: Helliwell, Andy Gallery: Hodge, Derek Gallery: Hooooge, Neil Gallery: Humm, Dave Gallery: I'm Bruce Gallery: Luther, Mark Gallery: The Mad Padre Gallery: Maerk Gallery: McCarthy, Andrew Gallery: Melville, Doug Gallery: Miller, Andrew Gallery: Miller, Steve Gallery: Milne, Neil Gallery: Mikkola, Topi Gallery: Mr Nouveau Gallery: Naylor, Richard Gallery: Nissvik, Thomas Gallery: Owen Gallery: Pedivere Gallery: Pingu Gallery: Pollard, Ashley Gallery: Plowman, Ralph Gallery: Ralls, Jason Gallery: Sapper Gallery: Skelton, Dom Gallery: Slade, Matt Gallery: Stapells, Tony Gallery: Stoesen, Chris Gallery: Strom, Joakim Gallery: Stumpy Gallery: Topyob Gallery: Treadhead Gallery: Vera, Benito Gallery: Vis Bellica Gallery: Willie B Gallery: Yuengling, Jon Gallery: Catchpole, Jim
  • Scorecard Gallery: Alexandros Gallery: Ambler, Craig Gallery: Armstrong, Keith Gallery: Bailey, Dave Gallery: Bairos, Vidal Gallery: Bax, Dick Gallery: Bloggs, Fred Gallery: Bond, Geoff Gallery: Burt, Steve Gallery: Carnegie, Ron Gallery: Carole Gallery: Catchpole, Jim Gallery: Clarke, Richard Gallery: Corbett, Wulf Gallery: Danziger, Richard Gallery: De Smedt, Koen Gallery: de Terre Neuve, John Gallery: Deeks, Jon Gallery: Douglas, Mervyn Gallery: Duffell, Andy Gallery: Egg, Free Range Gallery: Erikson, Leif Gallery: Fat Wally (Kev) Gallery: Fiene, Ben Gallery: Gilbride, Chris Gallery: Hodge, Derek Gallery: Humm, Dave Gallery: Llano, Manuel Gallery: Luther, Mark Gallery: Melville, Doug Gallery: Mikkola, Topi Gallery: Miller, Andrew Gallery: munsterfan8 Gallery: Murray, Jim Gallery: Nissvik, Thomas Gallery: Owen Gallery: The Mad Padre Gallery: PatG Gallery: Pingu Gallery: Plowman, Ralph Gallery: Pollard, Ashley Gallery: Ralls, Jason Gallery: Slade, Matt Gallery: Stoesen, Chris Gallery: Strom, Joakim Gallery: Stumpy Gallery: Thomas, John Gallery: Treadhead Gallery: Vera, Benito Gallery: Vis Bellica Gallery: Warrior in the Attic Gallery: Weir, Jim Gallery: Whitaker, Mike Gallery: WillieB Gallery: Yuengling, Jon
  • TooFatLardies
Vis Lardica
  • New & Updated/
  • TFL Painting Challenge 2025/
    • Introduction & Details
    • Scorecard 2025
    • Gallery: Burt, Steve
    • Gallery: Cooper, Nick
    • Gallery: Douglas, Mervyn
    • Gallery: Emmett, John
    • Gallery: Flint, Carole
    • Gallery: Helliwell, Andrew
    • Gallery: Luther, Mark
    • Gallery: Plowman, Ralph
    • Gallery: Sapper
    • Gallery: Stumpy
    • Gallery: Vis Bellica
  • I Ain't Been Shot, Mum! (WW2)/
    • Introduction to IABSM
    • Video: How To Play IABSM, Part One
    • Video: How to Play IABSM, Part Two
    • Video: How to Play IABSM, Part Three
    • After Action Reports (IABSM)
    • Army Galleries (IABSM)
    • Buy IABSM Scenario Packs
    • Buy IABSM Theatre Supplements
    • Figure Manufacturers (IABSM)
    • Figure Reviews (IABSM)
    • Game Aids (IABSM)
    • IABSM Facebook Group
  • Charlie Don't Surf! (Vietnam/Arab-Israeli/Moderns)/
    • Introduction to CDS
    • After Action Reports (CDS)
    • Army Galleries (CDS)
    • The Arab-Israeli Six Day War
    • The Arab-Israeli Yom Kippur War
    • After Action Reports (Arab-Israeli Wars)
    • Army Galleries (Arab-Israeli Wars)
    • After Action Reports (Moderns)
  • Quadrant 13 (Sci-Fi)/
    • Introduction to Q13
    • After Action Reports (Q13)
    • Army Galleries (Q13)
    • Army Lists for Q13
    • Buy Q13 and/or Five Planets
    • Figure Manufacturers (Q13)
    • Figure Reviews (Q13)
    • Points System Spreadsheets
  • Vis Imperica (19th Century)/
    • Introduction to 19th Century
    • Army Galleries (19th Century)
    • Army Lists
    • After Action Reports
    • Articles & Essays
    • Quick Guide to the Wars of the 19th Century
  • Vis Lucii (Pike & Shot)/
    • Introduction and AAR
    • FK&P: The Eastern Front
  • Vis Bellica (Ancients)/
    • Introduction to Vis Bellica
    • The Rules: Amendments
    • The Rules: Frequently Asked Questions
    • The Rules: Optional Rules
    • After Action Reports (Vis Bellica)
    • Army Lists
    • Articles about Vis Bellica
    • Scenarios for Vis Bellica
    • Other After Action Reports: WRG 6th
    • Other After Action Reports: TTS
  • Vis Magica (Fantasy)/
    • The Rules: Optional Rules
    • After Action Reports
  • TFL Painting Challenge 2024/
    • Scorecard 2024
    • Gallery: Burt, Steve
    • Gallery: Cooper, Nick
    • Gallery: Darkin, Des
    • Gallery: Davenport, Jonathan
    • Gallery: Douglas, Mervyn
    • Gallery: Emmett. John
    • Gallery: Flint, Carole
    • Gallery: Helliwell, Andrew
    • Gallery: Kay, Chris
    • Gallery: Luther, Mark
    • Gallery: Plowman, Ralph
    • Gallery: Sapper
    • Gallery: Scott, David
    • Gallery: Slade, Matt
    • Gallery: Stumpy
    • Gallery: Vis Bellica
  • TFL Painting Challenge 2023/
    • Scorecard 2023
    • Gallery: Bowler, Lloyd
    • Gallery: Burt, Steve
    • Gallery: Cooper, Nick
    • Gallery: Douglas, Mervyn
    • Gallery: Emmett, John
    • Gallery: Flint, Carole
    • Gallery: Helliwell, Andrew
    • Gallery: Hodge, Derek
    • Gallery: Kay, Chris
    • Gallery: Luther, Mark
    • Gallery: Plowman, Ralph
    • Gallery: Pollard, Ashley
    • Gallery: Sapper
    • Gallery: Scott, David
    • Gallery: Slade, Matt
    • Gallery: Stumpy
    • Gallery: Vis Bellica
  • TFL Painting Challenge 2022/
    • Scorecard 2022
    • Gallery: Bowler, Lloyd
    • Gallery: Burt, Steve
    • Gallery: Cooper, Nick
    • Gallery: Douglas, Mervyn
    • Gallery: Emmett, John
    • Gallery: Flint, Carole
    • Gallery: Goodrick, Pete
    • Gallery: Haines, John
    • Gallery: Helliwell, Andrew
    • Gallery: Hodge, Derek
    • Gallery: Kay, Chris
    • Gallery: Luther, Mark
    • Gallery: Plowman, Ralph
    • Gallery: Pollard, Ashley
    • Gallery: Sapper
    • Gallery: Scott, David
    • Gallery: Slade, Matt
    • Gallery: Stumpy
    • Gallery: Vis Bellica
  • TFL Painting Challenge 2021/
    • Scorecard 2021
    • Gallery: Anzani, Joe
    • Gallery: Bowler, Lloyd
    • Gallery: Burt, Steve
    • Gallery: Cooper, Nick
    • Gallery: Douglas, Mervyn
    • Gallery: Duffell, Andy
    • Gallery: Emmett, John
    • Gallery: Flint, Carole
    • Gallery: Haines, John
    • Gallery: Helliwell, Andrew
    • Gallery: Hiett, Travis
    • Gallery: Hodge, Derek
    • Gallery: Kay, Chris
    • Gallery: Luther, Mark
    • Gallery: McGinn, Joe
    • Gallery: Melville, Doug
    • Gallery: Plowman, Ralph
    • Gallery: Pollard, Ashley
    • Gallery: Ralls, Jason
    • Gallery: Sapper
    • Gallery: Scott, David
    • Gallery: Slade, Matt
    • Gallery: Stoesen, Chris
    • Gallery: Stumpy
    • Gallery: Vis Bellica
  • TFL Painting Challenge 2020/
    • Scorecard 2020
    • Gallery: Bloggs, Fred
    • Gallery: Bluemoose Ken
    • Gallery: Bowler, Lloyd
    • Gallery: Burt, Steve
    • Gallery: Cornwell, Chris
    • Gallery: Douglas, Mervyn
    • Gallery: Duffell, Andy
    • Gallery: Emmett, John
    • Gallery: Flint, Carole
    • Gallery: Haines, John
    • Gallery: Helliwell, Andrew
    • Gallery: Hiatt, Travis
    • Gallery: Hodge, Derek
    • Gallery: Hooge, Neil
    • Gallery: Kay, Chris
    • Gallery: Luther, Mark
    • Gallery: McGinn, Joe
    • Gallery: Melville, Doug
    • Gallery: Plowman, Ralph
    • Gallery: Pollard, Ashley
    • Gallery: Ralls, Jason
    • Gallery: Sapper
    • Gallery: Scott, David
    • Gallery: Slade, Matt
    • Gallery: Stoesen, Chris
    • Gallery: Stumpy
    • Gallery: Vis Bellica
  • TFL Painting Challenge 2019/
    • Scorecard 2019
    • Gallery: Bloggs, Fred
    • Gallery: Blue Moose Ken
    • Gallery: Bowen, Ed
    • Gallery: Bowler, Lloyd
    • Gallery: Burt, Steve
    • Gallery: Clarke, Richard
    • Gallery: Cornwell, Chris
    • Gallery: Davenport, Jon
    • Gallery: Douglas, Mervyn
    • Gallery: Duffell, Andy
    • Gallery: de Terre Neuve, John
    • Gallery: Emmett, John
    • Gallery: Fat Wally
    • Gallery: Flint, Carole
    • Gallery: Haines, John
    • Gallery: Helliwell, Andrew
    • Gallery: Hiett, Travis
    • Gallery: Hodge, Derek
    • Gallery: Hooge, Neil
    • Gallery: Johnston, Owen
    • Gallery: Kay, Chris
    • Gallery: Luther, Mark
    • Gallery: McGinn, Joe
    • Gallery: Melville, Doug
    • Gallery: Plowman, Ralph
    • Gallery: Ralls, Jason
    • Gallery: Sapper
    • Gallery: Scott, David
    • Gallery: Slade, Matt
    • Gallery: Stoesen, Chris
    • Gallery: Stumpy
    • Gallery: Vis Bellica
    • Gallery: Yuengling, Jon
  • TFL Painting Challenge 2018/
    • Scorecard 2018
    • Gallery: Bloggs, Fred
    • Gallery: Blue Moose Ken
    • Gallery: Bowen, Ed
    • Gallery: Bowler, Lloyd
    • Gallery: Burt, Steve
    • Gallery: Cornwell, Chris
    • Gallery: Davenport, Jonathan
    • Gallery: de Terre Neuve, John
    • Gallery: Douglas, Mervyn
    • Gallery: Duffell, Andy
    • Gallery: Fat Wally
    • Gallery: Flint, Carole
    • Gallery: Freerange Egg
    • Gallery: Haines, John
    • Gallery: Helliwell, Andrew
    • Gallery: Hiett, Travis
    • Gallery: Hodge, Derek
    • Gallery: Hooge, Neil
    • Gallery: Johnston, Owen
    • Gallery: Kay, Chris
    • Gallery: Lampon, Steven
    • Gallery: Luther, Mark
    • Gallery: McGinn, Joe
    • Gallery: Melville, Doug
    • Gallery: Plowman, Ralph
    • Gallery: Ralls, Jason
    • Gallery: Sapper
    • Gallery: Scott, David
    • Gallery: Slade, Matt
    • Gallery: Stoesen, Chris
    • Gallery: Stumpy
    • Gallery: Treadhead
    • Gallery: Vis Bellica
    • Gallery: Yuengling, Jon
  • TFL Painting Challenge 2017/
    • Scorecard
    • Gallery: Bond, Geoff
    • Gallery: Bowen, Edward
    • Gallery: Bowler, Lloyd
    • Gallery: Burt, Steve
    • Gallery: Cabey Cabey
    • Gallery: Catchpole, Jim
    • Gallery: Davenport, Jon
    • Gallery: Davies, Keith
    • Gallery: de Smedt, Kohn
    • Gallery: de Terre Neuve, John
    • Gallery: Douglas, Mervyn
    • Gallery: Duffell, Andy
    • Gallery: Fat Wally (Kev)
    • Gallery: Flint, Carole
    • Gallery: Freerange Egg
    • Gallery: Gatzemeyer, Garrett
    • Gallery: Gilbride, Chris
    • Gallery: Haines, John
    • Gallery: Helliwell, Andrew
    • Gallery: Hodge, Derek
    • Gallery: Hooge, Neil
    • Gallery: Humm, Dave
    • Gallery: Kay, Chris
    • Gallery: Lampon, Steven
    • Gallery: Luther, Mark
    • Gallery: MacNeill, Craig
    • Gallery: McCarthy, Andrew
    • Gallery: The Mad Padre
    • Gallery: McGinn, Joe
    • Gallery: Melville, Doug
    • Gallery: Naylor, Richard
    • Gallery: Nissvik, Thomas
    • Gallery: Old Pivot
    • Gallery: Owen
    • Gallery: Pollard, Ashley
    • Gallery: Plowman, Ralph
    • Gallery: Ralls, Jason
    • Gallery: Sapper
    • Gallery: Scott, David
    • Gallery: Slade, Matt
    • Gallery: Stoesen, Chris
    • Gallery: Stumpy
    • Gallery: Treadhead
    • Gallery: Vis Bellica
    • Gallery: Weathersby, Brian
    • Gallery: WillieB
    • Gallery: Yuengling, Jon
  • TFL Painting Challenge 2016/
    • Scorecard 2016
    • Gallery: Baldwin, Paul
    • Gallery: Blankenship, Paul
    • Gallery: Bloggs, Fred
    • Gallery: Bond, Geoff
    • Gallery: Bowen, Ed
    • Gallery: Bowler, Lloyd
    • Gallery: Burt, Steve
    • Gallery: Catchpole, Jim
    • Gallery: Clarke, Richard
    • Gallery: Davenport, Jon
    • Gallery: Davies, Keith
    • Gallery: de Smedt, Koen
    • Gallery: Douglas, Mervyn
    • Gallery: Duffell, Andy
    • Gallery: Egg
    • Gallery: Fitch, Doug
    • Gallery: Flint, Carole
    • Gallery: Gatzemeyer, Garrett
    • Gallery: Gilbride, Chris
    • Gallery: Helliwell, Andrew
    • Gallery: Hodge, Derek
    • Gallery: Hooge, Neil
    • Gallery: Humm, Dave
    • Gallery: I Am Bruce
    • Gallery: Lowth, Kev (Fat Wally)
    • Gallery: Luther, Mark
    • Gallery: The Mad Padre
    • Gallery: McCarthy, Andrew
    • Gallery: Melville, Doug
    • Gallery: Naylor, Richard
    • Gallery: Nissvik, Thomas
    • Gallery: Oracle
    • Gallery: Owen
    • Gallery: Plowman, Ralph
    • Gallery: Pollard, Ashley
    • Gallery: Ralls, Jason
    • Gallery: Sapper
    • Gallery: Slade, Matt
    • Gallery: Stoesen, Chris
    • Gallery: Stumpy
    • Gallery: Treadhead
    • Gallery: Vis Bellica
    • Gallery: Willie B
    • Gallery: Yuengling, Jon
  • TFL Painting Challenge 2015/
    • Scorecard 2015
    • Gallery: AJH
    • Gallery: Bairos, Vidal
    • Gallery: Baldwin, Paul
    • Gallery: Bax, Dick
    • Gallery: Blankenship, Paul
    • Gallery: Bloggs, Fred
    • Gallery: Bond, Geoff Bond
    • Gallery: Bowler, Hat
    • Gallery: Burt, Steve
    • Gallery: Corbett, Wulf
    • Gallery: Danziger, Richard
    • Gallery: Davies, Keith
    • Gallery: de Smedt, Koen
    • Gallery: de terre neuve, john
    • Gallery: Douglas, Mervyn
    • Gallery: Duffell, Andy
    • Gallery: Egg, Freerange
    • Gallery: Eggman Glass
    • Gallery: Eriksson, Leif
    • Gallery: Fat Wally
    • Gallery: Flint, Carole
    • Gallery: Gilbride, Chris
    • Gallery: Hedglin, Nils
    • Gallery: Helliwell, Andy
    • Gallery: Hodge, Derek
    • Gallery: Hooooge, Neil
    • Gallery: Humm, Dave
    • Gallery: I'm Bruce
    • Gallery: Luther, Mark
    • Gallery: The Mad Padre
    • Gallery: Maerk
    • Gallery: McCarthy, Andrew
    • Gallery: Melville, Doug
    • Gallery: Miller, Andrew
    • Gallery: Miller, Steve
    • Gallery: Milne, Neil
    • Gallery: Mikkola, Topi
    • Gallery: Mr Nouveau
    • Gallery: Naylor, Richard
    • Gallery: Nissvik, Thomas
    • Gallery: Owen
    • Gallery: Pedivere
    • Gallery: Pingu
    • Gallery: Pollard, Ashley
    • Gallery: Plowman, Ralph
    • Gallery: Ralls, Jason
    • Gallery: Sapper
    • Gallery: Skelton, Dom
    • Gallery: Slade, Matt
    • Gallery: Stapells, Tony
    • Gallery: Stoesen, Chris
    • Gallery: Strom, Joakim
    • Gallery: Stumpy
    • Gallery: Topyob
    • Gallery: Treadhead
    • Gallery: Vera, Benito
    • Gallery: Vis Bellica
    • Gallery: Willie B
    • Gallery: Yuengling, Jon
    • Gallery: Catchpole, Jim
  • TFL Painting Challenge 2014/
    • Scorecard
    • Gallery: Alexandros
    • Gallery: Ambler, Craig
    • Gallery: Armstrong, Keith
    • Gallery: Bailey, Dave
    • Gallery: Bairos, Vidal
    • Gallery: Bax, Dick
    • Gallery: Bloggs, Fred
    • Gallery: Bond, Geoff
    • Gallery: Burt, Steve
    • Gallery: Carnegie, Ron
    • Gallery: Carole
    • Gallery: Catchpole, Jim
    • Gallery: Clarke, Richard
    • Gallery: Corbett, Wulf
    • Gallery: Danziger, Richard
    • Gallery: De Smedt, Koen
    • Gallery: de Terre Neuve, John
    • Gallery: Deeks, Jon
    • Gallery: Douglas, Mervyn
    • Gallery: Duffell, Andy
    • Gallery: Egg, Free Range
    • Gallery: Erikson, Leif
    • Gallery: Fat Wally (Kev)
    • Gallery: Fiene, Ben
    • Gallery: Gilbride, Chris
    • Gallery: Hodge, Derek
    • Gallery: Humm, Dave
    • Gallery: Llano, Manuel
    • Gallery: Luther, Mark
    • Gallery: Melville, Doug
    • Gallery: Mikkola, Topi
    • Gallery: Miller, Andrew
    • Gallery: munsterfan8
    • Gallery: Murray, Jim
    • Gallery: Nissvik, Thomas
    • Gallery: Owen
    • Gallery: The Mad Padre
    • Gallery: PatG
    • Gallery: Pingu
    • Gallery: Plowman, Ralph
    • Gallery: Pollard, Ashley
    • Gallery: Ralls, Jason
    • Gallery: Slade, Matt
    • Gallery: Stoesen, Chris
    • Gallery: Strom, Joakim
    • Gallery: Stumpy
    • Gallery: Thomas, John
    • Gallery: Treadhead
    • Gallery: Vera, Benito
    • Gallery: Vis Bellica
    • Gallery: Warrior in the Attic
    • Gallery: Weir, Jim
    • Gallery: Whitaker, Mike
    • Gallery: WillieB
    • Gallery: Yuengling, Jon
  • TooFatLardies/
An impressive start
Vis Lardica

AAR 1943 Eastern Front: Mius River Part 2 by Mark Luther

A battle report or After Action Report (AAR) for I Ain't Been Shot, Mum (IABSM), the company-sized wargaming rules for WW2 from the TooFatLardies. A one-off game or scenario set on the Eastern Front in the year 1943.

Vis Lardica
  • New & Updated/
  • TFL Painting Challenge 2025/
    • Introduction & Details
    • Scorecard 2025
    • Gallery: Burt, Steve
    • Gallery: Cooper, Nick
    • Gallery: Douglas, Mervyn
    • Gallery: Emmett, John
    • Gallery: Flint, Carole
    • Gallery: Helliwell, Andrew
    • Gallery: Luther, Mark
    • Gallery: Plowman, Ralph
    • Gallery: Sapper
    • Gallery: Stumpy
    • Gallery: Vis Bellica
  • I Ain't Been Shot, Mum! (WW2)/
    • Introduction to IABSM
    • Video: How To Play IABSM, Part One
    • Video: How to Play IABSM, Part Two
    • Video: How to Play IABSM, Part Three
    • After Action Reports (IABSM)
    • Army Galleries (IABSM)
    • Buy IABSM Scenario Packs
    • Buy IABSM Theatre Supplements
    • Figure Manufacturers (IABSM)
    • Figure Reviews (IABSM)
    • Game Aids (IABSM)
    • IABSM Facebook Group
  • Charlie Don't Surf! (Vietnam/Arab-Israeli/Moderns)/
    • Introduction to CDS
    • After Action Reports (CDS)
    • Army Galleries (CDS)
    • The Arab-Israeli Six Day War
    • The Arab-Israeli Yom Kippur War
    • After Action Reports (Arab-Israeli Wars)
    • Army Galleries (Arab-Israeli Wars)
    • After Action Reports (Moderns)
  • Quadrant 13 (Sci-Fi)/
    • Introduction to Q13
    • After Action Reports (Q13)
    • Army Galleries (Q13)
    • Army Lists for Q13
    • Buy Q13 and/or Five Planets
    • Figure Manufacturers (Q13)
    • Figure Reviews (Q13)
    • Points System Spreadsheets
  • Vis Imperica (19th Century)/
    • Introduction to 19th Century
    • Army Galleries (19th Century)
    • Army Lists
    • After Action Reports
    • Articles & Essays
    • Quick Guide to the Wars of the 19th Century
  • Vis Lucii (Pike & Shot)/
    • Introduction and AAR
    • FK&P: The Eastern Front
  • Vis Bellica (Ancients)/
    • Introduction to Vis Bellica
    • The Rules: Amendments
    • The Rules: Frequently Asked Questions
    • The Rules: Optional Rules
    • After Action Reports (Vis Bellica)
    • Army Lists
    • Articles about Vis Bellica
    • Scenarios for Vis Bellica
    • Other After Action Reports: WRG 6th
    • Other After Action Reports: TTS
  • Vis Magica (Fantasy)/
    • The Rules: Optional Rules
    • After Action Reports
  • TFL Painting Challenge 2024/
    • Scorecard 2024
    • Gallery: Burt, Steve
    • Gallery: Cooper, Nick
    • Gallery: Darkin, Des
    • Gallery: Davenport, Jonathan
    • Gallery: Douglas, Mervyn
    • Gallery: Emmett. John
    • Gallery: Flint, Carole
    • Gallery: Helliwell, Andrew
    • Gallery: Kay, Chris
    • Gallery: Luther, Mark
    • Gallery: Plowman, Ralph
    • Gallery: Sapper
    • Gallery: Scott, David
    • Gallery: Slade, Matt
    • Gallery: Stumpy
    • Gallery: Vis Bellica
  • TFL Painting Challenge 2023/
    • Scorecard 2023
    • Gallery: Bowler, Lloyd
    • Gallery: Burt, Steve
    • Gallery: Cooper, Nick
    • Gallery: Douglas, Mervyn
    • Gallery: Emmett, John
    • Gallery: Flint, Carole
    • Gallery: Helliwell, Andrew
    • Gallery: Hodge, Derek
    • Gallery: Kay, Chris
    • Gallery: Luther, Mark
    • Gallery: Plowman, Ralph
    • Gallery: Pollard, Ashley
    • Gallery: Sapper
    • Gallery: Scott, David
    • Gallery: Slade, Matt
    • Gallery: Stumpy
    • Gallery: Vis Bellica
  • TFL Painting Challenge 2022/
    • Scorecard 2022
    • Gallery: Bowler, Lloyd
    • Gallery: Burt, Steve
    • Gallery: Cooper, Nick
    • Gallery: Douglas, Mervyn
    • Gallery: Emmett, John
    • Gallery: Flint, Carole
    • Gallery: Goodrick, Pete
    • Gallery: Haines, John
    • Gallery: Helliwell, Andrew
    • Gallery: Hodge, Derek
    • Gallery: Kay, Chris
    • Gallery: Luther, Mark
    • Gallery: Plowman, Ralph
    • Gallery: Pollard, Ashley
    • Gallery: Sapper
    • Gallery: Scott, David
    • Gallery: Slade, Matt
    • Gallery: Stumpy
    • Gallery: Vis Bellica
  • TFL Painting Challenge 2021/
    • Scorecard 2021
    • Gallery: Anzani, Joe
    • Gallery: Bowler, Lloyd
    • Gallery: Burt, Steve
    • Gallery: Cooper, Nick
    • Gallery: Douglas, Mervyn
    • Gallery: Duffell, Andy
    • Gallery: Emmett, John
    • Gallery: Flint, Carole
    • Gallery: Haines, John
    • Gallery: Helliwell, Andrew
    • Gallery: Hiett, Travis
    • Gallery: Hodge, Derek
    • Gallery: Kay, Chris
    • Gallery: Luther, Mark
    • Gallery: McGinn, Joe
    • Gallery: Melville, Doug
    • Gallery: Plowman, Ralph
    • Gallery: Pollard, Ashley
    • Gallery: Ralls, Jason
    • Gallery: Sapper
    • Gallery: Scott, David
    • Gallery: Slade, Matt
    • Gallery: Stoesen, Chris
    • Gallery: Stumpy
    • Gallery: Vis Bellica
  • TFL Painting Challenge 2020/
    • Scorecard 2020
    • Gallery: Bloggs, Fred
    • Gallery: Bluemoose Ken
    • Gallery: Bowler, Lloyd
    • Gallery: Burt, Steve
    • Gallery: Cornwell, Chris
    • Gallery: Douglas, Mervyn
    • Gallery: Duffell, Andy
    • Gallery: Emmett, John
    • Gallery: Flint, Carole
    • Gallery: Haines, John
    • Gallery: Helliwell, Andrew
    • Gallery: Hiatt, Travis
    • Gallery: Hodge, Derek
    • Gallery: Hooge, Neil
    • Gallery: Kay, Chris
    • Gallery: Luther, Mark
    • Gallery: McGinn, Joe
    • Gallery: Melville, Doug
    • Gallery: Plowman, Ralph
    • Gallery: Pollard, Ashley
    • Gallery: Ralls, Jason
    • Gallery: Sapper
    • Gallery: Scott, David
    • Gallery: Slade, Matt
    • Gallery: Stoesen, Chris
    • Gallery: Stumpy
    • Gallery: Vis Bellica
  • TFL Painting Challenge 2019/
    • Scorecard 2019
    • Gallery: Bloggs, Fred
    • Gallery: Blue Moose Ken
    • Gallery: Bowen, Ed
    • Gallery: Bowler, Lloyd
    • Gallery: Burt, Steve
    • Gallery: Clarke, Richard
    • Gallery: Cornwell, Chris
    • Gallery: Davenport, Jon
    • Gallery: Douglas, Mervyn
    • Gallery: Duffell, Andy
    • Gallery: de Terre Neuve, John
    • Gallery: Emmett, John
    • Gallery: Fat Wally
    • Gallery: Flint, Carole
    • Gallery: Haines, John
    • Gallery: Helliwell, Andrew
    • Gallery: Hiett, Travis
    • Gallery: Hodge, Derek
    • Gallery: Hooge, Neil
    • Gallery: Johnston, Owen
    • Gallery: Kay, Chris
    • Gallery: Luther, Mark
    • Gallery: McGinn, Joe
    • Gallery: Melville, Doug
    • Gallery: Plowman, Ralph
    • Gallery: Ralls, Jason
    • Gallery: Sapper
    • Gallery: Scott, David
    • Gallery: Slade, Matt
    • Gallery: Stoesen, Chris
    • Gallery: Stumpy
    • Gallery: Vis Bellica
    • Gallery: Yuengling, Jon
  • TFL Painting Challenge 2018/
    • Scorecard 2018
    • Gallery: Bloggs, Fred
    • Gallery: Blue Moose Ken
    • Gallery: Bowen, Ed
    • Gallery: Bowler, Lloyd
    • Gallery: Burt, Steve
    • Gallery: Cornwell, Chris
    • Gallery: Davenport, Jonathan
    • Gallery: de Terre Neuve, John
    • Gallery: Douglas, Mervyn
    • Gallery: Duffell, Andy
    • Gallery: Fat Wally
    • Gallery: Flint, Carole
    • Gallery: Freerange Egg
    • Gallery: Haines, John
    • Gallery: Helliwell, Andrew
    • Gallery: Hiett, Travis
    • Gallery: Hodge, Derek
    • Gallery: Hooge, Neil
    • Gallery: Johnston, Owen
    • Gallery: Kay, Chris
    • Gallery: Lampon, Steven
    • Gallery: Luther, Mark
    • Gallery: McGinn, Joe
    • Gallery: Melville, Doug
    • Gallery: Plowman, Ralph
    • Gallery: Ralls, Jason
    • Gallery: Sapper
    • Gallery: Scott, David
    • Gallery: Slade, Matt
    • Gallery: Stoesen, Chris
    • Gallery: Stumpy
    • Gallery: Treadhead
    • Gallery: Vis Bellica
    • Gallery: Yuengling, Jon
  • TFL Painting Challenge 2017/
    • Scorecard
    • Gallery: Bond, Geoff
    • Gallery: Bowen, Edward
    • Gallery: Bowler, Lloyd
    • Gallery: Burt, Steve
    • Gallery: Cabey Cabey
    • Gallery: Catchpole, Jim
    • Gallery: Davenport, Jon
    • Gallery: Davies, Keith
    • Gallery: de Smedt, Kohn
    • Gallery: de Terre Neuve, John
    • Gallery: Douglas, Mervyn
    • Gallery: Duffell, Andy
    • Gallery: Fat Wally (Kev)
    • Gallery: Flint, Carole
    • Gallery: Freerange Egg
    • Gallery: Gatzemeyer, Garrett
    • Gallery: Gilbride, Chris
    • Gallery: Haines, John
    • Gallery: Helliwell, Andrew
    • Gallery: Hodge, Derek
    • Gallery: Hooge, Neil
    • Gallery: Humm, Dave
    • Gallery: Kay, Chris
    • Gallery: Lampon, Steven
    • Gallery: Luther, Mark
    • Gallery: MacNeill, Craig
    • Gallery: McCarthy, Andrew
    • Gallery: The Mad Padre
    • Gallery: McGinn, Joe
    • Gallery: Melville, Doug
    • Gallery: Naylor, Richard
    • Gallery: Nissvik, Thomas
    • Gallery: Old Pivot
    • Gallery: Owen
    • Gallery: Pollard, Ashley
    • Gallery: Plowman, Ralph
    • Gallery: Ralls, Jason
    • Gallery: Sapper
    • Gallery: Scott, David
    • Gallery: Slade, Matt
    • Gallery: Stoesen, Chris
    • Gallery: Stumpy
    • Gallery: Treadhead
    • Gallery: Vis Bellica
    • Gallery: Weathersby, Brian
    • Gallery: WillieB
    • Gallery: Yuengling, Jon
  • TFL Painting Challenge 2016/
    • Scorecard 2016
    • Gallery: Baldwin, Paul
    • Gallery: Blankenship, Paul
    • Gallery: Bloggs, Fred
    • Gallery: Bond, Geoff
    • Gallery: Bowen, Ed
    • Gallery: Bowler, Lloyd
    • Gallery: Burt, Steve
    • Gallery: Catchpole, Jim
    • Gallery: Clarke, Richard
    • Gallery: Davenport, Jon
    • Gallery: Davies, Keith
    • Gallery: de Smedt, Koen
    • Gallery: Douglas, Mervyn
    • Gallery: Duffell, Andy
    • Gallery: Egg
    • Gallery: Fitch, Doug
    • Gallery: Flint, Carole
    • Gallery: Gatzemeyer, Garrett
    • Gallery: Gilbride, Chris
    • Gallery: Helliwell, Andrew
    • Gallery: Hodge, Derek
    • Gallery: Hooge, Neil
    • Gallery: Humm, Dave
    • Gallery: I Am Bruce
    • Gallery: Lowth, Kev (Fat Wally)
    • Gallery: Luther, Mark
    • Gallery: The Mad Padre
    • Gallery: McCarthy, Andrew
    • Gallery: Melville, Doug
    • Gallery: Naylor, Richard
    • Gallery: Nissvik, Thomas
    • Gallery: Oracle
    • Gallery: Owen
    • Gallery: Plowman, Ralph
    • Gallery: Pollard, Ashley
    • Gallery: Ralls, Jason
    • Gallery: Sapper
    • Gallery: Slade, Matt
    • Gallery: Stoesen, Chris
    • Gallery: Stumpy
    • Gallery: Treadhead
    • Gallery: Vis Bellica
    • Gallery: Willie B
    • Gallery: Yuengling, Jon
  • TFL Painting Challenge 2015/
    • Scorecard 2015
    • Gallery: AJH
    • Gallery: Bairos, Vidal
    • Gallery: Baldwin, Paul
    • Gallery: Bax, Dick
    • Gallery: Blankenship, Paul
    • Gallery: Bloggs, Fred
    • Gallery: Bond, Geoff Bond
    • Gallery: Bowler, Hat
    • Gallery: Burt, Steve
    • Gallery: Corbett, Wulf
    • Gallery: Danziger, Richard
    • Gallery: Davies, Keith
    • Gallery: de Smedt, Koen
    • Gallery: de terre neuve, john
    • Gallery: Douglas, Mervyn
    • Gallery: Duffell, Andy
    • Gallery: Egg, Freerange
    • Gallery: Eggman Glass
    • Gallery: Eriksson, Leif
    • Gallery: Fat Wally
    • Gallery: Flint, Carole
    • Gallery: Gilbride, Chris
    • Gallery: Hedglin, Nils
    • Gallery: Helliwell, Andy
    • Gallery: Hodge, Derek
    • Gallery: Hooooge, Neil
    • Gallery: Humm, Dave
    • Gallery: I'm Bruce
    • Gallery: Luther, Mark
    • Gallery: The Mad Padre
    • Gallery: Maerk
    • Gallery: McCarthy, Andrew
    • Gallery: Melville, Doug
    • Gallery: Miller, Andrew
    • Gallery: Miller, Steve
    • Gallery: Milne, Neil
    • Gallery: Mikkola, Topi
    • Gallery: Mr Nouveau
    • Gallery: Naylor, Richard
    • Gallery: Nissvik, Thomas
    • Gallery: Owen
    • Gallery: Pedivere
    • Gallery: Pingu
    • Gallery: Pollard, Ashley
    • Gallery: Plowman, Ralph
    • Gallery: Ralls, Jason
    • Gallery: Sapper
    • Gallery: Skelton, Dom
    • Gallery: Slade, Matt
    • Gallery: Stapells, Tony
    • Gallery: Stoesen, Chris
    • Gallery: Strom, Joakim
    • Gallery: Stumpy
    • Gallery: Topyob
    • Gallery: Treadhead
    • Gallery: Vera, Benito
    • Gallery: Vis Bellica
    • Gallery: Willie B
    • Gallery: Yuengling, Jon
    • Gallery: Catchpole, Jim
  • TFL Painting Challenge 2014/
    • Scorecard
    • Gallery: Alexandros
    • Gallery: Ambler, Craig
    • Gallery: Armstrong, Keith
    • Gallery: Bailey, Dave
    • Gallery: Bairos, Vidal
    • Gallery: Bax, Dick
    • Gallery: Bloggs, Fred
    • Gallery: Bond, Geoff
    • Gallery: Burt, Steve
    • Gallery: Carnegie, Ron
    • Gallery: Carole
    • Gallery: Catchpole, Jim
    • Gallery: Clarke, Richard
    • Gallery: Corbett, Wulf
    • Gallery: Danziger, Richard
    • Gallery: De Smedt, Koen
    • Gallery: de Terre Neuve, John
    • Gallery: Deeks, Jon
    • Gallery: Douglas, Mervyn
    • Gallery: Duffell, Andy
    • Gallery: Egg, Free Range
    • Gallery: Erikson, Leif
    • Gallery: Fat Wally (Kev)
    • Gallery: Fiene, Ben
    • Gallery: Gilbride, Chris
    • Gallery: Hodge, Derek
    • Gallery: Humm, Dave
    • Gallery: Llano, Manuel
    • Gallery: Luther, Mark
    • Gallery: Melville, Doug
    • Gallery: Mikkola, Topi
    • Gallery: Miller, Andrew
    • Gallery: munsterfan8
    • Gallery: Murray, Jim
    • Gallery: Nissvik, Thomas
    • Gallery: Owen
    • Gallery: The Mad Padre
    • Gallery: PatG
    • Gallery: Pingu
    • Gallery: Plowman, Ralph
    • Gallery: Pollard, Ashley
    • Gallery: Ralls, Jason
    • Gallery: Slade, Matt
    • Gallery: Stoesen, Chris
    • Gallery: Strom, Joakim
    • Gallery: Stumpy
    • Gallery: Thomas, John
    • Gallery: Treadhead
    • Gallery: Vera, Benito
    • Gallery: Vis Bellica
    • Gallery: Warrior in the Attic
    • Gallery: Weir, Jim
    • Gallery: Whitaker, Mike
    • Gallery: WillieB
    • Gallery: Yuengling, Jon
  • TooFatLardies/
 

Here we go again. Ten days after the 23 Panzer Division tries to take Point 213.9, the 3 SS Panzer Division is tasked with the same assault. In the meantime, the Russians have had a chance to build up their defenses in anticipation of this attack.

The Germans have a company of three grenadier platoons, with three attached MMGs, and two infantry guns. There is also a pioneer platoon onhand. The armor consists of one platoon of Tiger Is and two platoons of Pz IVGs. Artillery available could be a 105, 150 and medium mortar battery.

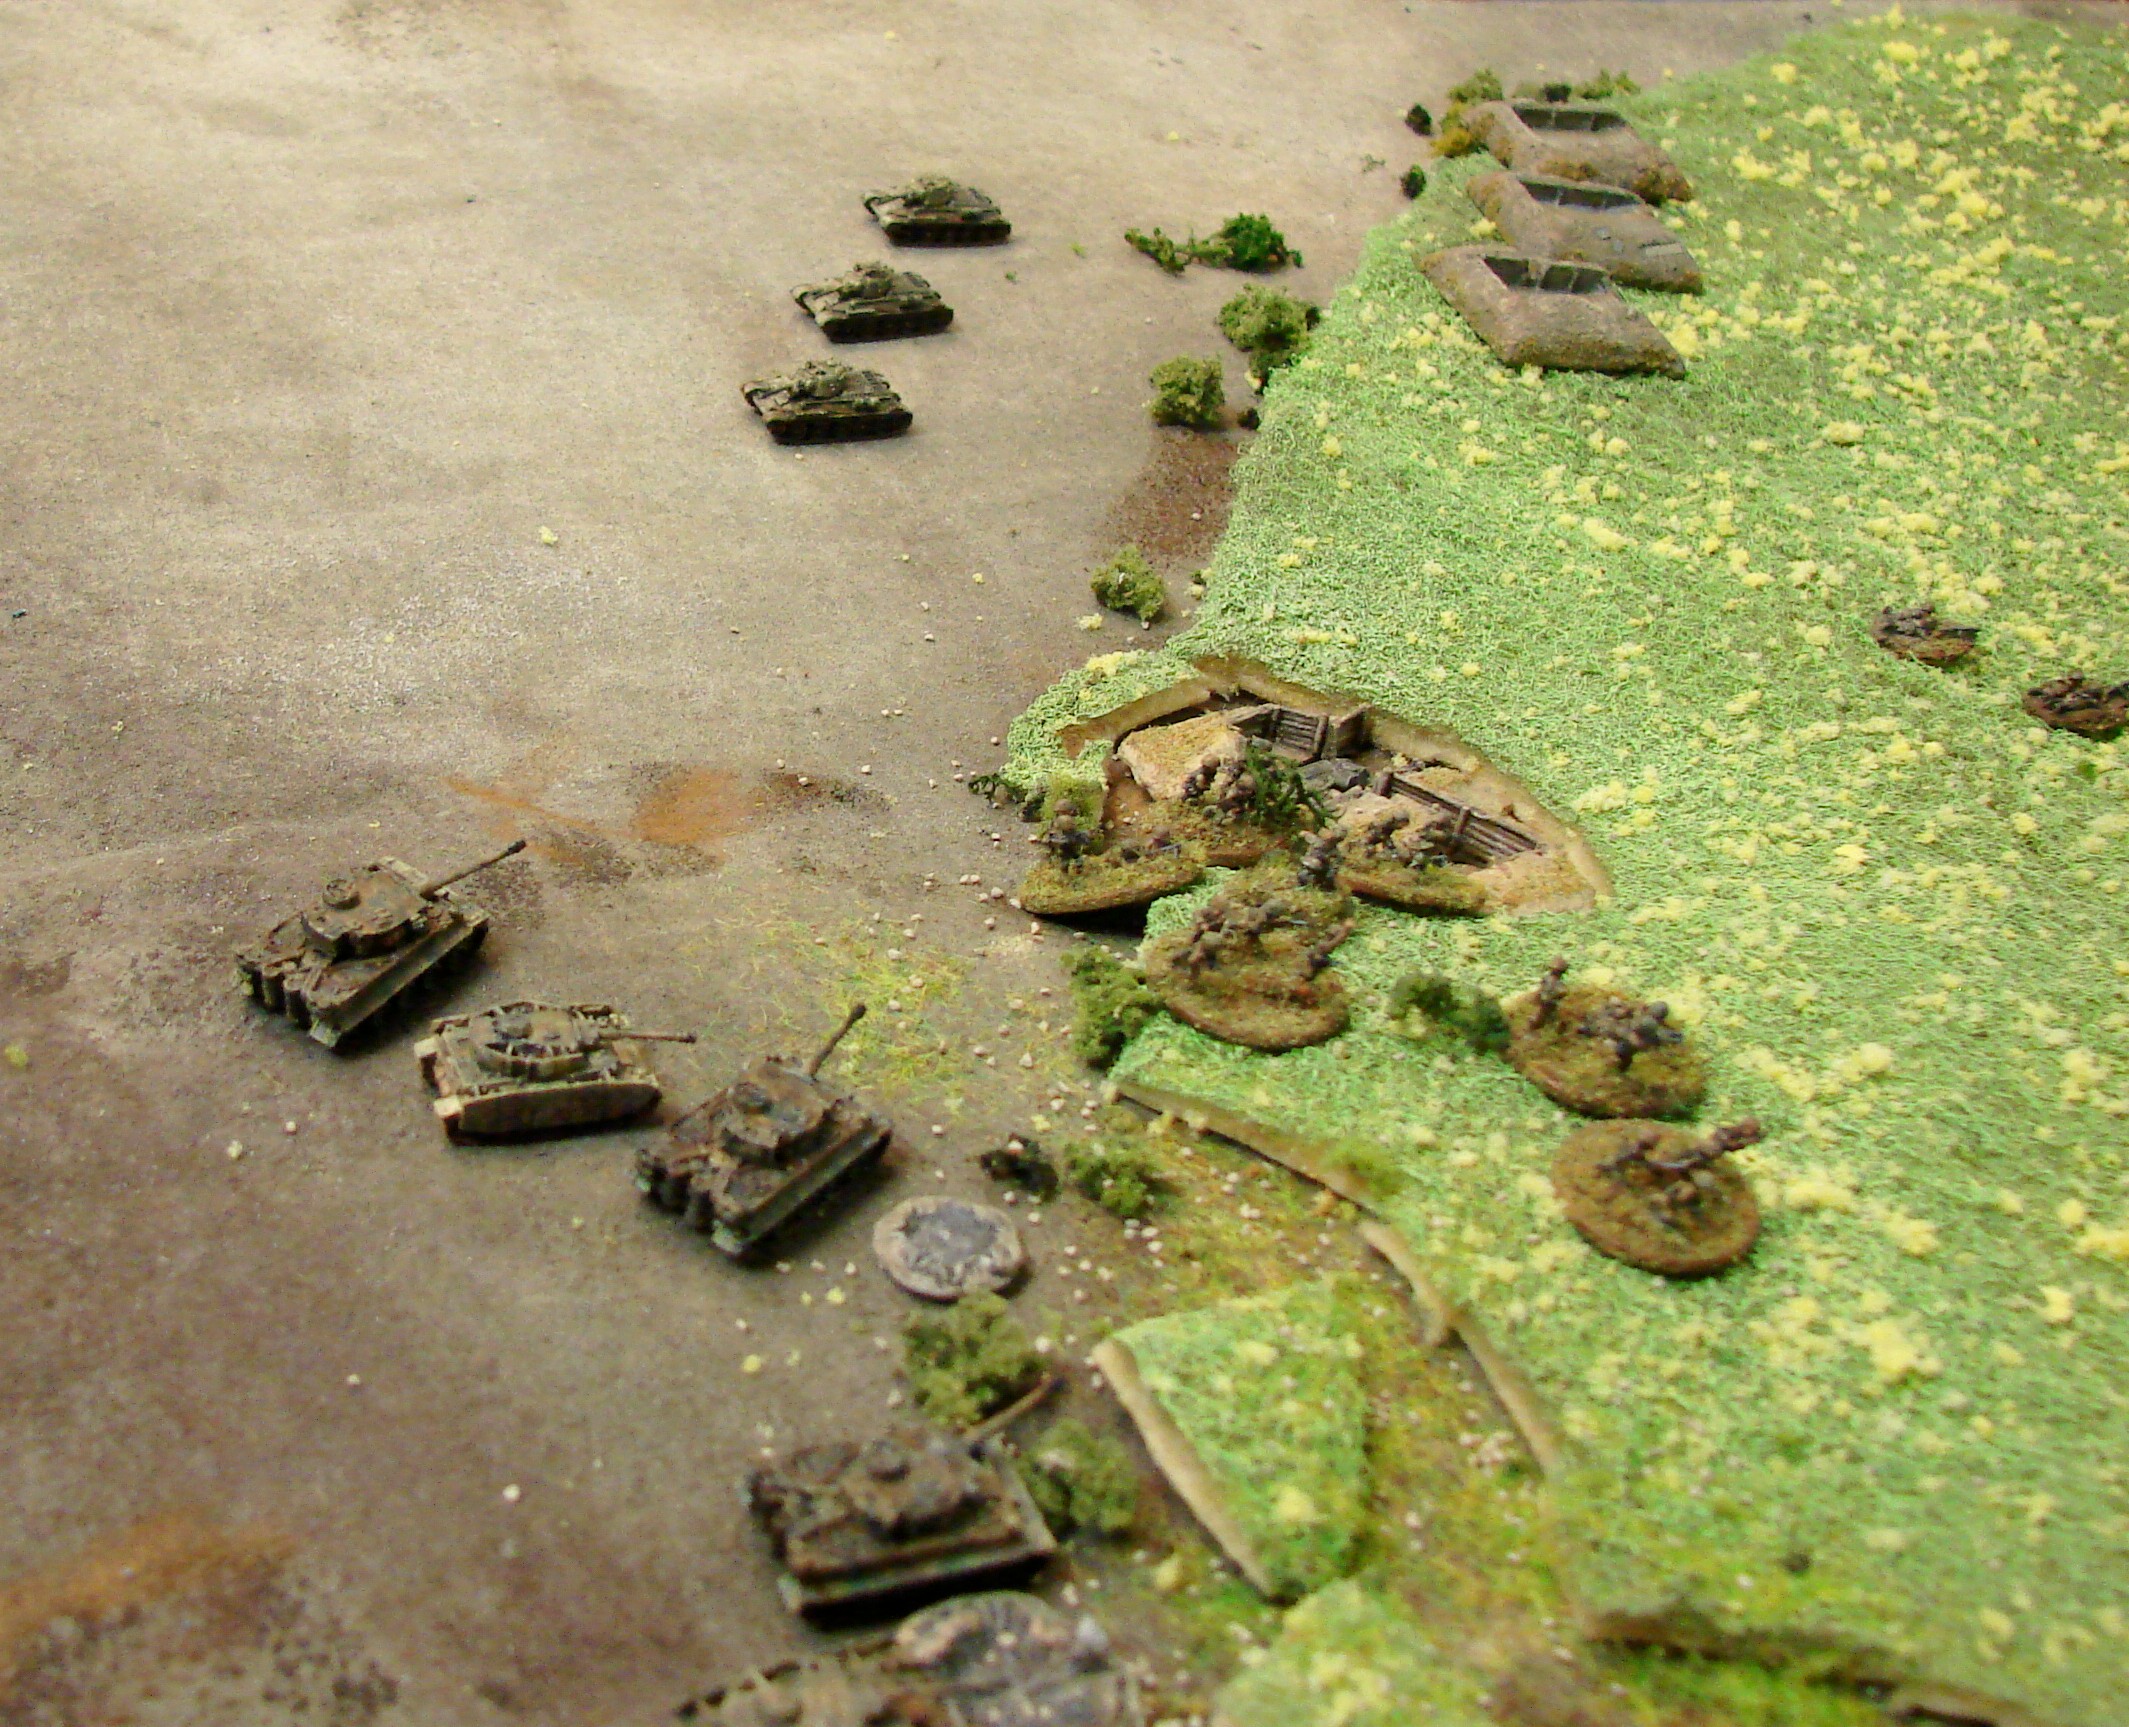
The Russians have a dug in infantry company of three platoons, with four MMGs, eight ATRs, eight 45mm ATGs and a medium and heavy mortar battery. They also have several minefields (a last minute 'bonus' minefield would claim two Pz IVs). There are also nine dug in T34s on board along with five 76mm guns. Offboard on both flanks are several 76mm guns that can add their fire to the table.

Air support is possible for both sides:  Ju87s and Il-2s.

The table already shows the signs of previous battles:  derelict tanks and plenty of shell holes and destroyed sunflower fields.

Rules used were I Ain't Been Shot, Mum from TooFatLardies. We had some first time users:  my friend Rick and his teenage sons, Stephen and Peter were up from Florida for a long weekend. A good time all around.

 
An impressive start

An impressive start

The Tigers lead the PzIVs towards the Russina frontline. They were suppose to be accompanied by a grenadier platoon, but it seems to be lagging behind. The tanks need to get out of the open ground as it is in the sights of guns offboard to their right, so they can't wait around for the tardy support.

Moving closer

Moving closer

Panzers start to take some hits from their front and from offboard as they move toward the hidden enemy.

Blasting at point blank range

Blasting at point blank range

They don't enter the sunflower field without some close support, but advance right up to the edge.

Preparing to go into the field

Preparing to go into the field

The center grenadier platoon prepares to close assault the Russkies under fire as the Panzers keep up the fire to their right.

Repulsed

Repulsed

The assault is thrown back with heavy losses. Two out of three squads are now at half strength.

Taking hits and looking for the grenadiers

Taking hits and looking for the grenadiers

The Panzers are taking hits from the ridge and offboard as they wait for their infantry support to show.

Surprise tank assault

Surprise tank assault

While the Panzers were focused to their front and softening up the dugin infantry, this platoon of T34s appeared to their flank.

View from the Soviet dugouts

View from the Soviet dugouts

This platoon thought it could dash around the flank of the Panzers but had terrible movement throws. It would cost them two out of three tanks as the Tigers picked them off quickly.

Russian counterattack

Russian counterattack

Not content to engage in a waiting game, a Soviet platoon with ATRs, MMGs and a couple of tank hunter teams storms out of their postions in the sunflower field. The Germans weren't expecting that.

Nasty surprise

Nasty surprise

The T-34 company decides to swing around the side. These tanks were dug in around the back of table but got tired of waiting for the Germans to move up. A bold move.

Standoff

Standoff

The Russian infantry is stopped in the gulley by the Grenadiers as both units grind each other down. The Russian Platoon CO is hit, but the leader of the tank hunters takes over and dashes from squad to squad to maintain the pressure.

T-34s halt to shell the Grenadiers

T-34s halt to shell the Grenadiers

Seeing their comrades getting pinned on the slopes, the T-34 company decides to hold back and shell the Germans from a safe distance. This was a fateful decision that cost the Russkies the game. The Germans had nothing on this flank to stop the tanks and the center PzIV platoon was too tied up to move over to stop any advance. The Germans did have several blinds left (mainly FOs and infantry guns) but the Russians were sure they had to be something more potent back there A not so bold move.

The Grenadiers finally arrive

The Grenadiers finally arrive

The platoon finally gets to the sunflowers. They haven't taken any losses at least, but the tankers were wondering what was taking so long.

Putting the Grenadiers up front

Putting the Grenadiers up front

After clearing the initial front line, the Germans start moving forward again. Visibility through the sunflowers is 4 to 6 inches, and even that has to be rolled for.

Minefield

Minefield

A last minute minefield(unknown to the Germans), manages to immobilise two PzIVs, while the other two engage a pair of 45mm ATGs.

Pinned on the slope

Pinned on the slope

The Russkies are pinned down by the MMG team that seems to be shot proof. The T-34s continue to shell the Grenadiers and not advance.

Stukas see some T-34s

Stukas see some T-34s

This was a pretty ineffectual attack, but the Russian armor CO lost his nerve after this and turned around to protect the HQ area.

The models are incorrect (JU87Bs) but all my later model Stukas are in snow camp.

Mortar fire

Mortar fire

The Grenadiers were already spent before the mortars started landing. The Russians are also down to no initiative dice. This was pretty much the end of the battle on this flank. The combination of Stukas, few surviving infantry and the threat of panzers on the other side of the ridge was enough to call off this assault.

Waiting for the Grenadiers to take the lead

Waiting for the Grenadiers to take the lead

The Tigers hang back while the Grenadiers move up to clear out the lurking Red ATRs and tank hunters.

And now some Soviet air support

And now some Soviet air support

These IL-2s try to nail some Tigers, but they come much closer to blowing up the sole surviving T-34 of the right hand platoon.

Slow advance

Slow advance

The German infantry keeps the Russian tank hunters from getting close to the Panzers, but its slow going.

Clearing the road

Clearing the road

Two of the Pz IVs have been immobilised in a minefield. The other two charge ahead. The German infantry unit is a pioneer platoon that is engaged with some Russian infantry and tank hunter teams and attempting to clear the minefield. A bit too late on the latter.

Bigger guns on the second line

Bigger guns on the second line

The first of the 76mm ATGs starts to open up on the advancing Panzers.

Looking lonely out here

Looking lonely out here

The Pz IV commander takes the lead and becomes the main target. Outrunning the infantry support in this terrain leaves the tanks blind. The seeminly empty spot to the right of the Panzers is actually full of more dug in Russian infantry and support weapons.

Clearing out the ATGs the hard way

Clearing out the ATGs the hard way

Just as the Panzers think they neutralized a pair of 45s by running them over, another pair knock out the running gear and engines.

AT fire from across the road

AT fire from across the road

A couple of ATRs and 45mm ATG halt the rampaging PzIVs as they overrun another nest of 45s. This meant that the right side platoon was completely spent.

Nice target

Nice target

This 76mm had been waiting for a nice side shot.

Where did the Russkies go?

Where did the Russkies go?

The Germans once again get through the initial line, but the infantry is thinning out, the panzers are taking side hits from the top of the ridge and offbd . Time for the artillery to start clearing the front.

Advancing or getting exposed to flank shots?

Advancing or getting exposed to flank shots?

This angle shows to advantage the positions held by Soviet ATGs on top of the ridge. With the right side PzIV platoon immobilised, it would take too long to silence the positions along the road. There is still an additional Russian infantry platoon dug in to the front of the Germans. At this point, everyone decided that it was time to head for unexposed positions and wait for the artillery to soften up the enemy. The Germans had started to register 105 and 150mm guns, while the soviets had their Medium and Heavy mortars coming in.

1 2 3 4 5 6 7 8 9 10 11 12 13 14 15 16 17 18 19 20 21 22 23 24 25 26 27 28 29
Previous Next
An impressive start
Moving closer
Blasting at point blank range
Preparing to go into the field
Repulsed
Taking hits and looking for the grenadiers
Surprise tank assault
View from the Soviet dugouts
Russian counterattack
Nasty surprise
Standoff
T-34s halt to shell the Grenadiers
The Grenadiers finally arrive
Putting the Grenadiers up front
Minefield
Pinned on the slope
Stukas see some T-34s
Mortar fire
Waiting for the Grenadiers to take the lead
And now some Soviet air support
Slow advance
Clearing the road
Bigger guns on the second line
Looking lonely out here
Clearing out the ATGs the hard way
AT fire from across the road
Nice target
Where did the Russkies go?
Advancing or getting exposed to flank shots?
 
BACK