Vis Lardica
  • New & Updated
  • Introduction & Details Scorecard 2025 Gallery: Burt, Steve Gallery: Cooper, Nick Gallery: Douglas, Mervyn Gallery: Emmett, John Gallery: Flint, Carole Gallery: Helliwell, Andrew Gallery: Luther, Mark Gallery: Plowman, Ralph Gallery: Sapper Gallery: Stumpy Gallery: Vis Bellica
  • Introduction to IABSM Video: How To Play IABSM, Part One Video: How to Play IABSM, Part Two Video: How to Play IABSM, Part Three After Action Reports (IABSM) Army Galleries (IABSM) Buy IABSM Scenario Packs Buy IABSM Theatre Supplements Figure Manufacturers (IABSM) Figure Reviews (IABSM) Game Aids (IABSM) IABSM Facebook Group
  • Introduction to CDS After Action Reports (CDS) Army Galleries (CDS) The Arab-Israeli Six Day War The Arab-Israeli Yom Kippur War After Action Reports (Arab-Israeli Wars) Army Galleries (Arab-Israeli Wars) After Action Reports (Moderns)
  • Introduction to Q13 After Action Reports (Q13) Army Galleries (Q13) Army Lists for Q13 Buy Q13 and/or Five Planets Figure Manufacturers (Q13) Figure Reviews (Q13) Points System Spreadsheets
  • Introduction to 19th Century Army Galleries (19th Century) Army Lists After Action Reports Articles & Essays Quick Guide to the Wars of the 19th Century
  • Introduction and AAR FK&P: The Eastern Front
  • Introduction to Vis Bellica The Rules: Amendments The Rules: Frequently Asked Questions The Rules: Optional Rules After Action Reports (Vis Bellica) Army Lists Articles about Vis Bellica Scenarios for Vis Bellica Other After Action Reports: WRG 6th Other After Action Reports: TTS
  • The Rules: Optional Rules After Action Reports
  • Scorecard 2024 Gallery: Burt, Steve Gallery: Cooper, Nick Gallery: Darkin, Des Gallery: Davenport, Jonathan Gallery: Douglas, Mervyn Gallery: Emmett. John Gallery: Flint, Carole Gallery: Helliwell, Andrew Gallery: Kay, Chris Gallery: Luther, Mark Gallery: Plowman, Ralph Gallery: Sapper Gallery: Scott, David Gallery: Slade, Matt Gallery: Stumpy Gallery: Vis Bellica
  • Scorecard 2023 Gallery: Bowler, Lloyd Gallery: Burt, Steve Gallery: Cooper, Nick Gallery: Douglas, Mervyn Gallery: Emmett, John Gallery: Flint, Carole Gallery: Helliwell, Andrew Gallery: Hodge, Derek Gallery: Kay, Chris Gallery: Luther, Mark Gallery: Plowman, Ralph Gallery: Pollard, Ashley Gallery: Sapper Gallery: Scott, David Gallery: Slade, Matt Gallery: Stumpy Gallery: Vis Bellica
  • Scorecard 2022 Gallery: Bowler, Lloyd Gallery: Burt, Steve Gallery: Cooper, Nick Gallery: Douglas, Mervyn Gallery: Emmett, John Gallery: Flint, Carole Gallery: Goodrick, Pete Gallery: Haines, John Gallery: Helliwell, Andrew Gallery: Hodge, Derek Gallery: Kay, Chris Gallery: Luther, Mark Gallery: Plowman, Ralph Gallery: Pollard, Ashley Gallery: Sapper Gallery: Scott, David Gallery: Slade, Matt Gallery: Stumpy Gallery: Vis Bellica
  • Scorecard 2021 Gallery: Anzani, Joe Gallery: Bowler, Lloyd Gallery: Burt, Steve Gallery: Cooper, Nick Gallery: Douglas, Mervyn Gallery: Duffell, Andy Gallery: Emmett, John Gallery: Flint, Carole Gallery: Haines, John Gallery: Helliwell, Andrew Gallery: Hiett, Travis Gallery: Hodge, Derek Gallery: Kay, Chris Gallery: Luther, Mark Gallery: McGinn, Joe Gallery: Melville, Doug Gallery: Plowman, Ralph Gallery: Pollard, Ashley Gallery: Ralls, Jason Gallery: Sapper Gallery: Scott, David Gallery: Slade, Matt Gallery: Stoesen, Chris Gallery: Stumpy Gallery: Vis Bellica
  • Scorecard 2020 Gallery: Bloggs, Fred Gallery: Bluemoose Ken Gallery: Bowler, Lloyd Gallery: Burt, Steve Gallery: Cornwell, Chris Gallery: Douglas, Mervyn Gallery: Duffell, Andy Gallery: Emmett, John Gallery: Flint, Carole Gallery: Haines, John Gallery: Helliwell, Andrew Gallery: Hiatt, Travis Gallery: Hodge, Derek Gallery: Hooge, Neil Gallery: Kay, Chris Gallery: Luther, Mark Gallery: McGinn, Joe Gallery: Melville, Doug Gallery: Plowman, Ralph Gallery: Pollard, Ashley Gallery: Ralls, Jason Gallery: Sapper Gallery: Scott, David Gallery: Slade, Matt Gallery: Stoesen, Chris Gallery: Stumpy Gallery: Vis Bellica
  • Scorecard 2019 Gallery: Bloggs, Fred Gallery: Blue Moose Ken Gallery: Bowen, Ed Gallery: Bowler, Lloyd Gallery: Burt, Steve Gallery: Clarke, Richard Gallery: Cornwell, Chris Gallery: Davenport, Jon Gallery: Douglas, Mervyn Gallery: Duffell, Andy Gallery: de Terre Neuve, John Gallery: Emmett, John Gallery: Fat Wally Gallery: Flint, Carole Gallery: Haines, John Gallery: Helliwell, Andrew Gallery: Hiett, Travis Gallery: Hodge, Derek Gallery: Hooge, Neil Gallery: Johnston, Owen Gallery: Kay, Chris Gallery: Luther, Mark Gallery: McGinn, Joe Gallery: Melville, Doug Gallery: Plowman, Ralph Gallery: Ralls, Jason Gallery: Sapper Gallery: Scott, David Gallery: Slade, Matt Gallery: Stoesen, Chris Gallery: Stumpy Gallery: Vis Bellica Gallery: Yuengling, Jon
  • Scorecard 2018 Gallery: Bloggs, Fred Gallery: Blue Moose Ken Gallery: Bowen, Ed Gallery: Bowler, Lloyd Gallery: Burt, Steve Gallery: Cornwell, Chris Gallery: Davenport, Jonathan Gallery: de Terre Neuve, John Gallery: Douglas, Mervyn Gallery: Duffell, Andy Gallery: Fat Wally Gallery: Flint, Carole Gallery: Freerange Egg Gallery: Haines, John Gallery: Helliwell, Andrew Gallery: Hiett, Travis Gallery: Hodge, Derek Gallery: Hooge, Neil Gallery: Johnston, Owen Gallery: Kay, Chris Gallery: Lampon, Steven Gallery: Luther, Mark Gallery: McGinn, Joe Gallery: Melville, Doug Gallery: Plowman, Ralph Gallery: Ralls, Jason Gallery: Sapper Gallery: Scott, David Gallery: Slade, Matt Gallery: Stoesen, Chris Gallery: Stumpy Gallery: Treadhead Gallery: Vis Bellica Gallery: Yuengling, Jon
  • Scorecard Gallery: Bond, Geoff Gallery: Bowen, Edward Gallery: Bowler, Lloyd Gallery: Burt, Steve Gallery: Cabey Cabey Gallery: Catchpole, Jim Gallery: Davenport, Jon Gallery: Davies, Keith Gallery: de Smedt, Kohn Gallery: de Terre Neuve, John Gallery: Douglas, Mervyn Gallery: Duffell, Andy Gallery: Fat Wally (Kev) Gallery: Flint, Carole Gallery: Freerange Egg Gallery: Gatzemeyer, Garrett Gallery: Gilbride, Chris Gallery: Haines, John Gallery: Helliwell, Andrew Gallery: Hodge, Derek Gallery: Hooge, Neil Gallery: Humm, Dave Gallery: Kay, Chris Gallery: Lampon, Steven Gallery: Luther, Mark Gallery: MacNeill, Craig Gallery: McCarthy, Andrew Gallery: The Mad Padre Gallery: McGinn, Joe Gallery: Melville, Doug Gallery: Naylor, Richard Gallery: Nissvik, Thomas Gallery: Old Pivot Gallery: Owen Gallery: Pollard, Ashley Gallery: Plowman, Ralph Gallery: Ralls, Jason Gallery: Sapper Gallery: Scott, David Gallery: Slade, Matt Gallery: Stoesen, Chris Gallery: Stumpy Gallery: Treadhead Gallery: Vis Bellica Gallery: Weathersby, Brian Gallery: WillieB Gallery: Yuengling, Jon
  • Scorecard 2016 Gallery: Baldwin, Paul Gallery: Blankenship, Paul Gallery: Bloggs, Fred Gallery: Bond, Geoff Gallery: Bowen, Ed Gallery: Bowler, Lloyd Gallery: Burt, Steve Gallery: Catchpole, Jim Gallery: Clarke, Richard Gallery: Davenport, Jon Gallery: Davies, Keith Gallery: de Smedt, Koen Gallery: Douglas, Mervyn Gallery: Duffell, Andy Gallery: Egg Gallery: Fitch, Doug Gallery: Flint, Carole Gallery: Gatzemeyer, Garrett Gallery: Gilbride, Chris Gallery: Helliwell, Andrew Gallery: Hodge, Derek Gallery: Hooge, Neil Gallery: Humm, Dave Gallery: I Am Bruce Gallery: Lowth, Kev (Fat Wally) Gallery: Luther, Mark Gallery: The Mad Padre Gallery: McCarthy, Andrew Gallery: Melville, Doug Gallery: Naylor, Richard Gallery: Nissvik, Thomas Gallery: Oracle Gallery: Owen Gallery: Plowman, Ralph Gallery: Pollard, Ashley Gallery: Ralls, Jason Gallery: Sapper Gallery: Slade, Matt Gallery: Stoesen, Chris Gallery: Stumpy Gallery: Treadhead Gallery: Vis Bellica Gallery: Willie B Gallery: Yuengling, Jon
  • Scorecard 2015 Gallery: AJH Gallery: Bairos, Vidal Gallery: Baldwin, Paul Gallery: Bax, Dick Gallery: Blankenship, Paul Gallery: Bloggs, Fred Gallery: Bond, Geoff Bond Gallery: Bowler, Hat Gallery: Burt, Steve Gallery: Corbett, Wulf Gallery: Danziger, Richard Gallery: Davies, Keith Gallery: de Smedt, Koen Gallery: de terre neuve, john Gallery: Douglas, Mervyn Gallery: Duffell, Andy Gallery: Egg, Freerange Gallery: Eggman Glass Gallery: Eriksson, Leif Gallery: Fat Wally Gallery: Flint, Carole Gallery: Gilbride, Chris Gallery: Hedglin, Nils Gallery: Helliwell, Andy Gallery: Hodge, Derek Gallery: Hooooge, Neil Gallery: Humm, Dave Gallery: I'm Bruce Gallery: Luther, Mark Gallery: The Mad Padre Gallery: Maerk Gallery: McCarthy, Andrew Gallery: Melville, Doug Gallery: Miller, Andrew Gallery: Miller, Steve Gallery: Milne, Neil Gallery: Mikkola, Topi Gallery: Mr Nouveau Gallery: Naylor, Richard Gallery: Nissvik, Thomas Gallery: Owen Gallery: Pedivere Gallery: Pingu Gallery: Pollard, Ashley Gallery: Plowman, Ralph Gallery: Ralls, Jason Gallery: Sapper Gallery: Skelton, Dom Gallery: Slade, Matt Gallery: Stapells, Tony Gallery: Stoesen, Chris Gallery: Strom, Joakim Gallery: Stumpy Gallery: Topyob Gallery: Treadhead Gallery: Vera, Benito Gallery: Vis Bellica Gallery: Willie B Gallery: Yuengling, Jon Gallery: Catchpole, Jim
  • Scorecard Gallery: Alexandros Gallery: Ambler, Craig Gallery: Armstrong, Keith Gallery: Bailey, Dave Gallery: Bairos, Vidal Gallery: Bax, Dick Gallery: Bloggs, Fred Gallery: Bond, Geoff Gallery: Burt, Steve Gallery: Carnegie, Ron Gallery: Carole Gallery: Catchpole, Jim Gallery: Clarke, Richard Gallery: Corbett, Wulf Gallery: Danziger, Richard Gallery: De Smedt, Koen Gallery: de Terre Neuve, John Gallery: Deeks, Jon Gallery: Douglas, Mervyn Gallery: Duffell, Andy Gallery: Egg, Free Range Gallery: Erikson, Leif Gallery: Fat Wally (Kev) Gallery: Fiene, Ben Gallery: Gilbride, Chris Gallery: Hodge, Derek Gallery: Humm, Dave Gallery: Llano, Manuel Gallery: Luther, Mark Gallery: Melville, Doug Gallery: Mikkola, Topi Gallery: Miller, Andrew Gallery: munsterfan8 Gallery: Murray, Jim Gallery: Nissvik, Thomas Gallery: Owen Gallery: The Mad Padre Gallery: PatG Gallery: Pingu Gallery: Plowman, Ralph Gallery: Pollard, Ashley Gallery: Ralls, Jason Gallery: Slade, Matt Gallery: Stoesen, Chris Gallery: Strom, Joakim Gallery: Stumpy Gallery: Thomas, John Gallery: Treadhead Gallery: Vera, Benito Gallery: Vis Bellica Gallery: Warrior in the Attic Gallery: Weir, Jim Gallery: Whitaker, Mike Gallery: WillieB Gallery: Yuengling, Jon
  • TooFatLardies
Vis Lardica
  • New & Updated/
  • TFL Painting Challenge 2025/
    • Introduction & Details
    • Scorecard 2025
    • Gallery: Burt, Steve
    • Gallery: Cooper, Nick
    • Gallery: Douglas, Mervyn
    • Gallery: Emmett, John
    • Gallery: Flint, Carole
    • Gallery: Helliwell, Andrew
    • Gallery: Luther, Mark
    • Gallery: Plowman, Ralph
    • Gallery: Sapper
    • Gallery: Stumpy
    • Gallery: Vis Bellica
  • I Ain't Been Shot, Mum! (WW2)/
    • Introduction to IABSM
    • Video: How To Play IABSM, Part One
    • Video: How to Play IABSM, Part Two
    • Video: How to Play IABSM, Part Three
    • After Action Reports (IABSM)
    • Army Galleries (IABSM)
    • Buy IABSM Scenario Packs
    • Buy IABSM Theatre Supplements
    • Figure Manufacturers (IABSM)
    • Figure Reviews (IABSM)
    • Game Aids (IABSM)
    • IABSM Facebook Group
  • Charlie Don't Surf! (Vietnam/Arab-Israeli/Moderns)/
    • Introduction to CDS
    • After Action Reports (CDS)
    • Army Galleries (CDS)
    • The Arab-Israeli Six Day War
    • The Arab-Israeli Yom Kippur War
    • After Action Reports (Arab-Israeli Wars)
    • Army Galleries (Arab-Israeli Wars)
    • After Action Reports (Moderns)
  • Quadrant 13 (Sci-Fi)/
    • Introduction to Q13
    • After Action Reports (Q13)
    • Army Galleries (Q13)
    • Army Lists for Q13
    • Buy Q13 and/or Five Planets
    • Figure Manufacturers (Q13)
    • Figure Reviews (Q13)
    • Points System Spreadsheets
  • Vis Imperica (19th Century)/
    • Introduction to 19th Century
    • Army Galleries (19th Century)
    • Army Lists
    • After Action Reports
    • Articles & Essays
    • Quick Guide to the Wars of the 19th Century
  • Vis Lucii (Pike & Shot)/
    • Introduction and AAR
    • FK&P: The Eastern Front
  • Vis Bellica (Ancients)/
    • Introduction to Vis Bellica
    • The Rules: Amendments
    • The Rules: Frequently Asked Questions
    • The Rules: Optional Rules
    • After Action Reports (Vis Bellica)
    • Army Lists
    • Articles about Vis Bellica
    • Scenarios for Vis Bellica
    • Other After Action Reports: WRG 6th
    • Other After Action Reports: TTS
  • Vis Magica (Fantasy)/
    • The Rules: Optional Rules
    • After Action Reports
  • TFL Painting Challenge 2024/
    • Scorecard 2024
    • Gallery: Burt, Steve
    • Gallery: Cooper, Nick
    • Gallery: Darkin, Des
    • Gallery: Davenport, Jonathan
    • Gallery: Douglas, Mervyn
    • Gallery: Emmett. John
    • Gallery: Flint, Carole
    • Gallery: Helliwell, Andrew
    • Gallery: Kay, Chris
    • Gallery: Luther, Mark
    • Gallery: Plowman, Ralph
    • Gallery: Sapper
    • Gallery: Scott, David
    • Gallery: Slade, Matt
    • Gallery: Stumpy
    • Gallery: Vis Bellica
  • TFL Painting Challenge 2023/
    • Scorecard 2023
    • Gallery: Bowler, Lloyd
    • Gallery: Burt, Steve
    • Gallery: Cooper, Nick
    • Gallery: Douglas, Mervyn
    • Gallery: Emmett, John
    • Gallery: Flint, Carole
    • Gallery: Helliwell, Andrew
    • Gallery: Hodge, Derek
    • Gallery: Kay, Chris
    • Gallery: Luther, Mark
    • Gallery: Plowman, Ralph
    • Gallery: Pollard, Ashley
    • Gallery: Sapper
    • Gallery: Scott, David
    • Gallery: Slade, Matt
    • Gallery: Stumpy
    • Gallery: Vis Bellica
  • TFL Painting Challenge 2022/
    • Scorecard 2022
    • Gallery: Bowler, Lloyd
    • Gallery: Burt, Steve
    • Gallery: Cooper, Nick
    • Gallery: Douglas, Mervyn
    • Gallery: Emmett, John
    • Gallery: Flint, Carole
    • Gallery: Goodrick, Pete
    • Gallery: Haines, John
    • Gallery: Helliwell, Andrew
    • Gallery: Hodge, Derek
    • Gallery: Kay, Chris
    • Gallery: Luther, Mark
    • Gallery: Plowman, Ralph
    • Gallery: Pollard, Ashley
    • Gallery: Sapper
    • Gallery: Scott, David
    • Gallery: Slade, Matt
    • Gallery: Stumpy
    • Gallery: Vis Bellica
  • TFL Painting Challenge 2021/
    • Scorecard 2021
    • Gallery: Anzani, Joe
    • Gallery: Bowler, Lloyd
    • Gallery: Burt, Steve
    • Gallery: Cooper, Nick
    • Gallery: Douglas, Mervyn
    • Gallery: Duffell, Andy
    • Gallery: Emmett, John
    • Gallery: Flint, Carole
    • Gallery: Haines, John
    • Gallery: Helliwell, Andrew
    • Gallery: Hiett, Travis
    • Gallery: Hodge, Derek
    • Gallery: Kay, Chris
    • Gallery: Luther, Mark
    • Gallery: McGinn, Joe
    • Gallery: Melville, Doug
    • Gallery: Plowman, Ralph
    • Gallery: Pollard, Ashley
    • Gallery: Ralls, Jason
    • Gallery: Sapper
    • Gallery: Scott, David
    • Gallery: Slade, Matt
    • Gallery: Stoesen, Chris
    • Gallery: Stumpy
    • Gallery: Vis Bellica
  • TFL Painting Challenge 2020/
    • Scorecard 2020
    • Gallery: Bloggs, Fred
    • Gallery: Bluemoose Ken
    • Gallery: Bowler, Lloyd
    • Gallery: Burt, Steve
    • Gallery: Cornwell, Chris
    • Gallery: Douglas, Mervyn
    • Gallery: Duffell, Andy
    • Gallery: Emmett, John
    • Gallery: Flint, Carole
    • Gallery: Haines, John
    • Gallery: Helliwell, Andrew
    • Gallery: Hiatt, Travis
    • Gallery: Hodge, Derek
    • Gallery: Hooge, Neil
    • Gallery: Kay, Chris
    • Gallery: Luther, Mark
    • Gallery: McGinn, Joe
    • Gallery: Melville, Doug
    • Gallery: Plowman, Ralph
    • Gallery: Pollard, Ashley
    • Gallery: Ralls, Jason
    • Gallery: Sapper
    • Gallery: Scott, David
    • Gallery: Slade, Matt
    • Gallery: Stoesen, Chris
    • Gallery: Stumpy
    • Gallery: Vis Bellica
  • TFL Painting Challenge 2019/
    • Scorecard 2019
    • Gallery: Bloggs, Fred
    • Gallery: Blue Moose Ken
    • Gallery: Bowen, Ed
    • Gallery: Bowler, Lloyd
    • Gallery: Burt, Steve
    • Gallery: Clarke, Richard
    • Gallery: Cornwell, Chris
    • Gallery: Davenport, Jon
    • Gallery: Douglas, Mervyn
    • Gallery: Duffell, Andy
    • Gallery: de Terre Neuve, John
    • Gallery: Emmett, John
    • Gallery: Fat Wally
    • Gallery: Flint, Carole
    • Gallery: Haines, John
    • Gallery: Helliwell, Andrew
    • Gallery: Hiett, Travis
    • Gallery: Hodge, Derek
    • Gallery: Hooge, Neil
    • Gallery: Johnston, Owen
    • Gallery: Kay, Chris
    • Gallery: Luther, Mark
    • Gallery: McGinn, Joe
    • Gallery: Melville, Doug
    • Gallery: Plowman, Ralph
    • Gallery: Ralls, Jason
    • Gallery: Sapper
    • Gallery: Scott, David
    • Gallery: Slade, Matt
    • Gallery: Stoesen, Chris
    • Gallery: Stumpy
    • Gallery: Vis Bellica
    • Gallery: Yuengling, Jon
  • TFL Painting Challenge 2018/
    • Scorecard 2018
    • Gallery: Bloggs, Fred
    • Gallery: Blue Moose Ken
    • Gallery: Bowen, Ed
    • Gallery: Bowler, Lloyd
    • Gallery: Burt, Steve
    • Gallery: Cornwell, Chris
    • Gallery: Davenport, Jonathan
    • Gallery: de Terre Neuve, John
    • Gallery: Douglas, Mervyn
    • Gallery: Duffell, Andy
    • Gallery: Fat Wally
    • Gallery: Flint, Carole
    • Gallery: Freerange Egg
    • Gallery: Haines, John
    • Gallery: Helliwell, Andrew
    • Gallery: Hiett, Travis
    • Gallery: Hodge, Derek
    • Gallery: Hooge, Neil
    • Gallery: Johnston, Owen
    • Gallery: Kay, Chris
    • Gallery: Lampon, Steven
    • Gallery: Luther, Mark
    • Gallery: McGinn, Joe
    • Gallery: Melville, Doug
    • Gallery: Plowman, Ralph
    • Gallery: Ralls, Jason
    • Gallery: Sapper
    • Gallery: Scott, David
    • Gallery: Slade, Matt
    • Gallery: Stoesen, Chris
    • Gallery: Stumpy
    • Gallery: Treadhead
    • Gallery: Vis Bellica
    • Gallery: Yuengling, Jon
  • TFL Painting Challenge 2017/
    • Scorecard
    • Gallery: Bond, Geoff
    • Gallery: Bowen, Edward
    • Gallery: Bowler, Lloyd
    • Gallery: Burt, Steve
    • Gallery: Cabey Cabey
    • Gallery: Catchpole, Jim
    • Gallery: Davenport, Jon
    • Gallery: Davies, Keith
    • Gallery: de Smedt, Kohn
    • Gallery: de Terre Neuve, John
    • Gallery: Douglas, Mervyn
    • Gallery: Duffell, Andy
    • Gallery: Fat Wally (Kev)
    • Gallery: Flint, Carole
    • Gallery: Freerange Egg
    • Gallery: Gatzemeyer, Garrett
    • Gallery: Gilbride, Chris
    • Gallery: Haines, John
    • Gallery: Helliwell, Andrew
    • Gallery: Hodge, Derek
    • Gallery: Hooge, Neil
    • Gallery: Humm, Dave
    • Gallery: Kay, Chris
    • Gallery: Lampon, Steven
    • Gallery: Luther, Mark
    • Gallery: MacNeill, Craig
    • Gallery: McCarthy, Andrew
    • Gallery: The Mad Padre
    • Gallery: McGinn, Joe
    • Gallery: Melville, Doug
    • Gallery: Naylor, Richard
    • Gallery: Nissvik, Thomas
    • Gallery: Old Pivot
    • Gallery: Owen
    • Gallery: Pollard, Ashley
    • Gallery: Plowman, Ralph
    • Gallery: Ralls, Jason
    • Gallery: Sapper
    • Gallery: Scott, David
    • Gallery: Slade, Matt
    • Gallery: Stoesen, Chris
    • Gallery: Stumpy
    • Gallery: Treadhead
    • Gallery: Vis Bellica
    • Gallery: Weathersby, Brian
    • Gallery: WillieB
    • Gallery: Yuengling, Jon
  • TFL Painting Challenge 2016/
    • Scorecard 2016
    • Gallery: Baldwin, Paul
    • Gallery: Blankenship, Paul
    • Gallery: Bloggs, Fred
    • Gallery: Bond, Geoff
    • Gallery: Bowen, Ed
    • Gallery: Bowler, Lloyd
    • Gallery: Burt, Steve
    • Gallery: Catchpole, Jim
    • Gallery: Clarke, Richard
    • Gallery: Davenport, Jon
    • Gallery: Davies, Keith
    • Gallery: de Smedt, Koen
    • Gallery: Douglas, Mervyn
    • Gallery: Duffell, Andy
    • Gallery: Egg
    • Gallery: Fitch, Doug
    • Gallery: Flint, Carole
    • Gallery: Gatzemeyer, Garrett
    • Gallery: Gilbride, Chris
    • Gallery: Helliwell, Andrew
    • Gallery: Hodge, Derek
    • Gallery: Hooge, Neil
    • Gallery: Humm, Dave
    • Gallery: I Am Bruce
    • Gallery: Lowth, Kev (Fat Wally)
    • Gallery: Luther, Mark
    • Gallery: The Mad Padre
    • Gallery: McCarthy, Andrew
    • Gallery: Melville, Doug
    • Gallery: Naylor, Richard
    • Gallery: Nissvik, Thomas
    • Gallery: Oracle
    • Gallery: Owen
    • Gallery: Plowman, Ralph
    • Gallery: Pollard, Ashley
    • Gallery: Ralls, Jason
    • Gallery: Sapper
    • Gallery: Slade, Matt
    • Gallery: Stoesen, Chris
    • Gallery: Stumpy
    • Gallery: Treadhead
    • Gallery: Vis Bellica
    • Gallery: Willie B
    • Gallery: Yuengling, Jon
  • TFL Painting Challenge 2015/
    • Scorecard 2015
    • Gallery: AJH
    • Gallery: Bairos, Vidal
    • Gallery: Baldwin, Paul
    • Gallery: Bax, Dick
    • Gallery: Blankenship, Paul
    • Gallery: Bloggs, Fred
    • Gallery: Bond, Geoff Bond
    • Gallery: Bowler, Hat
    • Gallery: Burt, Steve
    • Gallery: Corbett, Wulf
    • Gallery: Danziger, Richard
    • Gallery: Davies, Keith
    • Gallery: de Smedt, Koen
    • Gallery: de terre neuve, john
    • Gallery: Douglas, Mervyn
    • Gallery: Duffell, Andy
    • Gallery: Egg, Freerange
    • Gallery: Eggman Glass
    • Gallery: Eriksson, Leif
    • Gallery: Fat Wally
    • Gallery: Flint, Carole
    • Gallery: Gilbride, Chris
    • Gallery: Hedglin, Nils
    • Gallery: Helliwell, Andy
    • Gallery: Hodge, Derek
    • Gallery: Hooooge, Neil
    • Gallery: Humm, Dave
    • Gallery: I'm Bruce
    • Gallery: Luther, Mark
    • Gallery: The Mad Padre
    • Gallery: Maerk
    • Gallery: McCarthy, Andrew
    • Gallery: Melville, Doug
    • Gallery: Miller, Andrew
    • Gallery: Miller, Steve
    • Gallery: Milne, Neil
    • Gallery: Mikkola, Topi
    • Gallery: Mr Nouveau
    • Gallery: Naylor, Richard
    • Gallery: Nissvik, Thomas
    • Gallery: Owen
    • Gallery: Pedivere
    • Gallery: Pingu
    • Gallery: Pollard, Ashley
    • Gallery: Plowman, Ralph
    • Gallery: Ralls, Jason
    • Gallery: Sapper
    • Gallery: Skelton, Dom
    • Gallery: Slade, Matt
    • Gallery: Stapells, Tony
    • Gallery: Stoesen, Chris
    • Gallery: Strom, Joakim
    • Gallery: Stumpy
    • Gallery: Topyob
    • Gallery: Treadhead
    • Gallery: Vera, Benito
    • Gallery: Vis Bellica
    • Gallery: Willie B
    • Gallery: Yuengling, Jon
    • Gallery: Catchpole, Jim
  • TFL Painting Challenge 2014/
    • Scorecard
    • Gallery: Alexandros
    • Gallery: Ambler, Craig
    • Gallery: Armstrong, Keith
    • Gallery: Bailey, Dave
    • Gallery: Bairos, Vidal
    • Gallery: Bax, Dick
    • Gallery: Bloggs, Fred
    • Gallery: Bond, Geoff
    • Gallery: Burt, Steve
    • Gallery: Carnegie, Ron
    • Gallery: Carole
    • Gallery: Catchpole, Jim
    • Gallery: Clarke, Richard
    • Gallery: Corbett, Wulf
    • Gallery: Danziger, Richard
    • Gallery: De Smedt, Koen
    • Gallery: de Terre Neuve, John
    • Gallery: Deeks, Jon
    • Gallery: Douglas, Mervyn
    • Gallery: Duffell, Andy
    • Gallery: Egg, Free Range
    • Gallery: Erikson, Leif
    • Gallery: Fat Wally (Kev)
    • Gallery: Fiene, Ben
    • Gallery: Gilbride, Chris
    • Gallery: Hodge, Derek
    • Gallery: Humm, Dave
    • Gallery: Llano, Manuel
    • Gallery: Luther, Mark
    • Gallery: Melville, Doug
    • Gallery: Mikkola, Topi
    • Gallery: Miller, Andrew
    • Gallery: munsterfan8
    • Gallery: Murray, Jim
    • Gallery: Nissvik, Thomas
    • Gallery: Owen
    • Gallery: The Mad Padre
    • Gallery: PatG
    • Gallery: Pingu
    • Gallery: Plowman, Ralph
    • Gallery: Pollard, Ashley
    • Gallery: Ralls, Jason
    • Gallery: Slade, Matt
    • Gallery: Stoesen, Chris
    • Gallery: Strom, Joakim
    • Gallery: Stumpy
    • Gallery: Thomas, John
    • Gallery: Treadhead
    • Gallery: Vera, Benito
    • Gallery: Vis Bellica
    • Gallery: Warrior in the Attic
    • Gallery: Weir, Jim
    • Gallery: Whitaker, Mike
    • Gallery: WillieB
    • Gallery: Yuengling, Jon
  • TooFatLardies/
  Road from Beringen, Belgium, Sept 44   This game is based on the engagement between The Welsh Guards and the recently arrived StuG IIIs of Schwere Heers Panzerjaeger-Abeteilung3/559 between Beringen and Helchteren, Belgium, Sept 7 1944.
Vis Lardica

AAR 1944 Belgium: The Koerselsesteenweg by Mark Luther

A battle report or After Action Report (AAR) for I Ain't Been Shot, Mum (IABSM), the company-sized wargaming rules for WW2 from the TooFatLardies. A one-off game or scenario set in Belgium in the year 1944.

Vis Lardica
  • New & Updated/
  • TFL Painting Challenge 2025/
    • Introduction & Details
    • Scorecard 2025
    • Gallery: Burt, Steve
    • Gallery: Cooper, Nick
    • Gallery: Douglas, Mervyn
    • Gallery: Emmett, John
    • Gallery: Flint, Carole
    • Gallery: Helliwell, Andrew
    • Gallery: Luther, Mark
    • Gallery: Plowman, Ralph
    • Gallery: Sapper
    • Gallery: Stumpy
    • Gallery: Vis Bellica
  • I Ain't Been Shot, Mum! (WW2)/
    • Introduction to IABSM
    • Video: How To Play IABSM, Part One
    • Video: How to Play IABSM, Part Two
    • Video: How to Play IABSM, Part Three
    • After Action Reports (IABSM)
    • Army Galleries (IABSM)
    • Buy IABSM Scenario Packs
    • Buy IABSM Theatre Supplements
    • Figure Manufacturers (IABSM)
    • Figure Reviews (IABSM)
    • Game Aids (IABSM)
    • IABSM Facebook Group
  • Charlie Don't Surf! (Vietnam/Arab-Israeli/Moderns)/
    • Introduction to CDS
    • After Action Reports (CDS)
    • Army Galleries (CDS)
    • The Arab-Israeli Six Day War
    • The Arab-Israeli Yom Kippur War
    • After Action Reports (Arab-Israeli Wars)
    • Army Galleries (Arab-Israeli Wars)
    • After Action Reports (Moderns)
  • Quadrant 13 (Sci-Fi)/
    • Introduction to Q13
    • After Action Reports (Q13)
    • Army Galleries (Q13)
    • Army Lists for Q13
    • Buy Q13 and/or Five Planets
    • Figure Manufacturers (Q13)
    • Figure Reviews (Q13)
    • Points System Spreadsheets
  • Vis Imperica (19th Century)/
    • Introduction to 19th Century
    • Army Galleries (19th Century)
    • Army Lists
    • After Action Reports
    • Articles & Essays
    • Quick Guide to the Wars of the 19th Century
  • Vis Lucii (Pike & Shot)/
    • Introduction and AAR
    • FK&P: The Eastern Front
  • Vis Bellica (Ancients)/
    • Introduction to Vis Bellica
    • The Rules: Amendments
    • The Rules: Frequently Asked Questions
    • The Rules: Optional Rules
    • After Action Reports (Vis Bellica)
    • Army Lists
    • Articles about Vis Bellica
    • Scenarios for Vis Bellica
    • Other After Action Reports: WRG 6th
    • Other After Action Reports: TTS
  • Vis Magica (Fantasy)/
    • The Rules: Optional Rules
    • After Action Reports
  • TFL Painting Challenge 2024/
    • Scorecard 2024
    • Gallery: Burt, Steve
    • Gallery: Cooper, Nick
    • Gallery: Darkin, Des
    • Gallery: Davenport, Jonathan
    • Gallery: Douglas, Mervyn
    • Gallery: Emmett. John
    • Gallery: Flint, Carole
    • Gallery: Helliwell, Andrew
    • Gallery: Kay, Chris
    • Gallery: Luther, Mark
    • Gallery: Plowman, Ralph
    • Gallery: Sapper
    • Gallery: Scott, David
    • Gallery: Slade, Matt
    • Gallery: Stumpy
    • Gallery: Vis Bellica
  • TFL Painting Challenge 2023/
    • Scorecard 2023
    • Gallery: Bowler, Lloyd
    • Gallery: Burt, Steve
    • Gallery: Cooper, Nick
    • Gallery: Douglas, Mervyn
    • Gallery: Emmett, John
    • Gallery: Flint, Carole
    • Gallery: Helliwell, Andrew
    • Gallery: Hodge, Derek
    • Gallery: Kay, Chris
    • Gallery: Luther, Mark
    • Gallery: Plowman, Ralph
    • Gallery: Pollard, Ashley
    • Gallery: Sapper
    • Gallery: Scott, David
    • Gallery: Slade, Matt
    • Gallery: Stumpy
    • Gallery: Vis Bellica
  • TFL Painting Challenge 2022/
    • Scorecard 2022
    • Gallery: Bowler, Lloyd
    • Gallery: Burt, Steve
    • Gallery: Cooper, Nick
    • Gallery: Douglas, Mervyn
    • Gallery: Emmett, John
    • Gallery: Flint, Carole
    • Gallery: Goodrick, Pete
    • Gallery: Haines, John
    • Gallery: Helliwell, Andrew
    • Gallery: Hodge, Derek
    • Gallery: Kay, Chris
    • Gallery: Luther, Mark
    • Gallery: Plowman, Ralph
    • Gallery: Pollard, Ashley
    • Gallery: Sapper
    • Gallery: Scott, David
    • Gallery: Slade, Matt
    • Gallery: Stumpy
    • Gallery: Vis Bellica
  • TFL Painting Challenge 2021/
    • Scorecard 2021
    • Gallery: Anzani, Joe
    • Gallery: Bowler, Lloyd
    • Gallery: Burt, Steve
    • Gallery: Cooper, Nick
    • Gallery: Douglas, Mervyn
    • Gallery: Duffell, Andy
    • Gallery: Emmett, John
    • Gallery: Flint, Carole
    • Gallery: Haines, John
    • Gallery: Helliwell, Andrew
    • Gallery: Hiett, Travis
    • Gallery: Hodge, Derek
    • Gallery: Kay, Chris
    • Gallery: Luther, Mark
    • Gallery: McGinn, Joe
    • Gallery: Melville, Doug
    • Gallery: Plowman, Ralph
    • Gallery: Pollard, Ashley
    • Gallery: Ralls, Jason
    • Gallery: Sapper
    • Gallery: Scott, David
    • Gallery: Slade, Matt
    • Gallery: Stoesen, Chris
    • Gallery: Stumpy
    • Gallery: Vis Bellica
  • TFL Painting Challenge 2020/
    • Scorecard 2020
    • Gallery: Bloggs, Fred
    • Gallery: Bluemoose Ken
    • Gallery: Bowler, Lloyd
    • Gallery: Burt, Steve
    • Gallery: Cornwell, Chris
    • Gallery: Douglas, Mervyn
    • Gallery: Duffell, Andy
    • Gallery: Emmett, John
    • Gallery: Flint, Carole
    • Gallery: Haines, John
    • Gallery: Helliwell, Andrew
    • Gallery: Hiatt, Travis
    • Gallery: Hodge, Derek
    • Gallery: Hooge, Neil
    • Gallery: Kay, Chris
    • Gallery: Luther, Mark
    • Gallery: McGinn, Joe
    • Gallery: Melville, Doug
    • Gallery: Plowman, Ralph
    • Gallery: Pollard, Ashley
    • Gallery: Ralls, Jason
    • Gallery: Sapper
    • Gallery: Scott, David
    • Gallery: Slade, Matt
    • Gallery: Stoesen, Chris
    • Gallery: Stumpy
    • Gallery: Vis Bellica
  • TFL Painting Challenge 2019/
    • Scorecard 2019
    • Gallery: Bloggs, Fred
    • Gallery: Blue Moose Ken
    • Gallery: Bowen, Ed
    • Gallery: Bowler, Lloyd
    • Gallery: Burt, Steve
    • Gallery: Clarke, Richard
    • Gallery: Cornwell, Chris
    • Gallery: Davenport, Jon
    • Gallery: Douglas, Mervyn
    • Gallery: Duffell, Andy
    • Gallery: de Terre Neuve, John
    • Gallery: Emmett, John
    • Gallery: Fat Wally
    • Gallery: Flint, Carole
    • Gallery: Haines, John
    • Gallery: Helliwell, Andrew
    • Gallery: Hiett, Travis
    • Gallery: Hodge, Derek
    • Gallery: Hooge, Neil
    • Gallery: Johnston, Owen
    • Gallery: Kay, Chris
    • Gallery: Luther, Mark
    • Gallery: McGinn, Joe
    • Gallery: Melville, Doug
    • Gallery: Plowman, Ralph
    • Gallery: Ralls, Jason
    • Gallery: Sapper
    • Gallery: Scott, David
    • Gallery: Slade, Matt
    • Gallery: Stoesen, Chris
    • Gallery: Stumpy
    • Gallery: Vis Bellica
    • Gallery: Yuengling, Jon
  • TFL Painting Challenge 2018/
    • Scorecard 2018
    • Gallery: Bloggs, Fred
    • Gallery: Blue Moose Ken
    • Gallery: Bowen, Ed
    • Gallery: Bowler, Lloyd
    • Gallery: Burt, Steve
    • Gallery: Cornwell, Chris
    • Gallery: Davenport, Jonathan
    • Gallery: de Terre Neuve, John
    • Gallery: Douglas, Mervyn
    • Gallery: Duffell, Andy
    • Gallery: Fat Wally
    • Gallery: Flint, Carole
    • Gallery: Freerange Egg
    • Gallery: Haines, John
    • Gallery: Helliwell, Andrew
    • Gallery: Hiett, Travis
    • Gallery: Hodge, Derek
    • Gallery: Hooge, Neil
    • Gallery: Johnston, Owen
    • Gallery: Kay, Chris
    • Gallery: Lampon, Steven
    • Gallery: Luther, Mark
    • Gallery: McGinn, Joe
    • Gallery: Melville, Doug
    • Gallery: Plowman, Ralph
    • Gallery: Ralls, Jason
    • Gallery: Sapper
    • Gallery: Scott, David
    • Gallery: Slade, Matt
    • Gallery: Stoesen, Chris
    • Gallery: Stumpy
    • Gallery: Treadhead
    • Gallery: Vis Bellica
    • Gallery: Yuengling, Jon
  • TFL Painting Challenge 2017/
    • Scorecard
    • Gallery: Bond, Geoff
    • Gallery: Bowen, Edward
    • Gallery: Bowler, Lloyd
    • Gallery: Burt, Steve
    • Gallery: Cabey Cabey
    • Gallery: Catchpole, Jim
    • Gallery: Davenport, Jon
    • Gallery: Davies, Keith
    • Gallery: de Smedt, Kohn
    • Gallery: de Terre Neuve, John
    • Gallery: Douglas, Mervyn
    • Gallery: Duffell, Andy
    • Gallery: Fat Wally (Kev)
    • Gallery: Flint, Carole
    • Gallery: Freerange Egg
    • Gallery: Gatzemeyer, Garrett
    • Gallery: Gilbride, Chris
    • Gallery: Haines, John
    • Gallery: Helliwell, Andrew
    • Gallery: Hodge, Derek
    • Gallery: Hooge, Neil
    • Gallery: Humm, Dave
    • Gallery: Kay, Chris
    • Gallery: Lampon, Steven
    • Gallery: Luther, Mark
    • Gallery: MacNeill, Craig
    • Gallery: McCarthy, Andrew
    • Gallery: The Mad Padre
    • Gallery: McGinn, Joe
    • Gallery: Melville, Doug
    • Gallery: Naylor, Richard
    • Gallery: Nissvik, Thomas
    • Gallery: Old Pivot
    • Gallery: Owen
    • Gallery: Pollard, Ashley
    • Gallery: Plowman, Ralph
    • Gallery: Ralls, Jason
    • Gallery: Sapper
    • Gallery: Scott, David
    • Gallery: Slade, Matt
    • Gallery: Stoesen, Chris
    • Gallery: Stumpy
    • Gallery: Treadhead
    • Gallery: Vis Bellica
    • Gallery: Weathersby, Brian
    • Gallery: WillieB
    • Gallery: Yuengling, Jon
  • TFL Painting Challenge 2016/
    • Scorecard 2016
    • Gallery: Baldwin, Paul
    • Gallery: Blankenship, Paul
    • Gallery: Bloggs, Fred
    • Gallery: Bond, Geoff
    • Gallery: Bowen, Ed
    • Gallery: Bowler, Lloyd
    • Gallery: Burt, Steve
    • Gallery: Catchpole, Jim
    • Gallery: Clarke, Richard
    • Gallery: Davenport, Jon
    • Gallery: Davies, Keith
    • Gallery: de Smedt, Koen
    • Gallery: Douglas, Mervyn
    • Gallery: Duffell, Andy
    • Gallery: Egg
    • Gallery: Fitch, Doug
    • Gallery: Flint, Carole
    • Gallery: Gatzemeyer, Garrett
    • Gallery: Gilbride, Chris
    • Gallery: Helliwell, Andrew
    • Gallery: Hodge, Derek
    • Gallery: Hooge, Neil
    • Gallery: Humm, Dave
    • Gallery: I Am Bruce
    • Gallery: Lowth, Kev (Fat Wally)
    • Gallery: Luther, Mark
    • Gallery: The Mad Padre
    • Gallery: McCarthy, Andrew
    • Gallery: Melville, Doug
    • Gallery: Naylor, Richard
    • Gallery: Nissvik, Thomas
    • Gallery: Oracle
    • Gallery: Owen
    • Gallery: Plowman, Ralph
    • Gallery: Pollard, Ashley
    • Gallery: Ralls, Jason
    • Gallery: Sapper
    • Gallery: Slade, Matt
    • Gallery: Stoesen, Chris
    • Gallery: Stumpy
    • Gallery: Treadhead
    • Gallery: Vis Bellica
    • Gallery: Willie B
    • Gallery: Yuengling, Jon
  • TFL Painting Challenge 2015/
    • Scorecard 2015
    • Gallery: AJH
    • Gallery: Bairos, Vidal
    • Gallery: Baldwin, Paul
    • Gallery: Bax, Dick
    • Gallery: Blankenship, Paul
    • Gallery: Bloggs, Fred
    • Gallery: Bond, Geoff Bond
    • Gallery: Bowler, Hat
    • Gallery: Burt, Steve
    • Gallery: Corbett, Wulf
    • Gallery: Danziger, Richard
    • Gallery: Davies, Keith
    • Gallery: de Smedt, Koen
    • Gallery: de terre neuve, john
    • Gallery: Douglas, Mervyn
    • Gallery: Duffell, Andy
    • Gallery: Egg, Freerange
    • Gallery: Eggman Glass
    • Gallery: Eriksson, Leif
    • Gallery: Fat Wally
    • Gallery: Flint, Carole
    • Gallery: Gilbride, Chris
    • Gallery: Hedglin, Nils
    • Gallery: Helliwell, Andy
    • Gallery: Hodge, Derek
    • Gallery: Hooooge, Neil
    • Gallery: Humm, Dave
    • Gallery: I'm Bruce
    • Gallery: Luther, Mark
    • Gallery: The Mad Padre
    • Gallery: Maerk
    • Gallery: McCarthy, Andrew
    • Gallery: Melville, Doug
    • Gallery: Miller, Andrew
    • Gallery: Miller, Steve
    • Gallery: Milne, Neil
    • Gallery: Mikkola, Topi
    • Gallery: Mr Nouveau
    • Gallery: Naylor, Richard
    • Gallery: Nissvik, Thomas
    • Gallery: Owen
    • Gallery: Pedivere
    • Gallery: Pingu
    • Gallery: Pollard, Ashley
    • Gallery: Plowman, Ralph
    • Gallery: Ralls, Jason
    • Gallery: Sapper
    • Gallery: Skelton, Dom
    • Gallery: Slade, Matt
    • Gallery: Stapells, Tony
    • Gallery: Stoesen, Chris
    • Gallery: Strom, Joakim
    • Gallery: Stumpy
    • Gallery: Topyob
    • Gallery: Treadhead
    • Gallery: Vera, Benito
    • Gallery: Vis Bellica
    • Gallery: Willie B
    • Gallery: Yuengling, Jon
    • Gallery: Catchpole, Jim
  • TFL Painting Challenge 2014/
    • Scorecard
    • Gallery: Alexandros
    • Gallery: Ambler, Craig
    • Gallery: Armstrong, Keith
    • Gallery: Bailey, Dave
    • Gallery: Bairos, Vidal
    • Gallery: Bax, Dick
    • Gallery: Bloggs, Fred
    • Gallery: Bond, Geoff
    • Gallery: Burt, Steve
    • Gallery: Carnegie, Ron
    • Gallery: Carole
    • Gallery: Catchpole, Jim
    • Gallery: Clarke, Richard
    • Gallery: Corbett, Wulf
    • Gallery: Danziger, Richard
    • Gallery: De Smedt, Koen
    • Gallery: de Terre Neuve, John
    • Gallery: Deeks, Jon
    • Gallery: Douglas, Mervyn
    • Gallery: Duffell, Andy
    • Gallery: Egg, Free Range
    • Gallery: Erikson, Leif
    • Gallery: Fat Wally (Kev)
    • Gallery: Fiene, Ben
    • Gallery: Gilbride, Chris
    • Gallery: Hodge, Derek
    • Gallery: Humm, Dave
    • Gallery: Llano, Manuel
    • Gallery: Luther, Mark
    • Gallery: Melville, Doug
    • Gallery: Mikkola, Topi
    • Gallery: Miller, Andrew
    • Gallery: munsterfan8
    • Gallery: Murray, Jim
    • Gallery: Nissvik, Thomas
    • Gallery: Owen
    • Gallery: The Mad Padre
    • Gallery: PatG
    • Gallery: Pingu
    • Gallery: Plowman, Ralph
    • Gallery: Pollard, Ashley
    • Gallery: Ralls, Jason
    • Gallery: Slade, Matt
    • Gallery: Stoesen, Chris
    • Gallery: Strom, Joakim
    • Gallery: Stumpy
    • Gallery: Thomas, John
    • Gallery: Treadhead
    • Gallery: Vera, Benito
    • Gallery: Vis Bellica
    • Gallery: Warrior in the Attic
    • Gallery: Weir, Jim
    • Gallery: Whitaker, Mike
    • Gallery: WillieB
    • Gallery: Yuengling, Jon
  • TooFatLardies/


An IABSM 6mm game played at Gigabites Cafe 2/2015

  Road from Beringen, Belgium, Sept 44   This game is based on the engagement between The Welsh Guards and the recently arrived StuG IIIs of Schwere Heers Panzerjaeger-Abeteilung3/559 between Beringen and Helchteren, Belgium, Sept 7 1944.
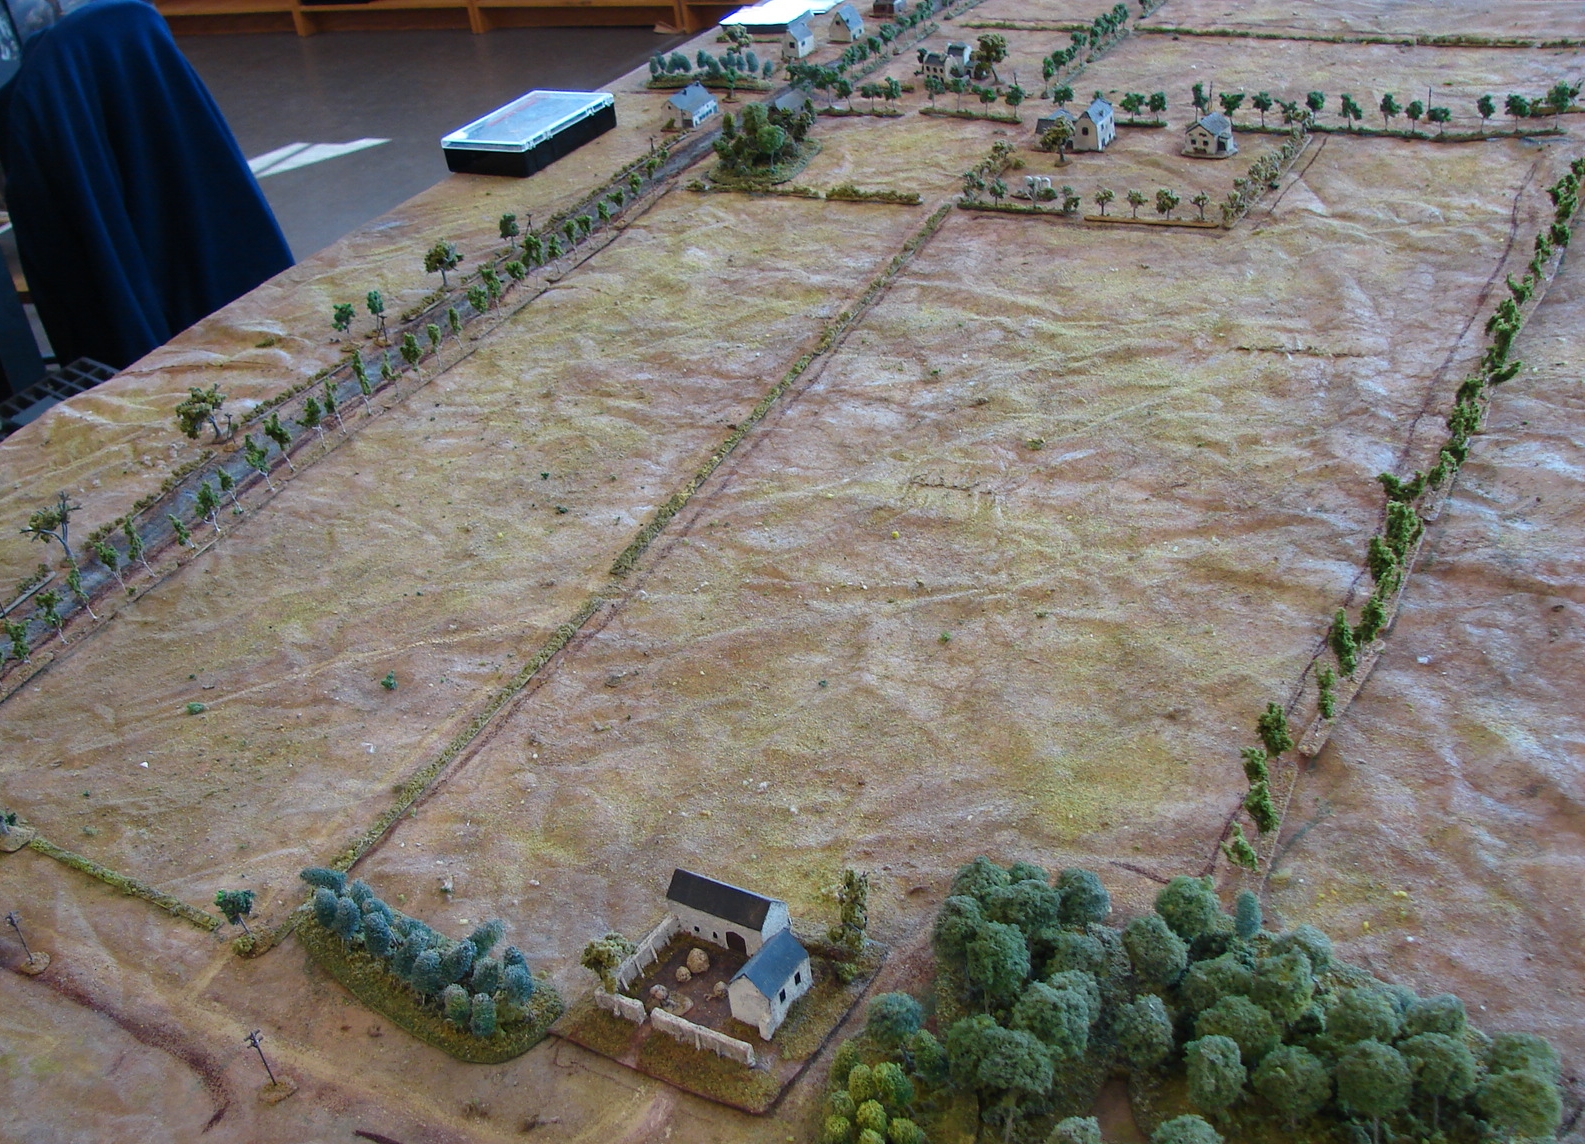
Road from Beringen, Belgium, Sept 44

This game is based on the engagement between The Welsh Guards and the recently arrived StuG IIIs of Schwere Heers Panzerjaeger-Abeteilung3/559 between Beringen and Helchteren, Belgium, Sept 7 1944.

  View from the eastern corner   Beringen is up the road off the top of the picture. This is the target of the counterattacking forces under Oberleutenant Franz Kopka (played today by John F). The idea was that these units were the left hook of the G

View from the eastern corner

Beringen is up the road off the top of the picture. This is the target of the counterattacking forces under Oberleutenant Franz Kopka (played today by John F). The idea was that these units were the left hook of the German attempt to eliminate the bridgehead over the Albert Canal in Beringen.

  Flat but boggy   Not a lot of thick terrain features. Treelines, low hedges, ditches and some farm buildings make up the scenery. But the ground is considered broken for movement and if two ones are rolled then the vehicle is temporarily stuck. On

Flat but boggy

Not a lot of thick terrain features. Treelines, low hedges, ditches and some farm buildings make up the scenery. But the ground is considered broken for movement and if two ones are rolled then the vehicle is temporarily stuck. On following turns the vehicle can attempt to unbog by rolling more sixes than ones, but if more ones are rolled then they are permanently stuck.

  Welsh entry area   The Commonwealth units had to come in on the road and exit off the opposite edge. Their mission was to break out of the bridgehead and capture the town of Helchteren. They had No 1 Squadron of The Welsh Guards with Cromwells (15

Welsh entry area

The Commonwealth units had to come in on the road and exit off the opposite edge. Their mission was to break out of the bridgehead and capture the town of Helchteren. They had No 1 Squadron of The Welsh Guards with Cromwells (15 tanks total) and No 3 Company of Welsh Guards infantry as tank riders. Rob T. had the PBIs and William T. the Cromwells in his first game of IABSM. No Fireflys or Challngers:  apparently they were in the shop at this time.

  William and Rob   Rob is at the entry point. Not a lot to discuss at this stage. They just need to move on down the highway.

William and Rob

Rob is at the entry point. Not a lot to discuss at this stage. They just need to move on down the highway.

  John puts out his Blinds   The units under John consisted of the Feld Ersatz Bttn (FEB) 347 under Hauptmann Sick and the StuGs of 3/559. The Stugs had already lost two vehicles due to bogging before they even got to the table, so now had six StuG I

John puts out his Blinds

The units under John consisted of the Feld Ersatz Bttn (FEB) 347 under Hauptmann Sick and the StuGs of 3/559. The Stugs had already lost two vehicles due to bogging before they even got to the table, so now had six StuG IIIs and two StuH42s. The grenadiers had three platoons of two 10-man sections for a weak company. And unfortunately NO panzerfausts. John's units came in on the NE long edge, 12" in from the corners.

  Zipping down the Koerselsesteenweg   William had a troop out front without any infantry followed by his HQ troop and then the rest with infantry hanging on. He managed to get three turns of movement before the German Blinds came up. I was afraid th

Zipping down the Koerselsesteenweg

William had a troop out front without any infantry followed by his HQ troop and then the rest with infantry hanging on. He managed to get three turns of movement before the German Blinds came up. I was afraid that the game might be over before John had a chance to move.

  Positions when the Guards were spotted   You can see some German blinds on the right edge moving in.

Positions when the Guards were spotted

You can see some German blinds on the right edge moving in.

  Enemy spotted   The troops with infantry stop and face the flank as soon as they see the Stugs appear.

Enemy spotted

The troops with infantry stop and face the flank as soon as they see the Stugs appear.

  Stugs spotted   John brought all his Stugs in on this spot. He wanted to avoid losing any with bogging if he moved across the fields and this track wrapped around the farm to link up with the main road. Before he could even open up on the Cromwells

Stugs spotted

John brought all his Stugs in on this spot. He wanted to avoid losing any with bogging if he moved across the fields and this track wrapped around the farm to link up with the main road. Before he could even open up on the Cromwells, his lead vehicle took a few hits forcing its crew to bail out. It was a zug leader so he transferred this man to the following vehicle.
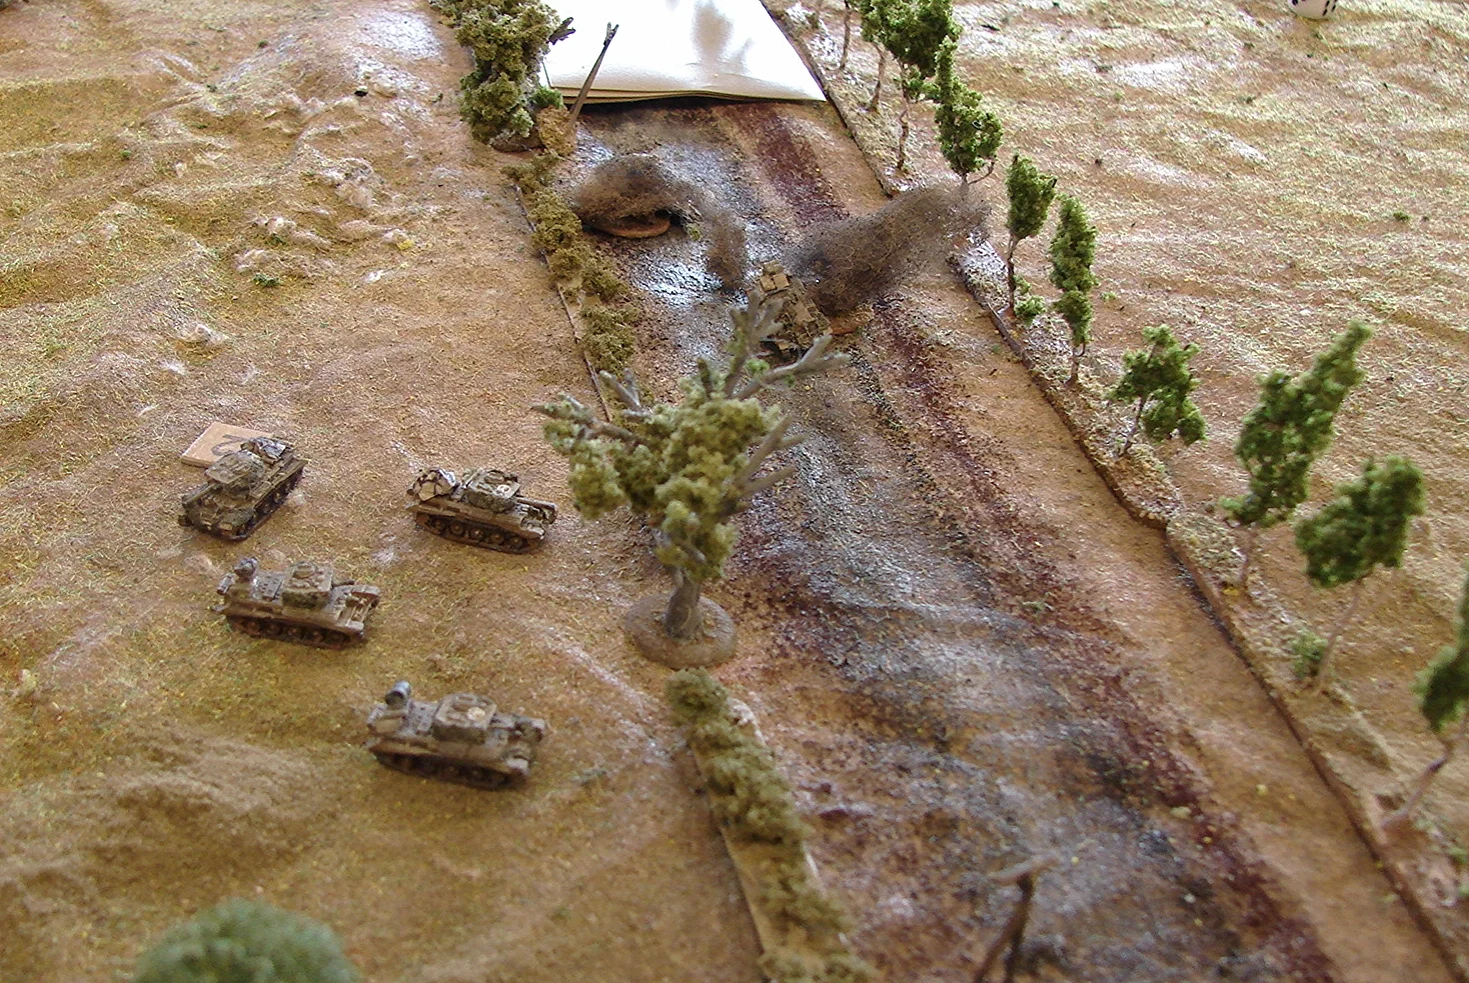
        Dead Cromwells   The lead troop of Cromwells loses two tanks to the initial Stug fire. The third one is out of action with a faulty turret/gun. The HQ troop swings around the victims to the right. None of these tanks had passengers.


Dead Cromwells

The lead troop of Cromwells loses two tanks to the initial Stug fire. The third one is out of action with a faulty turret/gun. The HQ troop swings around the victims to the right. None of these tanks had passengers.

  Stugs on line   John had one group of Stugs open up on the road column and put a hurtin' on the lead troop.

Stugs on line

John had one group of Stugs open up on the road column and put a hurtin' on the lead troop.

  Another Stug moves into position   Looks like a good spot to snipe at the road

Another Stug moves into position

Looks like a good spot to snipe at the road

  Infantry action on the other end of the table   One of the two-section grenadier platoons moves towards the road causing Rob to send back one of his platoons along with a troop of Cromwells.

Infantry action on the other end of the table

One of the two-section grenadier platoons moves towards the road causing Rob to send back one of his platoons along with a troop of Cromwells.

  Grenadiers on the right   John's first platoon hopes to get into some buildings close to the highway to cut off the Welsh.

Grenadiers on the right

John's first platoon hopes to get into some buildings close to the highway to cut off the Welsh.

  2nd Platoon, No 3 company, Welsh Guards   Rob's 2 Platoon heads back to counter the grenadiers and comes under fire.

2nd Platoon, No 3 company, Welsh Guards

Rob's 2 Platoon heads back to counter the grenadiers and comes under fire.

  Two more Cromwells hit   Miraculously, the sections on them only take one KIA. Plenty of shock though.

Two more Cromwells hit

Miraculously, the sections on them only take one KIA. Plenty of shock though.

  Looks like this road is pretty effectively blocked   Welsh Guards advance is getting scrambled at this stage

Looks like this road is pretty effectively blocked

Welsh Guards advance is getting scrambled at this stage

  Last troop heads back up the road   First they went back to help out the 2 Platoon, then they got Panzerfaust shy and backed away, and now going back up to engage the Stugs. I had mentioned to John that dropping a question about Panzerfaust ranges

Last troop heads back up the road

First they went back to help out the 2 Platoon, then they got Panzerfaust shy and backed away, and now going back up to engage the Stugs. I had mentioned to John that dropping a question about Panzerfaust ranges and strike numbers might convince the tankies that the grenadiers had some to play with. The bluff seemed to have worked

  Exchanging small arms between the houses   The far right grenadier section is taking a beating and loses its platoon CO. Fortunately the Company CO, Hauptman Sink, is with the other section in another building close by. John's other two platoons wi

Exchanging small arms between the houses

The far right grenadier section is taking a beating and loses its platoon CO. Fortunately the Company CO, Hauptman Sink, is with the other section in another building close by. John's other two platoons with the Stugs have a total of three Big Men between them so he felt safe to send the Company CO with this one platoon. The Welsh in the trees off to the right are also getting hammered.

  Looking for Stugs   This troop went back and forth on that section of road.

Looking for Stugs

This troop went back and forth on that section of road.

  Deployed along the road   The HQ troop with two CS tanks is on the road behind two regular Mk IVs now at the head of the column. The Squadron CO is in the trees off to the right. Cromwell with bad gun is behind the infantry along the hedge. The oth

Deployed along the road

The HQ troop with two CS tanks is on the road behind two regular Mk IVs now at the head of the column. The Squadron CO is in the trees off to the right. Cromwell with bad gun is behind the infantry along the hedge. The other platoon is in a ditch (dark brown line). You can see two Stugs at the top of the pic.

  Squadron CO is gone   Hit by one of the Stugs that is heading up the track from the farm.

Squadron CO is gone

Hit by one of the Stugs that is heading up the track from the farm.

  Here comes the Stugs   Grenadiers moving up in the ditch besides them.

Here comes the Stugs

Grenadiers moving up in the ditch besides them.

  One Stug KO'ed and the others behind smoke   Most of the game William has been rolling pretty lousy on his strike dice. But when his two CS tanks with their short 95mm howitzers were forced to take on armour, he managed to blow up one Stug and dama

One Stug KO'ed and the others behind smoke

Most of the game William has been rolling pretty lousy on his strike dice. But when his two CS tanks with their short 95mm howitzers were forced to take on armour, he managed to blow up one Stug and damage another with one shot each, then plop some smoke in front of them with subsequent rounds to make an escape. Well played!

  All hands facing to the left   Two platoons lining the roadside ditch and three troops of Cromwells face towards the Germans. Two more Cromwells are off picture at the bottom.

All hands facing to the left

Two platoons lining the roadside ditch and three troops of Cromwells face towards the Germans. Two more Cromwells are off picture at the bottom.

  This is where both advances end   The Welsh are not getting into Helchteren and the German counterattack on the Beringen bridgehead is well and truly stymied. The lead grenadier section is getting hosed in the ditch by as many Welsh riflemen as pos

This is where both advances end

The Welsh are not getting into Helchteren and the German counterattack on the Beringen bridgehead is well and truly stymied. The lead grenadier section is getting hosed in the ditch by as many Welsh riflemen as possible. The Stugs risk getting hit as soon as they come through the smoke. One Stug has temporarily gotten bogged going through the trees

  Standoff at the end   Total losses for the Welsh were four Cromwells KO'ed and two more damaged. They did lose their Squadron CO though. Infantry losses were almost all in the 2nd platoon with 11 KIAs. One other section had a kill. The Germans had

Standoff at the end

Total losses for the Welsh were four Cromwells KO'ed and two more damaged. They did lose their Squadron CO though. Infantry losses were almost all in the 2nd platoon with 11 KIAs. One other section had a kill. The Germans had two Stugs destroyed and two damaged. Grenadiers losses were only seven killed out of 60 men and one platoon leader. Historically, the Welsh were not halted and the Germans had at least one Stug taken out with a PIAT. Kopka ordered his Stugs to pull back to the RR Station. The Guards continued to move down the road brushing aside a couple of weak roadblocks. They were finally halted outside the town of Hechtel.

1 2 3 4 5 6 7 8 9 10 11 12 13 14 15 16 17 18 19 20 21 22 23 24 25 26 27 28
Previous Next
  Road from Beringen, Belgium, Sept 44   This game is based on the engagement between The Welsh Guards and the recently arrived StuG IIIs of Schwere Heers Panzerjaeger-Abeteilung3/559 between Beringen and Helchteren, Belgium, Sept 7 1944.
  View from the eastern corner   Beringen is up the road off the top of the picture. This is the target of the counterattacking forces under Oberleutenant Franz Kopka (played today by John F). The idea was that these units were the left hook of the G
  Flat but boggy   Not a lot of thick terrain features. Treelines, low hedges, ditches and some farm buildings make up the scenery. But the ground is considered broken for movement and if two ones are rolled then the vehicle is temporarily stuck. On
  Welsh entry area   The Commonwealth units had to come in on the road and exit off the opposite edge. Their mission was to break out of the bridgehead and capture the town of Helchteren. They had No 1 Squadron of The Welsh Guards with Cromwells (15
  William and Rob   Rob is at the entry point. Not a lot to discuss at this stage. They just need to move on down the highway.
  John puts out his Blinds   The units under John consisted of the Feld Ersatz Bttn (FEB) 347 under Hauptmann Sick and the StuGs of 3/559. The Stugs had already lost two vehicles due to bogging before they even got to the table, so now had six StuG I
  Zipping down the Koerselsesteenweg   William had a troop out front without any infantry followed by his HQ troop and then the rest with infantry hanging on. He managed to get three turns of movement before the German Blinds came up. I was afraid th
  Positions when the Guards were spotted   You can see some German blinds on the right edge moving in.
  Enemy spotted   The troops with infantry stop and face the flank as soon as they see the Stugs appear.
  Stugs spotted   John brought all his Stugs in on this spot. He wanted to avoid losing any with bogging if he moved across the fields and this track wrapped around the farm to link up with the main road. Before he could even open up on the Cromwells
        Dead Cromwells   The lead troop of Cromwells loses two tanks to the initial Stug fire. The third one is out of action with a faulty turret/gun. The HQ troop swings around the victims to the right. None of these tanks had passengers.
  Stugs on line   John had one group of Stugs open up on the road column and put a hurtin' on the lead troop.
  Another Stug moves into position   Looks like a good spot to snipe at the road
  Infantry action on the other end of the table   One of the two-section grenadier platoons moves towards the road causing Rob to send back one of his platoons along with a troop of Cromwells.
  Grenadiers on the right   John's first platoon hopes to get into some buildings close to the highway to cut off the Welsh.
  2nd Platoon, No 3 company, Welsh Guards   Rob's 2 Platoon heads back to counter the grenadiers and comes under fire.
  Two more Cromwells hit   Miraculously, the sections on them only take one KIA. Plenty of shock though.
  Looks like this road is pretty effectively blocked   Welsh Guards advance is getting scrambled at this stage
  Last troop heads back up the road   First they went back to help out the 2 Platoon, then they got Panzerfaust shy and backed away, and now going back up to engage the Stugs. I had mentioned to John that dropping a question about Panzerfaust ranges
  Exchanging small arms between the houses   The far right grenadier section is taking a beating and loses its platoon CO. Fortunately the Company CO, Hauptman Sink, is with the other section in another building close by. John's other two platoons wi
  Looking for Stugs   This troop went back and forth on that section of road.
  Deployed along the road   The HQ troop with two CS tanks is on the road behind two regular Mk IVs now at the head of the column. The Squadron CO is in the trees off to the right. Cromwell with bad gun is behind the infantry along the hedge. The oth
  Squadron CO is gone   Hit by one of the Stugs that is heading up the track from the farm.
  Here comes the Stugs   Grenadiers moving up in the ditch besides them.
  One Stug KO'ed and the others behind smoke   Most of the game William has been rolling pretty lousy on his strike dice. But when his two CS tanks with their short 95mm howitzers were forced to take on armour, he managed to blow up one Stug and dama
  All hands facing to the left   Two platoons lining the roadside ditch and three troops of Cromwells face towards the Germans. Two more Cromwells are off picture at the bottom.
  This is where both advances end   The Welsh are not getting into Helchteren and the German counterattack on the Beringen bridgehead is well and truly stymied. The lead grenadier section is getting hosed in the ditch by as many Welsh riflemen as pos
  Standoff at the end   Total losses for the Welsh were four Cromwells KO'ed and two more damaged. They did lose their Squadron CO though. Infantry losses were almost all in the 2nd platoon with 11 KIAs. One other section had a kill. The Germans had