
Another great game from the Anzio: Wildcat to Whale scenario pack by Robert Avery. This is the return match from scenario 2 played over the same ground but this time with the Germans trying to wrest the ground lost only days earlier back from the Allies. Should be easy enough with all these Elite Germans! As is normal I will be taking the Allies whilst Steve takes on the Germans.
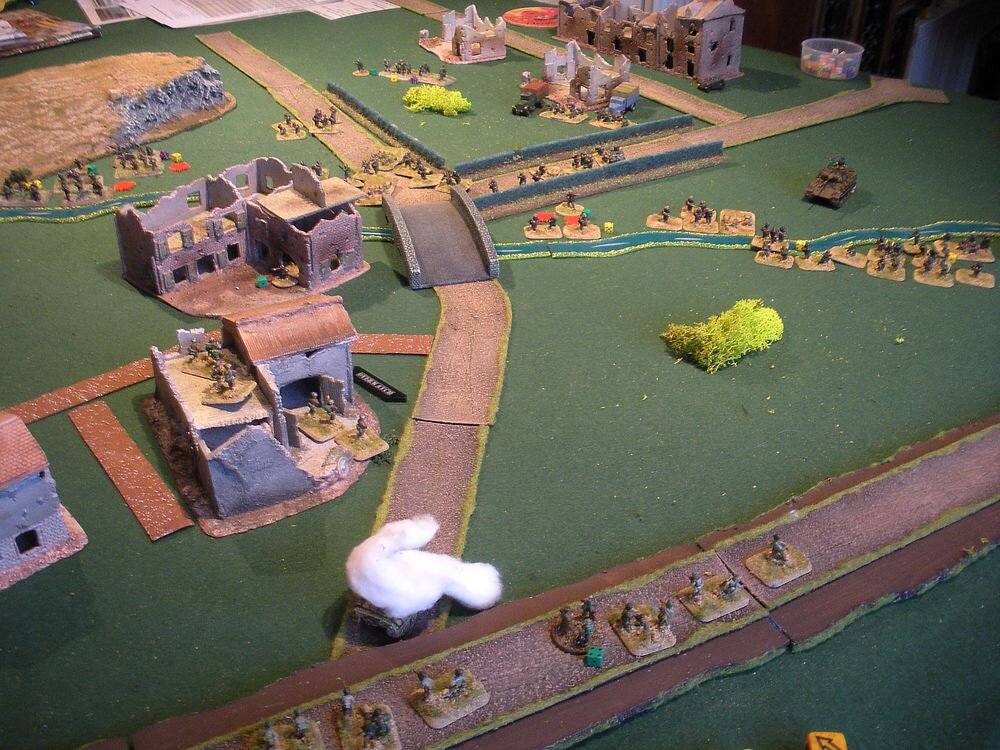
Here is the map with the wrecked building showing testimony to the vicious fight previously. The view is from the rear of the Allied position and shows the ground the Germans will be attacking across.
The Germans forces are large: having two full companies and well equipped both in support weapons and tanks. The Allies have excellent troops but they are a real mix of British Guards, Americans Paratrooper and even some Sappers, and with only with M10s in support they are not the best equipped Allies you will even see.
The Germans were able to advance their Blinds almost up to the Allied frontline, but luckily most of them were shown to be scouts and were removed. At this point I thought it would be the quickest game we had played as I would be swamped with Platoons hitting my weak sections, but, lo, all the Blinds were dummies. Why didn't they move slowly and spot?
This calm was not going to last very long though as the German Paratroopers towards the North were getting especially ambitious, although it may have had something to do with the strong presence of tanks they had with them. The Scots Guards entrenched in front of them were very happy they had purloined a PIAT team to support them.
The MMG looking out of the window had the support of the Irish Guards which made it feel a lot better. The numbers of Germans here was certainly getting frightening and a fire fight started here which went on for most of the game except for one burst of exciting action that came later.
If the masses of Germans coming on the northern edge was large, the Germans coming on the western side were enormous. To be honest though this log jam was in my favour as he could not get them all into action at the same time. Still just about the largest grouping of men I have seen in an IABSM scenario. I think in the larger games troop management comes to the fore, and I would have left most of the German troops on Blinds and used specific troops for specific tasks.
To the north the Scots were having a hard time of it as the numbers of Germans were just too much. The Germans though suffered especially from the Allied artillery which managed to hit the troops on the hill several times throughout the game. Not sure why he didn't spread them out after the first hit.
In the house behind the suppressed Scots were the Irish Guards who had another MMG to assist them. The Germans behind are massing and can just be seen making their first move to cross the stream to attack the causeway.
The Grenadier Guards and American Paratrooper had a great view over all the field and were concerned with the Germans move towards the stream. Both M10s (painting some up now) advanced to get a better firing angle on the advancing Germans who were taking a long time coming forward.
The blurry photo, above right, shows the Germans crossing the stream and also trying to attack the Irish Guards in the nearest building. In the background the resistance of the Scottish Guards is almost at an end. They have held up the Germans for longer than expected, and even if the PIAT didn't damage any of the tanks it hit, it was still an heroic stopping of the Germans.
Now was the time things got interesting as I moved my Tank Destroyers out to try and actually get him to move his tanks. As soon as I did this for some reason he sent a section over the stream to hit my MMG in the Railway station. This was not a good move as the MMG and supporting Guards had far more melee power than the Germans and destroyed them, although of course not without some loss to themselves. The MMG was then destroyed by tank fire, but the Guards survived.
The Germans to the east finally decided to attack the embankment with one platoon attacking the American Paratroopers section dug it at the top, although unluckily only getting two of the sections involved. Again this was closer than it looked and the American bravely hung on to the ground and badly damaged the Germans. This was the main turning point in the game and he never tried that again and wasted his large force advantage in the area.
This hazy photo (I must tried harder), shows the position at this time from behind the Allies line. What is does shows is that despite some very hard fighting the Germans have actually not taken any ground and the Allies are still in the position they held at the beginning. The casualties on both sides have been horrendous but of course the Germans have suffered more being mostly in the open.
The move by my M10 gained the immediate bonus of hitting and destroying one of the Panzer IVs that was hanging around the Railway. This upset my mate somewhat and he could see the fight slipping away. This excellent view shows the Irish Guards still easily holding the Station. Various Germans Platoons are just hanging around behind the stream and not actually doing a lot, which seemed strange to me but was apparently the plan. In the far distance you can just see the Panthers taking the scenic and long route round the village.
Several quick turns with not much happening ended with the Panthers in position and from which he easily destroyed my M10 guarding that flank before it could retreat to safety. I also had my first ever collateral damage as well, when the Bazooka Team that had retreated from the bridge found that hiding behind a tank was not always a good idea. This I thought was it and the Germans really would go for it. The M10 had done exactly as it did historically and been hurting the German infantry with its HMG. Nothing of the sort as the damage I had done had hurt my mate and he gave in. His Germans had only taken the one building in the end and lost a lot of men.


This series of photos shows the table at the end of the game. Personally I thought my mate's resignation was premature but he had lost heart with his men being in the open and being shot at by my entrenched infantry. His tactic of a slugfest didn't work and he was also unable to bring his MMG and tanks to really bear, something I also did in the last game. So we both need to learn to play the game and use our forces better.
In hindsight with this big a force he should have managed it better and left some of his forces off table. The masses of men look impressive but in the end either became a traffic jam or nice targets. Playing with a large force is certainly different from just playing a normal game. Of course it is easy to criticise and I had the easy job and just sat still shooting Germans whenever I could, with the excellent troops I had.
Looking at the photos you can see that the German masses have gone and one can see why the constant pressure told on his forces.
All in all another excellent game from the Anzio: Wildcat to Whale scenario pack with some enormous forces and equally brilliant fun. Next one up is Scenario 1 which is a more free flowing fight between mobile American and Germans with minimal cover and so a very different game. Brilliant!
Craig Ambler