A bit of Miscellaneous Painting
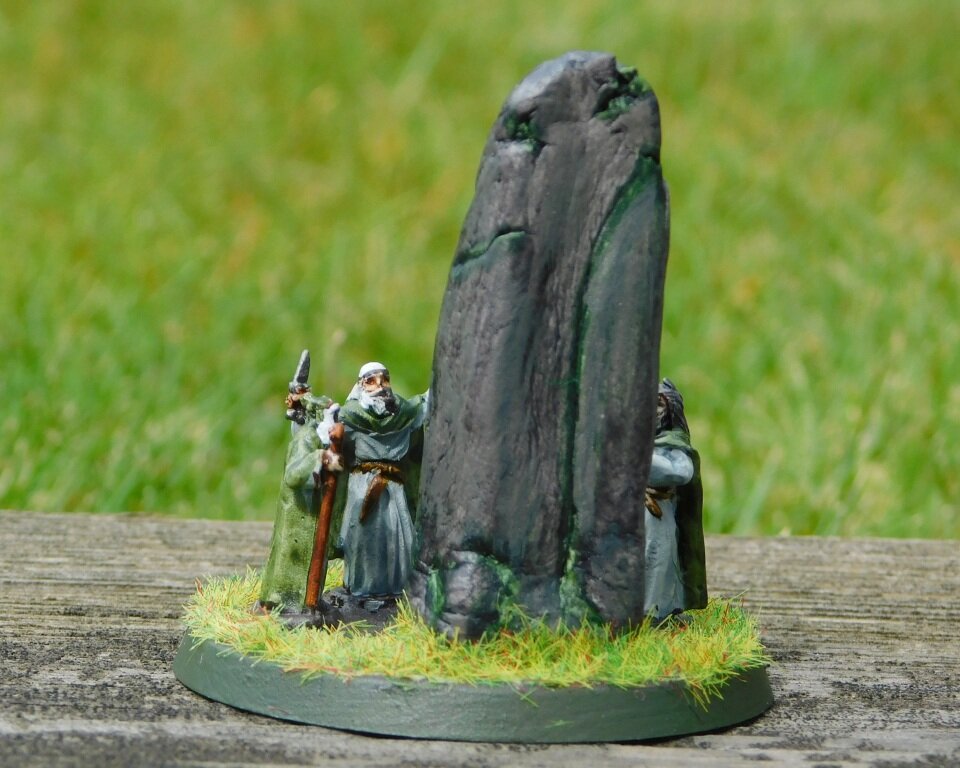
Always good to add some character units to your rank and file, so when I saw that the 3D printed March to Hell range of Celts included war dogs and a handler, I knew I had to get one to act as one of the many "Heros” accompanying my Ancient Brits.

A nice little piece that paints up very easily indeed. The hounds were a single coat of Contrast Basilicum Grey over undercoat; the handler was painted as a normal Celt: dark blue tunic with light blue stripes.

Next are a couple of extras for my Venetians.

My Spearmen don’t seem to be achieving much, so here’s a unit of Alabadiers or Billmen who, hopefully, will fare a bit better.

The Alabardiers are made from the heads and bodies of spare normal infantry combined with the arms and weapons of spare knights, which is why they all look a bit top heavy!

It also got a bit crowded on the base…which is why, in the back rank, one of them is smashing the back end of his axe into the face of another! I should perhaps have dropped a figure from each line or at least spaced them out properly.

Finally, a unit of light crossbowmen and an infantryman carrying a flag that I can use either as an army standard or to mark where a dismounted general is or the like.

TTS World Championships 2024: Game 3: Venetians vs Ancient British

The story so far: one big win, one big defeat…so it was all to play for in game three of the 2024 To The Strongest World Championships.

This time, my Ventians would face Matt’s Ancient British, and lot’s of them there were too!

The Ancient British outcouted, and before I knew it, I had shed loads of barbarians coming right at me: chariots and cavalry on the wings, infantry in the centre.

There was nothing for it but to get straight back at them and see what happened!

The two lines came together with a mighty crash…

…but honours were fairly even. The Brit infantry were in deep units, but my Knights had better saves, so things pretty much cancelled themselves out.

Cue a grinding melee that swung backwards and forwards between us: before too long, most of Matt’s units were on two disorders and most of mine were on one, but my pikemen and spearmen were having a good day and were pushing forwards towards the British camps: it was all going to be down to who gave way first.

Then disaster struck: one of Matt’s warbands broke through my line and charged towards my camp.

No matter, I thought, I have light infantry handgunners behind fortifications, and whenever I have tried taking a fortified camp packed full of light infantry, I have failed again and again and again.

Not today, however.

With barely a pause to draw breath, the British warband smashed straight through the fortifications into the camp, killing my lights as they did so. Four coins down!

Next thing, the game ended due to time considerations, with the Venetians recording a 4-9 losing draw: actually the first time I have not had a clear “win/lose” result in a competition game.

It had been a great encounter with a tough opponent. Had we continued, I think Matt would have quickly taken the rest of my camp and therefore the game but, on the other hand, there was also a fair possibility that I could have caused a general collapse in his line first, which could just about have given me the win…but I guess we will never know.

Must be an excuse for a return match some time in the future!

TTS AAR: A Defeat for the Legions!

Time for another game of To The Strongest with John.

Rather than play a standard pick-up game where each side lines up on opposite sides of the table, we went for a more scenario based encounter, with the Romans starting the game in three columns: their main legionary force in the centre, their horse to the right and their lights to the left. The Celtic types facing them were largely deployed as one might start a standard game, but with enough exceptions to make things interesting.

To have any chance of victory, the Romans needed to deploy for battle as soon as possible: a task completed fairly easily as the superb drill of the legionaries kicked into play. There was a gap in the line on the road itself: the Cohorts VIII and IX not performing as expected!

Note that the yellow markers indicate that the Romans have pila ready to use.

The Celts announced their intention to move forward en masse. Their wings duly did so, but for some reason (the vagaries of the cards) their centre units hung back. This gave me a real opportunity to defeat them in detail on either flank before turning to crush their centre.

On the right, my single unit of legionary cavalry, supported by some auxiliary horse archers, duly moved forward to engage the enemy horse and chariots rapidly trying to curl around my flank. I also brought four cohorts of infantry (two units in TTS terms) across in support.

This really was a good opportunity to win on this flank, but the Gods decided otherwise: consecutive 2’s drawn from the pack meant that my legionary horse sat stationary rather than charging home.

My supporting legionaries were, however, able to charge home, dispersing the Celtic cavalry in front of them (kudos to the single Cohort X base for its contribution to the fight) but this wing was still very much in dispute rather than going my way.

Things weren’t going my way on the other wing either. For some reason, my main legionary force, including the double-size Cohort I with the aquila or Eagle Standard, also hung back, meaning that rather than fighting two enemy warbands with two Roman units, I now risked a delayed fight tying up my units until they were overwhelmed by more Celts coming into the fray!

And so it came to pass: the Celtic warbands in the centre ‘woke up’, and headed forward…

It would now be much more of a traditional stand up fight, and all would be well if I could get the Roman ‘mincing machine’ into action: I needed to bring my men together, make full use of my remaining pila, and rotate units in and out of the front line as required.

Unfortunately none of that happened!

Having split my line to deal with each wing of the initial enemy attack, I couldn’t get free enough of the rampaging Celts to get it back together again. So rather than fighting as one command, my Romans had to fight as three isolated commands on the left, in the centre, and on the right.

Secondly, my legionaries had obviously packed their pila away for the march, as not a single volley had any effect on the opposition. I also suffered a wave of officer casualties including the two tribunes commanding the main body of the legion. On top of that, even John remarked that the cards had turned against me: I was missing hits that should have gone in and failing saves that should have been easy. It was just not the Romans’ day!

My cohorts were gradually disordered and then wiped by the Celts using their superior numbers, and I just didn’t have the coins to withstand those losses for long.

So a defeat for the Romans probably stemming from my failure to wipe the enemy wings at the beginning of the battle. I’d made a bold tactical decision that had a good chance of success, particularly on the right, but it hadn’t worked and I’d suffered the consequences against the remorseless Celtic hordes commanded by John!

Druids...and did anyone order a Chinese?

I’ve been playing quite a lot of To The Strongest over Zoom lately, using my new-ish Marian Romans against the Celts. One thing my opponent likes fielding that I had never done are the Druids available as an army standard equivalent.

We’ve been using memory or a marker of some kind to represent said religious types, but I think it’s always better to get the proper figures onto the table so have been looking out from some suitable minis.

Something else led me to the Stonewall Figures website and their range of Ancients figures by Capitan. These include Gauls, and a quick browse revealed some rather nice Druids which I purchased immediately. Only a couple of days later these popped through the letterbox and were immediately accelerated to the front of the painting queue:

The rather fanciful obelisk is home made: some modelling clay stolen from Daughter #2 and roughly shaped into a monolithic shape. I then added some very rough horizontal-type ogham-style writing with a sharp edge. The obelisk was painted in GW Contrast Basilicum Grey with some green mossy details added. It still didn’t look quite right, so I very crudely filled the ogham writing with some acrylic dark gold paint, wiping off any excess.

I quite like the result, although it is a very large obelisk…which means that at least I shouldn’t forget to apply the re-play attack card bonus on the tabletop!

Anyway, the figures are lovely and highly recommended. The whole Capitan range is worth a look: they are quite large 15mm figures, but very nicely sculpted.

A Chinese Anyone?

Whilst waiting for the clay to set, my eye happened to fall onto a pack of MDF buildings sent to me as samples by Frank, the chap who runs MiniWarfare out of China. These were forming a small hillock on the edge of the lead mountain, so I thought I’d excavate and build them.

Regular readers will know that MiniWarfare produce some spectacularly good far eastern buildings for Burma/Malaya/Vietnam etc:

The burlap in the windows and door is mine.

The samples that Frank sent me were of Chinese buildings: two identical houses and a restaurant.

It’s the photography that’s crooked, not the models!

As with the Vietnamese huts, these kits are hyper-easy to build - much easier than 4Ground or Sarissa - and are therefore highly recommended for that reason alone.

Unlike normal, I decided to paint them using GW Contrast paints. The roofs on the houses are actually much darker than they appear in the pic above (obelisk coloured to be exact!) and please forgive the slightly brash colouring on the restaurant!

And now for the bad news: the MiniWar website is currently under construction, so you can’t buy anything at the moment. I do hope Frank hasn’t gone out of business due to COVID, so please join me in checking back every now and then.

I really must get my far eastern huts back on the tabletop soon: time for some Liongate or Bloody Burma!

Two More Games of TTS

It’s back to the living room for another couple of games of To The Strongest against K.: daughter #1’s boyfriend, trapped with us for the duration of lockdown. K. is becoming a seasoned wargamer now: into double figures with battles over the lockdown period and, as we began our games, victor in three out of our last four encounters.

“How is your Sarmatian coming along?”

In fact, so veteran is he that for this game, rather than just saying that he didn’t mind which army he played, K. very emphatically said that he’s like to play the Sarmatians again: the army he’d had so much success with last time. That was fine by me: I proxie my Sassanid Persians as Sarmatians, with the cataphracts representing veteran Sarmations and the Clibinarii standing in for the regular chaps.

A solid wall of lancers!

I, on the other hand, would take my beloved Ancient Britons, now quite a different army since the list changed the chariot force from being lights to being normal troops…it was time for the Ancient British Panzer Division to take to the field once more!

Four of my six warbands

I did still have some lights, javelin-armed horsemen and slingers, and was determined to try and use them as well as some of my other opponents i.e. manoeuvring around the battlefield like Billy Whiz, constantly nipping at flanks and rear.

“Come and have a go if you think you’re hard enough!”

Our first game was the sort of grinding encounter that typicalises battles where one or both sides are full of deep units. I couldn’t kill his veteran lancers, he was having difficulty breaking my deep warbands. I did manage to get my light horse attacking the flanks and rear of various Sarmatian units, but to no effect whatsoever!

The Ancient Britons head for the rough ground

Chariots kept back as a mobile reserve/exploitation force

In the end, however, it was lights that won the day for me. A unit of light infantry slingers found themselves out of ammunition and in the middle of the battlefield. They spent a bit of time desperately trying not to be noticed by the Sarmatians, a tactic that succeeded to the extent that one lancer unit, already disordered, strayed within flank charge range. In went the slingers and KO’d the Sarmatian cavalry. This left them a few squares from the rear of another Sarmatian cavalry unit. Their blood was obviously up, as a couple of high activation cards allowed me to charge them as well…and then take them out, relieving K. of the last of his victory coins. The slingers had won the day!

Game 2

As the distaff side of things had taken the evil pooch (squatter in my wargames room!) out for a walk, we swapped sides for a second battle.

One thing I noticed immediately was what a lot of Ancient Britons there were: ‘fousands of them to be inexact!

From the other side: there are an awful lot of hairy-arsed barbarians to kill!

This turned out, however, not to matter at all, as the game ended up being very much a walkover in my favour. The Ancient Brits came on in a slightly crooked line, which allowed me to target individual units with my bow fire. This was, as usual, quite ineffectual, but the odd Disorders I did achieve gave me an extra advantage in the melees that followed.

I did have a scare early on when one of my non-Veteran brigade generals was killed by a slingshot, but, once battle was joined in the centre, my veteran units killed the warbands in front of them, punching a huge hole in the British line.

The British line begins to crumble

Not only did this cost K. a lot of victory coins, but it also left the way open to his camp: worth another three coins. In the end, however, I didn’t even need that: I had kept my left and right flanks back whilst my centre went in, now I sent them forward as well, aiming all the time at his weaker units. This tactic proved successful, and suddenly K. had no coins left. Looking at the tabletop, we both realised that I hadn’t actually lost a unit: just one very unfortunate general. Total victory was mine.

Big Hole in the middle of the Ancient British line

Aftermath

A great afternoon’s gaming, and a chance for me to pull two games back against K. Tomorrow is Father’s Day, so I’ve booked another couple of games for then, but more on that in a future post…

Robert Avery

An Afternoon of "To The Strongest"

Second weekend of the year and I’ve managed to get in an afternoon of “To The Strongest”.

Bevan and I managed two games. The first was a grinding clash between two quite similar armies: I played the Akkadians, Bevan took an Athenian Hoplite force. Each side had a core of a number of deep blocks of close-formed infantry (Spearmen for the Akkadians, slightly superior Hoplites for the Athenians); but the Akkadians had their veteran four-onager heavy chariots plus Royal Bodyguard axe- and bowmen versus a mix of low quality cavalry and lights for the Greeks.

As mentioned, the game was a truly grinding clash. The Akkadian chariots, out on their right wing, threatened to curl around the Athenian left flank, but began the game seemingly unable to move. This meant that the Greeks could come forward and join a general line-against-line engagement that slowly started to bow the Akkadian battle line backwards.

But somehow the Akkadians held on. The Royal Bodyguard axemen did stirring work, the line began to straighten slightly, and then the heavy chariots finally got going and smashed in from the right. In the end, this was a colossal victory for the Akkadians, who didn’t lose a single unit and managed to capture the Greek camp. Here are some pictures:

For the second game, I took the Ancient Britons, with Bevan playing the Sassanid Persians.

The Brits had a huge chunk of (somewhat unwieldy) warriors in the centre of the field, and large numbers of light chariots/cavalry and infantry on each wing…so many lights, in fact, that (much to Bevan’s surprise) his all-horse Sassanids were matched in terms of scouting points.

Looking at the set up, I was confident of victory: there was no way his incredibly small force was going to beat the Ancient British steamroller!

Unfortunately, Bevan and the Persians begged to differ, and what followed was the dissection of my army with surgical precision. First my lights were stripped away unit by unit as I struggled to get my warriors moving, and then enough of those warriors that did move were beaten for me to lose (given that I’d lost a lot of coins through my lights). It was a superb demonstration of how to use a horse archer and cataphract based army.

Fortunately I did manage to kill at least one of his units, so technically the afternoon as a whole was to my advantage, but the way my Brits were annihilated didn’t make it feel so!

Here are some more pictures:

Sumerians Finally Hit The Tabletop!

A great start to my Xmas holiday with an afternoon of gaming To The Strongest, so also a chance to get the Sumerians that I have been so assiduously painting over the last few months onto the tabletop.

First off was an encounter with the Ancient Britons. Weird how I would never think of playing a non-contemporaneous battle when playing WW2, but accept it as normal for the Ancient period. Doubtless the Brits were on holiday, and when asked where they wanted to go, just replied “Errr…”

Moving swiftly onwards, I had to deploy first, so it was chariots on the left, militia in the middle, and good troops on the right. Opposite me, the Brits had adopted a very traditional deployment: chariots and light horse on the wings, infantry in the middle.

In a nutshell, the battle went as follows. The Britons opened the game by moving forward really quickly. I responded by sending my chariots forward on the left, but they spent just about the whole game dealing with his light chariots and horse, who just wouldn’t stay still long enough to be properly mullered. On the right, the same thing happened with my Royal Guard axemen. I tied his chariots up, but that was all. That left the infantry in the middle to win or lose the battle. My troops were largely militia raw troops, his were screaming barbarians: I lost!

So on to a second battle, where although the Ancient Brits were unchanged, I switched my Dynastic Sumerians into the slightly more advanced Akkadians. With no raw militia, I was slightly more confident of success but my opponent, Bevan, was very clever and tactically astute: all his light chariots and horse went on one flank, whilst his infantry advanced in echelon towards me.

Those of you who are equally tactically astute will of course know exactly what happened next. His light chariots swarmed all over my ponderous battlecarts: if I chased one, it evaded, and then the others attacked my flanks and so on! Meanwhile my infantry just couldn’t get a grip on his foot and found themselves always facing two units or a threat from a flank. I lost again, and lost badly!

Our final game saw me using the Akkadians again, but this time facing another geo-anachronistic foe: a Pyrrhic army composed mostly of Hoplites. This was more my type of opponent: no hordes of light chariots to annoy me.

I deployed with my battle carts facing his cavalry on my right, my Household Axemen and Bowmen facing his elephants on the left, and a straight up infantry face off in the middle.

My battle carts literally smashed his cavalry from the field (apart from a nasty charge from his lancers), and then proceeded to take his left hand camp, with the other only a turn away from falling as well. On the other wing, my bowmen saw off his elephants without too much difficulty, which left an infantry clash in the middle. This was more even, with the fortunes of war swinging backwards and forwards. My successes on the wings, however, meant that although we each lost the same amount of infantry units in the centre, his army lost its morale first.

So two losses and one win for the first Sumerian outing: not a bad performance. Here are some more pictures of the day’s gaming:

The Last of the Gauls

I really should have painted these myself, but I’m very busy with the last of the Sumerians at the moment, so when friend John offered to paint them up for a very reasonable rate, I jumped at the chance.

This is a Gallic, or general Celtic, warband in 15mm. Figures from Forged in Battle’s excellent Empire range.

Ancient, Ancient British!

I play To The Strongest in 15mm, but on a 28mm-sized grid. I love the look of the huge armies that you have to field to fill the space.

The problem, of course, is that you have to have the aforementioned huge armies in order to play and if, like me, your collection was gathered to play (my own) Vis Bellica rules, then you find yourself short of lots of figures.

Three of my existing chariots

No problem, I hear you cry: an excellent excuse to buy more…and indeed it is. So there I was, mooching around Warfare, wondering whether to buy the final pack of Ancient British chariots that I needed to complete my 130 point army when I saw a chap selling painted Ancient British (or Gallic etc) figures, including chariots.

Now these figures were old, and painted in quite a basic style, but on inquiry were being sold for only £1 per chariot. Hmmm…four new chariots at about £5 each which I then have to paint, base etc, or just buy four of these and be done.

Well, I prefer to paint my own stuff, but then I looked down at these poor figures, all jumbled together in a box, suffering a bit from lead rot (which shows you how old they were) and thought “no, I won’t buy new, I’ll give these old veterans a new home”. After all, figures are not just for Christmas, they are for life!

So here they are: four ancient Ancient British chariots that look more like 20mm than 15mm; are basically painted (although shroffed up a bit by me); are suffering from lead rot (hence the very heavy coat of shiny car lacquer I’ve given them): but given a new home and a new lease of life. Only a shame I couldn’t have taken them all…

More Celts

One thing about playing the To The Strongest rules for Ancients in 15mm is that you need an awful lot of figures, especially if playing an army whose units are mostly “deep”.

I’m playing on a 15cm grid, with a normal unit represented by two Vis Bellica bases i.e. two bases 6cm wide and 3cm deep next to each other, frontage 12cm. Already that’s double the number of bases that you’d need for a game of VB.

Now add the fact that one of my collections is Ancient British/Gallic (or indeed anyone vaguely Celtic) and that their units are deep and therefore four bases in all (so a unit has frontage 12cm and depth 6cm) and you can see that I needed to quadruple the number of bases that I used in VB to play TTS.

Well, not quite, as I used to play very big games of VB, but the point is that my Celts needed reinforcements. I’d already painted the chariots/light cavalry I needed, and one warband, but couldn’t face painting another. So I got someone else to do it for me!

Here’s a lovely bunch of Celts painted by friend John. Can’t wait for them to take the field!

Even More To The Strongest

More pictures from a recent day of To The Strongest gaming.

First game was a replay of the last: me and my Ancient Britons vs Neil and the Pyrrhics.

Unfortunately, this time he protected his flanks well, and kept his battle line very closely together. I tried the same tactics as before: warbands in the middle, outflank with the chariots, but this time just couldn’t get through.

On my left flank, he advanced as quickly as possible and used his cavalry to drive my chariots back until they were forced off table. His cavalry were then free to take one of my camps and then turn back towards the rear of my line. meanwhile, the elephants and lights on his left flank were doing exactly the same thing: drive my lights back with charges that might not actually connect, but do force my lights to evade and evade until they are no longer relevant to the main action.

In the centre, my infantry were held by his Hoplites and pikemen until his cavalry appeared in my rear…and that, as they say, was that!

A loss to the Ancient Britons.

Robert Avery

More To The Strongest

Just to leaven the flow of I Ain’t Been Shot, Mum! battle reports that have been flowing through this site, here are some pictures of another day spent playing the Ancients ruleset To The Strongest.

One of the great things about the game is how fast it plays, so an afternoon’s gaming can often involve three games of TTS…and so it was the last time that friend Neil came around to play.

The action began with Neil playing a Pyrrhic army against my Ancient Britons. Not exactly contemporary or contemporaneous, but not spectacularly unbalanced either.

I placed my warbands in the middle of the field, and my massed chariots on either flank. Neil lined up his Hoplite and pikemen on his right flank, his cavalry in the middle, and his elephants and light infantry on his left wing.

Unfortunately for Neil, his Hoplites took too long to advance forward, which allowed me to engage and pin his centre whilst I sent a mass of chariots around behind his left flank. This led to me rapidly capturing his camps, and then threaten the rear of his main line: a victory to me.

Here are some more pictures of the game:

TTS Battle Day Game 3

Onto the third battle of the three that took place as part of a TTS battle day with friend Bevan. Regular visitors will know that by this time I was down two-nil, so rather keen to finish the day with a victory! The sides would be Pyrrhic (played by Bevan) and Ancient British (played by me).

The Ancient Brits are a favourite of mine: in fact, they were the army I used to use when I played WRG 6th competitions in 28mm some thirty years ago…when your chariots were known as the Ancient British Panzer Division.

Under TTS, the Ancient British have an even greater proportion of their army as light chariots than under WRG 6th, so I decided to keep things very simple and employ that well known AncBrit tactic known as “the horns of the Highland Cow”!

This actually worked surprisingly well. My light troops on either flank overwhelmed his light troops through sheer weight of numbers and, most pleasingly, before his Hoplites could start trying to chew through my warbands.

As my chariots curled around onto his rear, the Pyrrhics realised that this was not going to be a Pyrrhic victory so much as a Pyrrhic disaster, and surrendered.

End of the day score: Bevan - 2, Me - 1 .

A great days gaming with what is a delightful little rule set!

Huts for the Ancient Brits

With the game To The Strongest, each army really needs at least one, and usually three, camps. Obviously, one can cobble something together, but it’s nice to have some specific pieces for each force.

Forged in Battle’s Empire range has recently added a whole series of 10-15mm buildings that, when combined with a flat base, make rather nice camps. I’ve bought a few, with the first off the production line being these six Ancient British huts:

Loving these. Easy to paint up: spray white; paint the roofs straw colour and the doors brown; wash with GW Agrax Earthshade; leave to properly dry and then highlight the thatch and doors; finally, take a stippling brush to the walls.

They are perhaps a bit pricey at £24, but well worth it. Recommended.

First of the Ancient British Foot

A bit more painting left over from last year: four bases, so one To The Strongest deep unit, of Ancient British foot in 15mm. The figures are Forged in Battle, excuse the shed!

Quite like these. The shields are partly painted and partly using LitteBigMan transfers. What decided which to use? Well, I couldn’t be bothered to cut out the holes in the transfers for the double-boss shields, so only used the transfers for the simple single-boss shields. I did try to do one: but it was annoyingly difficult and time-consuming!

Here’s the back view. The tartan and stripe patterns look better at wargaming distance than under the microscope.

I now need another four units of these: the thought of painting which fills me with horror! The Hoplites are bad enough, but at least they are homogeneous: these all have to be painted individually. Anyone got a pile of well-painted Ancient Brits they don’t want any more?

Christmas Painting

I always seem to get a lot of painting done over Christmas.

I think it’s because there’s nothing else to do apart from eating and drinking heavily (check), watching tv (check), arguing with the family (check), snoozing (check)!

Anyhow, three more units for my Ancients refurbishment completed:

Another four bases of Celtic light cavalry to pad out my chariot units

Another three Celtic chariot bases, meaning I can now field the minimum number required

Four Sassanid Persian elephant bases, so one full unit in To The Strongest, four units in Vis Bellica.

Bulking Out The Ancient British Panzer Division

Updating all my Vis Bellica-based armies for To The Strongest means doubling the size of all my forces, or at least it does the way that I’m doing it. Vis Bellica has element bases that are (for 15mm figures) 6cm wide, so when I switched systems, it seemed obvious to use two VB elements to represent one TTS unit using the recommended 15cm TTS grid. That also means that I can show disorder in TTS merely by moving the two elements apart at an angle i.e. no need for additional markers.

That’s fine for standard units, but we’ve already seen how TTS deep units (such as Hoplites, Pikes, some Warriors) need four VB bases per TTS unit…and the same is unfortunately true for light chariots as well. In VB, they are based on a 3cm frontage: so four VB light chariot units are needed to make one TTS light chariot unit.

That was fine for the Egyptians, as I already had loads of light chariots in a double-size VB army. It is not so fine, however, for my Ancient British. The VB version has six light chariot bases - just about the right number - but that only makes 1½ TTS light chariot bases. Time to paint lots of chariots!

Reading the TTS army lists, however, the Ancient British have light chariots up to AD211 and light cavalry after that, so the author recommends mixing light cavalry and light chariots in a TTS Ancient British light unit that can count as both. Good idea: time, then, to paint loads of light cavalry rather than light chariots!

Xyston have some very nice Ancient British Unarmoured Cavalry, so that’s what I went for: painting up six four-horse bases’ worth and, controversially, mounting them to match the chariots rather than the more normal four-across-6cm for light cavalry.

This means that the ABPD currently looks like this:

Which looks really good.

So all I need now is another two chariots and another eight cavalry to hit the minimum number of light chariot units required.

Oh, and if I wanted to keep my chariots together, here’s what a light cavalry unit would look like too:

New Ancient Britons!

I need to take a break from painting Hoplites, so thought I’d also start bringing my Ancient Britons up to scratch.

I’ve had Ancient Brits for as long as I have been wargaming: starting with an army for WRG 6th mostly made up with Airfix plastics but with a smattering of metal command figures; and then another, 15mm, force for Vis Bellica, which I had painted for me for the Society of Ancients “Battle of the Sambre” Day, for which we won best game of the day.

It’s only meet and right, therefore, that I adapt the 15mm troops for To The Strongest: which means painting chariots, light cavalry and warriors. And heroes, which is what I’ve started with.

This is a pack of Gaeseti Nobles from Xyston. Nice crisp, animated figures that paint up well. Which is lucky, as I’ve got a load of light cavalry to paint as well.