SU-57s from Battlefront

More Soviet vehicles rolling off the production line as a result of Battlefront’s last sale: this time it’s the SU-57 self-propelled guns.

More correctly called the T48 Gun Motor Carriage, the Samokhodnaya ustanovka 57 was what the Soviets called the M3 half-track with a 57mm anti-tank gun mounted on top. The Russians received 650 of them, and used the SP AT guns in Operation Bagration et al. in 1943/4.

I usually hate putting Battlefront artillery together, especially those with a gun shield, so was pleasantly surprised at how easily I could build the four SU-57s. The M3 body has a fits-just-right post for the gun, with a lovely little ledge just in front of it for the edge of the gun shield. No swearing required at all!

The crew are good too. I chose to mount them as part of the initial build (as opposed to painting them separately then putting them into the painted vehicles) and this seemed to work quite well. There’s enough room to get a brush right their way down to the feet, if necessary, so my standard block colour-wash-highlight technique worked well.

Almost to my surprise, another highly recommended.

IABSM AAR: Kicking in the Door

Here’s an AAR from Alastair Birch first published onto the I Ain’t Been Shot, Mum Facebook page, so I hope he doesn’t mind me reproducing it here.

This is a cracking little encounter written by the big man himself, Richard Clarke, back in about 2005. I actually have a Word version of the scenario, designed for IABSM v2, although where I got it from I have no idea!

Adolf himself has told his troops that “the Soviet Union is a rotten structure, that we only need to kick in the door, and the whole thing will collapse before us”. Click on he picture below to see if that’s true!

KV-85 Tanks from Battlefront

I’m continuing to work my way through all the tanks I bought last time Battlefront had a significant sale, moving on from the Germans (Jagdpanzer IVs) to the Soviets.

The first batch of Stalin’s toys off the painting table were a company of heavy tanks: KV-85s to be exact. These filled the gap between the KV-1E (and a few lend lease Churchills) until the arrival in 1944 of the JS-III.

I’ve always liked the shape of the KV class of Soviet tank: nice and chunky!

These, the usual Battlefront combination of resin body/turret and metal tracks/gun/hatches, went together really easily (makers of plastic vehicles take note), and were a joy to paint up as well.

I did add a bit of extra stowage to a few of them: somewhat ironically given my previous comment, the canvas rolls on the front two tanks are actually the furled up canvas tops to the PSC Steyrs that I posted about a few days ago. Nothing ever goes to waste!

KV-85s from Battlefront: highly recommended.

IABSM AAR: Operation Sealion #04: Take the Heights

Another great Sealion AAR, but not this time from Karim and friends at the Stipsicz Hussars. No, this time it’s Tim Whitworth and his friends at the “Like a Stonewall” wargames group who are playing out the action.

Click on the pic below to see whether the Hyde Home Guard Platoon, under the watchful eye of their daring commander Major fforbes-Cole MC (retired) can defend Paddlesworth against the Fallschirmjaeger Hun.

IABSM AAR: Operation Sealion #03: Capture the Port

Another great AAR from Karim Van Overmeire and friends at the Stipsicz Hussars, again from the Operation Sealion scenario pack for I Ain’t Been Shot, Mum!

This battle report features Scenario #03: Capture the Port, in which elements of the London Irish Rifles defend the small sea side village of Seabrook against the German 21st Infantry Regiment. The Germans had to capture this position on their way to Folkestone: securing the port of Folkestone was necessary to allow German armour to be brought ashore.

Click on the picture below to see if Seabrook will fall under the Nazi jackboot!

Battlefront Jagdpanzer IV in 15mm

I’m always a sucker for a bargain, so when Battlefront recently had a 25% sale in preparation for withdrawing some models from sale whilst they re-model, I took full advantage and added another peak to the lead mountain.

One gap in my collection that I was happy to fill in were some Jagdpanzer IVs: the infamous very low profile tank hunters.

These were easy to build (therapy after the Steyrs!) and easy to paint. Spray dunkelgelb, then use the sponge pad that Battlefront use as packaging to protect their models to dab on some dark green then brown. Wash with the ubiquitous Agrax Earthshade, highlight with Screaming Skull, do the tracks, crewman and decals and away you go. Simple.

Can’t wait to get them onto the table.

IABSM AAR: Battle at Parczew

It’s September 29th, 1939, and Independent Operational Group Polesie are marching south towards Koch. Attacked by Soviet cavalry and tanks, the Poles are at first beaten back, but then counter-attack and manage to re-take the village of Milanow. This they then prepare to hold in the face of further attacks from Russian infantry with tank support.

The above is a condensed version of the background given to scenario #31: The Battle at Parczew from the September War scenario pack. I would play the Poles, defending Milanow; with John and Dave commanding the advancing Soviets.

Click on the picture below to see all…

PSC Steyr Heavy Cars in 15mm

I’m quite a fan of plastic vehicles: the price means you can buy by the company rather than by the platoon, the plastic allows for an incredible amount of detail, and they weigh a fraction of their metal or resin equivalents - important when you’re carrying a company of large tanks around!

So when I needed a re-stock of spray paints for undercoating, and had decided to use the ones available on the Plastic Soldier Company website, and noticed that they had released a set of Steyr heavy transport cars, I impulse-purchased a box-full and looked forward to adding them to my collection. I didn’t exactly need them, but they could join the mass of other PSC products that I already had: Cromwells, Churchills, half-tracks etc.

As you might have gathered already, I like PSC kit, and have built many a PSC model, but I’m afraid to say that these were a complete nightmare to put together! They’ve turned out brilliantly, as you’ll hopefully see from the pictures below, but the actual build process was…well, it was traumatic, to say the least!

So what was the problem?

The problem starts right at the beginning of the build: step 2 in the instructions IIRC.

The first step is to attach the bottom of the vehicle to the chassis that will take the wheels. No real problem here, but my advice is to do this on all the vehicles you are building first, then properly leave them to dry until the glue is rock-solid. That assembly is going to take an awful lot of pressure as you try and complete step 2, and will easily un-stick itself as the shear you will have to use takes effect.

Okay: now onto step 2. Sticking the sides of the vehicle onto the bottom/chassis assembly. This is where the fun starts.

The sides of the vehicle are necessarily shaped and curved to represent the body and the bonnet (hood for my US chums) of the Steyr. This curved piece of plastic is not quite shaped correctly to sit on the vehicle bottom. This means that you have to glue the front of it in place, and then bend the plastic into position on the sides. That means gluing plastic under pressure in place i.e. the sides want to flex back into their natural shape rather than sit in position as the glue hardens. As this is a 15mm model, the surfaces to be stuck together are small, which means there’s not much glue available to hold the plastic-wanting-to-flex-back to-its-natural-shape in place.

One simple paragraph, but a couple of hours of extreme frustration!

No matter what I did, I couldn’t get the models to go together without leaving seam-gaps where there shouldn’t have been seam gaps. By the end, I was using plastic cement, Superglue, and, finally, a paste made up of Superglue and PVA mixed together in a desperate attempt to make things work. I had so much glue on my fingers that, even now, four days later, I still look like someone trying to conceal their fingerprints from forensics!

Things got so bad at one stage that I seriously considered taking two of the models outside and using a hammer to smash them into smithereens! I can feel my blood pressure rising even as I type this!

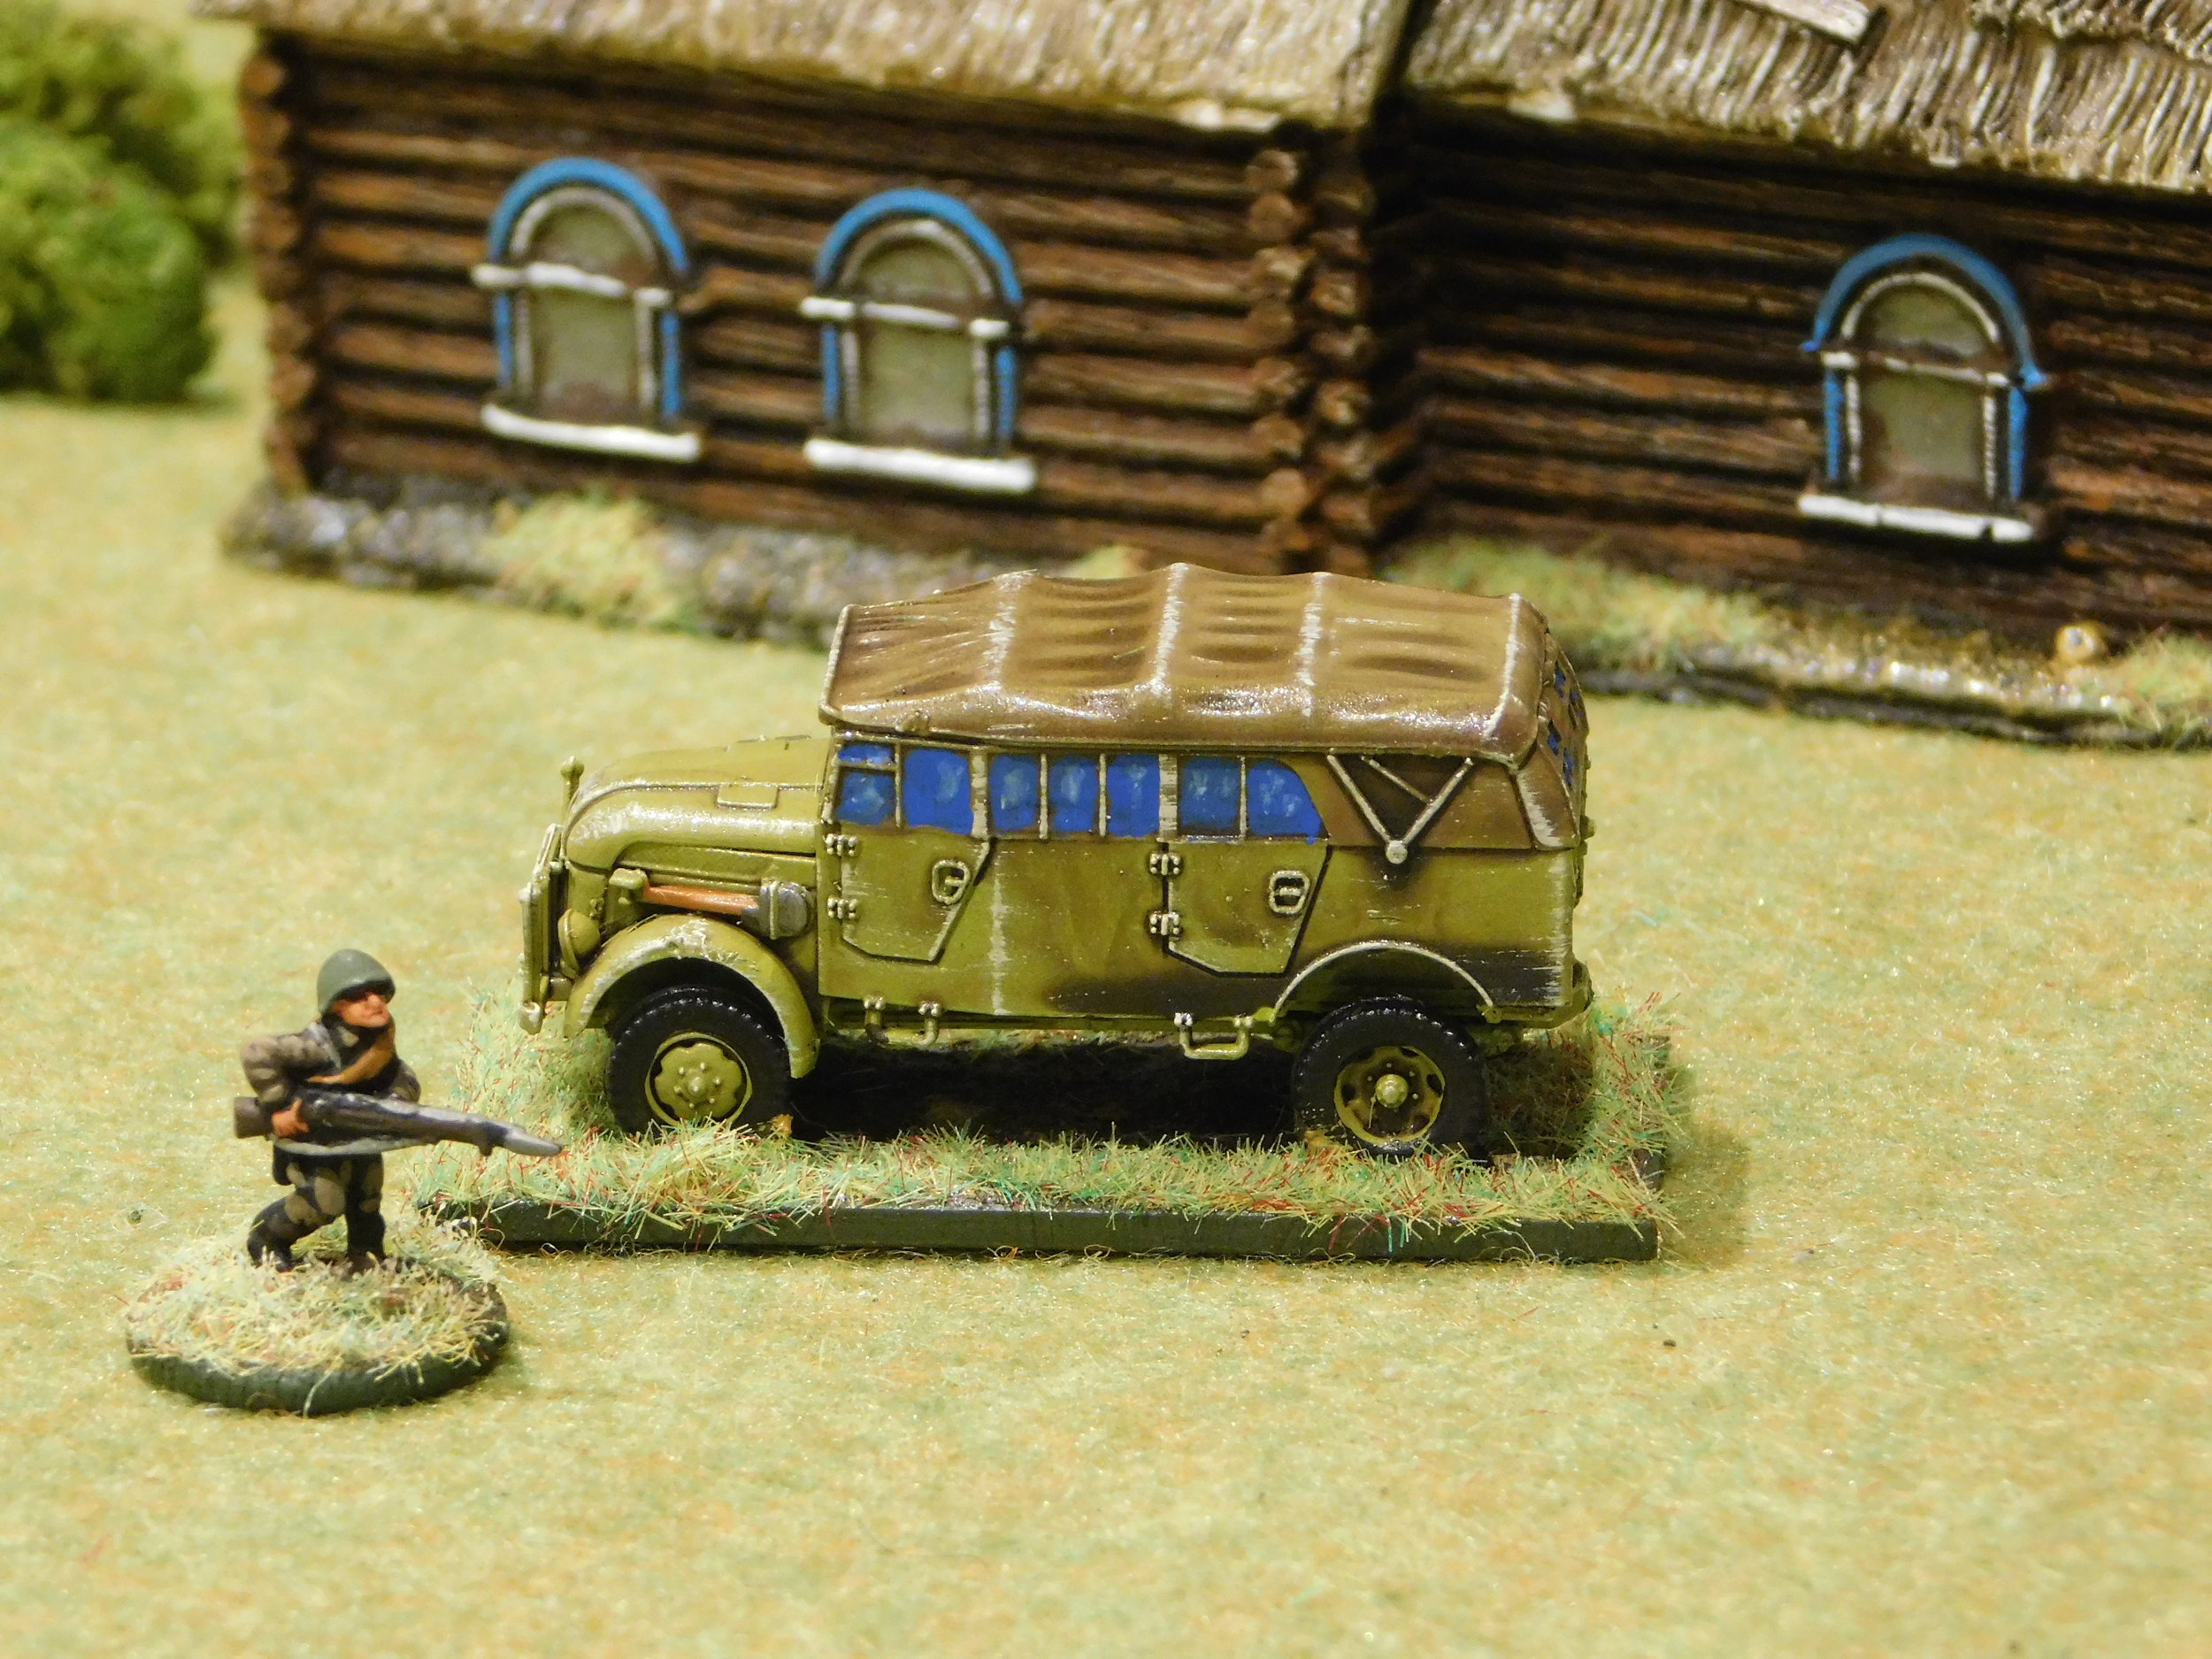
Anyway, I eventually got them built and painted and, I must say, they’ve turned out very well indeed:

The paint job is simple. Spray dunkelgelb from the PSC spray can. Paint canvas light brown. Wash with Agrax Earthshade, highlight with Screaming Skull. Paint in relevant bits: tyres, tools and the windows.

I’m quite pleased with the windows: they are painted a medium-light blue then very gently brushed with a bit of white.

So a very lovely looking set of transport vehicles, but achieved with much pain and frustration…to the point where if PSC offered me another box for free, I might actually say “thanks, but no thanks”.

PS Note that the Steyrs come with plenty of options: early or late (my bad: the single Steyr shown above is an early model painted in late colours, the only one I actually made that mistake on: the others are all late models painted in late colours); and with the option to have the canvas top down showing the inside and some crew. I would have done that, but was so hacked off with the basic body build that I just wanted to get them finished, so went with the quick slap-on-the-canvas-roof option instead.

IABSM AAR: Operation Sealion #02: Rearguard at Pevensy

Karim van Overmeire and the Stipsicz Hussars are continuing to play through the Operation Sealion scenario pack, this time they fight scenario #02: Rearguard at Pevensy.

Will the British hold the bridges, or will the fearsome Hun get in amongst them? Click on the picture below to find out all…

Searchlights (literally) in 28mm

Those of you who have the The Defence of Calais scenario pack for I Ain’t Been Shot, Mum, and those who have read the Blitzkrieg: The BEF theatre supplement, will know that during the fall of France campaign the British were often forced to use Searchlight Infantry (i.e. line of communication troops whose purpose was to help anti-aircraft units hit enemy ‘planes by shining big searchlights into the sky) in the front line.

Up to now, unfortunately, there’s been no way to differentiate Searchlight Infantry from normal, run-of-the-mill types: after all, they wore the same basic uniform. Now, however, at least in 28mm, Sarissa Precision Ltd has produced a portable searchlight and generator.

Now the model is actually not quite right for the Searchlight Regiments (they used the searchlights either mounted on trucks, or carried on lorries with a slightly different stand) but is the closest thing I have seen so far.

Credit where credit is due: I didn’t see this on the Sarissa site, but on the Bad Squiddo games site, where Annie has created a Home Front female crew for the spotlight, and is selling the Sarissa model for them to, er, man.

Apologies if you’ve seen this before (the model is not marked as a new release on the Sarissa site) but I thought it worth mentioning. You never know, Sarissa might produce a 15mm version as a result or, equally good, Annie might start doing some of her Soviet female infantry in 15mm!

IABSM AAR: Return to San Marco

Tim Whitworth and the Like a Stonewall Wargames Group had a second go at the “Attack on San Marco” scenario from the “Cymru Am Byth” scenario pack.

Rather than start a new AAR, I’ve added the words and pics to the bottom of their first attempt.

Click on the picture below to see all:

IABSM AAR: Sidi Ahmed

Another great battle report by Carojon and the Devon Wargames Group.

This time they have ventured into the Western Desert, with a version of the battle for Longstop Hill: the encounter that opened the way for the final Allied advance on Tunis.

What’s great about this AAR is that the forces are detailed as well: so it will be easy for you to replay this encounter yourselves should you want to.

Click on the picture below to see all:

IABSM AAR: Hauts-Vents at Cold Wars 19

Matthew Matic and friends ran a game of IABSM at Cold Wars this year. Click on the pic below to see a few photos, including one that shows just how much kit goes into to putting on a demonstration game of this quality…


I’m happy to add any other pictures or info people have about the game: usual address of admin@vislardica.com.


IABSM AAR: Sealion #01: The Fight for the Military Canal

It’s been ages since we saw anything from the Stipsicz Hussars, our friends in Belgium/Flanders, so I was really pleased when the following battle report dropped into my Inbox.

Here we see the first game from the Operation Sealion scenario pack: the British defending a vital bridge against assault from German Paratroopers.

Click on the picture below to see all, and it’s great to see the next generation of wargamers pushing lead round the table…

It’s hard to reach the middle of the table when you’re only nine!

IABSM AAR: Lardiarz or BoB: Near Vcheva

Captain Cliche and friends have played another game based on one of the scenarios from the late war Bashnya or Bust! scenario pack.

This time, they have adapted scenario #5D (or scenario #5N): Near Vcheva. This is an encounter battle as two armoured forces meet to contest a vital junction.

Click on the pick below to see all:

IABSM AAR: Happy Christmas!

This weekend just gone, John, Dave, Bevan and I re-fought the Battle of the Bulge scenario that we played a couple of years ago. You can read the AAR for that game here (opens in a new window).

I played the Germans in that one, but played the Allies today. A cracking game that was action, action, action from the moment battle was joined.

Click on the picture below to see all: