Christmas Games - Militaria

Many years ago, there was what we would now call a Kickstarter for a military version of Trivial Pursuit.

I signed up and received the first of what was due to be several boxes of questions…and that unfortunately ended up being just the one. No money lost, I hasten to add, as you only paid for each box as they were produced.

The one box has, however, given many hours of fun. Whilst the kids, when they were kids, answered the Kids questions; and now, as (young) adults, answer the Adult questions, or Harry Potter questions or some other specialisation, I attempt to answer the Militaria questions.

Here’s an example of one card: one of the easiest!

As I said, that’s one of the easiest. This is me yesterday trying to remember some obscure bit of military trivia…

IABSM AAR: Cymru Am Byth #13: Swanning Up To Brussels

Tim Whitworth and the lads from the Like A Stone Wall wargames group played another game of I Ain’t Been Shot, Mum the other day, this time using the Cymru Am Byth scenario pack.

The scenario pack covers the operations of the Welsh Guards during WW2, and includes sixteen unique scenarios and a mini-campaign.

The LASW chaps played scenario #13: Swanning Up To Brussels: a German heroic rearguard action versus 1st and 2nd Battalion elements of the Welsh Guards Group that took place on 2nd September 1944.

Tim’s general comment was: “I'll just say the British found it hard going. In these rules the tactics that you employ certainly matter!”

TFL Painting Challenge: Christmas Eve Update

The wheels of the Painting Challenge turn even on Christmas Eve!

A good septet of entries into the Challenge today, although three of you claim that this will be your last entry for the year. Errrr…do you not realise that the Xmas and New Year period is suppose to be when you paint more miniatures than normal. It’s either that or spend time with the family or watch Die Hard for the 45th time!

Anyway, in no particular order, today’s entries are:

As per usual, clicking on the name of the person in the list above will take you straight to their gallery, which will open in a new window. Highly recommended: as there are some lovely paint-jobs on show.

In the meantime, keep painting: plenty of time before the New Year’s Eve deadline.

Today’s pictures are below:

IABSM AAR: Normandy Breakout

A few pictures from the Like a Stone Wall wargaming group playing a Normandy 1944 break out game. The British are defending against a German counter attack. 

Note the use of the Lardage measurement sticks. The LASW chaps have swapped from using inches to Lards, with one Lard being equivalent to 1½ inches.  This allows them to play on their rather swanky 12 foot long table!

TFL "Lard Magazine" Now Available

Those of you familiar with Lardy products will know that it’s usual for Big Rich and the team to produce two “Specials” each year: pdf publications packed with Lard content.

All the new products, travelling and demonstrating has taken its toll, however, and the plan is now to produce one Lard Magazine each year…and this year’s magazine is now available.

This very first edition is crammed with high quality articles, scenarios, interviews and even a complete campaign inside its 170 pages. Ideal for reading on iPad or Tablet in conjunction with Adobe Reader.

Here’s a list of the contents:

  • Nassauers for Sharp Practice. Fat Nicholas regales us with tales of brave Germans and how he recreated them for our best selling skirmish rules.

  • Review of the Year. We take a stroll through 2018 and look at its highs, lows and the bits in the middle that were pretty much alright.

  • There are Many Rivers to Cross. A complete 1940 Pint Sized campaign for Chain of Command with complimentary wet patch.

  • IABSM Lite. Wargaming celebrity and all round good egg Mike Whittaker looks at how to strip down IABSM for action along with a scenario for said rules

  • Fifth Column. A new column by new Lardy convert Alister Campbell-Grieve looking at what drew him to the pleasures of Lard

  • Achtung Indianer. Regular Lardy contributor James Crate looks at spotting and pre-game manoeuvre in Bag the Hun

  • Are You a Complete Tanker? Rotund Nick talks tank tactics for top tanking times with What a Tanker.

  • Blitzkrieg Shortcut. Robert Avery gives some tips on using the Blitzkrieg in the West supplement series for I AIn’t Been Shot Mum along with a scenario

  • Where there is Discord May we Bring Kriegsspiel. Nick Skinner discuses using social media to run kriegsspiel games from afar.

  • Kazemat. Richard looks at Dutch and Belgian bunker types for 1940. How they were organised, used and how to build them

  • The Green Wolves meet the Fox. Belgian Chasseur Ardennais encounter 7 Panzer in 1940. A Scenario for Chain of Command

  • What an Ambush! Wargames celebrity and Wizard to the Stars, Mike Hobbs, presents some ideas on how to add ambushes in What a Tanker.

  • Apache Attack. A scenario for Bag the Hun with US dive bombers attacking a German rail yards.

  • Up Amongst the Pandies. Simon Walker presents an Indian Mutiny scenario for Sharp Practice. Watch out for those baboons!

  • Guards on the Escaut. A 1940 Chain of Command scenario for the first VC action of WWII

  • Cold War. Jeremy Ratcliffe brings I AIn’t Been Shot Mum forward to the Cold War with rule amendments and Army Lists

  • Lard America. Team Lard is Go in the US of A. Here Lard Magazine discovers what’s happening on the Lard scene across the pond

  • Kriegsspiel Cocktail. Charles Eckart shakes and stirs Lardy classic If the Lord Spares Us in with Kriegsspiel to get a cocktail with a big kick.

  • Command & Control at Chickamauga. Godfather of wargaming, Dave Brown, considers events at Chickamauga with a scenario for Pickett’s Charge

  • Aubergine Autos. Nick has the decorators in with this build article using a Charlie Foxtrot model to build a garage fit for a Frenchman.

  • Barkmann Corner Overdrive. This classic scenario for What a Tanker has wowed the crowds around the shows, now you can play it at home. Or elsewhere..

  • And Now the Weather… Weather ideas in Bag the Hun from the pen of James Crate.

  • Dear Johnny. Squadron Leader Johnny Danger signs off with a letter from an admirer.

You can buy the magazine from here.

The Sassanids Are Go!

With the below, my Sassanid army in 15mm for To The Strongest is now finally legitimate i.e. fulfils the minimums required by the army lists.

So, here are two units of Heavy Cavalry - armoured men on unarmoured horses - plus a couple of heroes.

Naturally I haven’t quite finished yet: a unit of elephants and another unit of levy foot are sitting on the painting table waiting for a bit of attention. They’ll have to wait for the Ancient Brits to be finished first, and I’ve got that final unit of Hoplites to finish, and don’t even mention the Macedonians! So much painting, so little time!

6th Game of To The Strongest

This game was a replay of the last i.e. a clash between two homogeneous Sengoku Samurai forces. You can see the sides in the post from December 12th.

The Battle is about to begin

I deployed half my foot samurai on each of the left and right flanks, with my Ashigaru right-centre and my mounted cavalry left-centre. As before, my plan was to hold the centre and then loop around whichever flank opened up first.

Neil, as last game, deployed quite in depth. He placed his “mobs” on his left; his big Ashigaru command mixed in with his cavalry in the centre; and his main samurai command on his right.

This was a much closer game than last time. On the right, I pushed forward quickly with one Samurai command and an Ashigaru command, leaving the other Ashigaru command in reserve. Over the course of the battle, this wing would hit the enemy line several times , but not quite manage to gain a significant advantage. In fact, towards the end of the battle, I had to commit my reserves to prop up this section of my line or risk being pushed back.

My right wing advances

In the centre/left-centre, my cavalry moved forward and managed to get a positional advantage on the Ashigaru facing them. Again, however, no mater how much I tried, I couldn’t quite get in a blow hard enough to crack Neil’s line and, again, towards the end of the battle, my troops began to look a bit “thin”. Fortunately I had a spare unit of foot Samurai from the left that I could move right in order to cover my camps against enemy breakthrough, so the situation remained at least stable.

My left flank moves forward

On my left flank, I advanced strongly and, again, had mixed success. Although, as above, I couldn’t break through Neil’s line, my command of three foot samurai units managed to kill three of the four foot samurai units in front of them for the loss of only one of their own. This left me with two units, one of which I used to reinforce the centre, the other managing to manoeuvre around a rocky outcrop and get behind the enemy line.

At this point, both sides were down to around four to six Victory Coins, and each side had three to four units disordered i.e. about to break at a cost of two Victory Coins per unit: so it was definitely turning out to be a very close run thing.

As it happened, in the endgame, the cards fell my way. My unit of foot samurai that had managed to get around the end of Neil’s line had a series of activations that allowed them to take one of his camps, and one of my reserve Ashigaru Teppo units, firing for the first time, blew a unit of disordered mounted samurai away. With that, Neil’s Victory Coins were all gone, and he was forced to retreat. The day was mine!

Analysis

Another cracking game of To The Strongest. Again, the maxims of trying to break your opponents line and making sure you have a reserve held true, with flank charges and taking camps being very successful routes to victory.

Back to painting the 15mm Ancients now: loving the Samurai armies, but they are very small!

First go at Blood Red Skies

Blood Red Skies is the WW2 aerial combat game from Warlord Games. It’s played with 1/200th scale miniatures on a mat showing the ground beneath…and quite a fun game it is too.

A 109 climbs towards a flight of Spitfires

The first big question, of course, is how do you represent the three dimensions of air combat using models and flight stands? Are the flight stands extendable? And, if so, how high do they go: 40,000 feet?

Well, BRS abstracts all question of height into “advantage”. A ‘plane is either Advantaged (i.e. has managed to get to a height at which is can dive down onto its target), Neutral, or Disadvantaged (i.e. the pilot has let the enemy get above him). The different states are shown by how the model is tilted: up for Advantaged, flat for neutral, down for Disadvantaged. You can only shoot another ‘plane that is at a worse advantage than you so, quite rightly, half the battle is getting into an advantaged position on your enemy.

The top 109 is at a Disadvantage

The other half of the equation is positioning: and how you can move depends partly on your ‘plane (some come with cards that you can play e.g. the Spitfires I was using came with a Tight Turn card, meaning I could turn at any point in my turn rather than just at the end); partly on your skill level and dice rolls (pilots can attempt to outmanoeuvre their opponents); and partly on what you choose to do during your turn: you can “burn off” one level of advantage by doing an extra manouevre.

This makes the game a bit like a game of chess: you have to think ahead at least one move and make sure you don’t leave your aircraft where it is vulnerable to what the enemy pilots will do when its their turn.

There are also rules for Aces, clouds, home field advantage, radar advantage etc. Games are pretty quick: about an hour for a decent-sized dogfight.

Dogfight!

You win the game mainly by driving off the opposition by putting holes into their aircraft, although would just like to point out that I did shoot down two Jerry crates for no loss during my successful defense of Blighty!

As I said above, all in all it’s quite a fun game: although you will need to shell out around £40 for a starter set (giving you two six-plane forces, the stands, the cards, the counters, the dice etc) and then the same amount again if you want a nice mat to play on (4’ by 4’ will do for dogfighting).

It’s not a game that I’ll invest in - aerial combat not being my thing - but it is something I’d be happy to play if on offer.

TFL Painting Challenge: Another Big Update

The entries are still flooding in as people try to beat the midnight on 31st December deadline.

And if you think I’m joking about how keen people are to get their scores as high as possible, two years ago, I had the final entry at 11.58pm…and the first entry into the next year’s challenge at 12.01am!

Here, in no particular order, are today’s entries:

  • Joe McGinn gets the rest of his WW2 US infantry platoon completed

  • David Scott, still on his second wind, sends in loads of WW2 Italians and the some Soviet armour

  • There’s more LOTR from Mervyn, along with some 20mm buildings and some 15mm re-basing

  • Travis has the last of his Colonial Militia. Travis will learn that we never say “the Last” on Vis Lardica: there’s always more figures to buy!

  • More 7YW figures from Mr Helliwell, who never knows when to stop

  • Mark Luther is continuing to paint up figures for his 15mm Spice Islands campaign

  • There’s a welcome return for the Fat Wally, who finally manages to leave his professional painting alone for long enough to paint up some ACW figures for himself

As usual, clicking on the name of the person above will take you straight to their gallery (opens in a new window). Still plenty of time to get your entries in this year: I’m certainly still painting like mad!

Here are today’s pictures:

IABSM AAR: Blenneville or Bust! #3D: Saint Melotte

Bruce Romanick has been learning the IABSM ropes whilst playing some of the scenarios from the Blenneville or Bust! scenario pack.

He’s posted a few photos of his latest game, scenario #3D Saint Melotte (where the British are defending a small French village against German armoured attack) on the IABSM Facebook page, which (and I hope he doesn’t mind) I reproduce here.

Apparently the plucky Brits managed to hold off the Germans…

And Now The Sassanids

Another ancients army that I need to bulk out for To The Strongest is my Sassanid Persians.

Fortunately, I had plenty of cataphracts already painted, so all I need to add to bring the force up to regulation ratios is some of the heavy cavalry that supported the superheavies.

That requires four heavy horse units, which I have decided to field as two units of what I would call Clibanarii (armoured men on felt-armoured covered horses) and two units of Heavy Cavalry (armoured men on unarmoured horses). They have exactly the same stats in TTS, but it’s nice to have the variety should I ever need it.

Here are the Clibanarii:

Lovely 15mm figures from Forged in Battle’s Empires range. Highly recommended.

The grey Clibanarii at the back have come out beautifully, but the turquoise lot at the front haven’t quite worked the way I wanted. I think the contrast between the white and turquoise is just too great to look good at this scale. No matter: I’ll know better for next time!

Looking good!

Not looking too bad!

Bulking Out The Ancient British Panzer Division

Updating all my Vis Bellica-based armies for To The Strongest means doubling the size of all my forces, or at least it does the way that I’m doing it. Vis Bellica has element bases that are (for 15mm figures) 6cm wide, so when I switched systems, it seemed obvious to use two VB elements to represent one TTS unit using the recommended 15cm TTS grid. That also means that I can show disorder in TTS merely by moving the two elements apart at an angle i.e. no need for additional markers.

That’s fine for standard units, but we’ve already seen how TTS deep units (such as Hoplites, Pikes, some Warriors) need four VB bases per TTS unit…and the same is unfortunately true for light chariots as well. In VB, they are based on a 3cm frontage: so four VB light chariot units are needed to make one TTS light chariot unit.

That was fine for the Egyptians, as I already had loads of light chariots in a double-size VB army. It is not so fine, however, for my Ancient British. The VB version has six light chariot bases - just about the right number - but that only makes 1½ TTS light chariot bases. Time to paint lots of chariots!

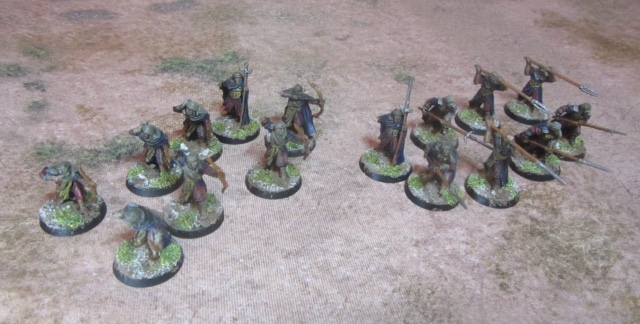
Reading the TTS army lists, however, the Ancient British have light chariots up to AD211 and light cavalry after that, so the author recommends mixing light cavalry and light chariots in a TTS Ancient British light unit that can count as both. Good idea: time, then, to paint loads of light cavalry rather than light chariots!

Xyston have some very nice Ancient British Unarmoured Cavalry, so that’s what I went for: painting up six four-horse bases’ worth and, controversially, mounting them to match the chariots rather than the more normal four-across-6cm for light cavalry.

This means that the ABPD currently looks like this:

Which looks really good.

So all I need now is another two chariots and another eight cavalry to hit the minimum number of light chariot units required.

Oh, and if I wanted to keep my chariots together, here’s what a light cavalry unit would look like too:

5th Game of To The Strongest

Wargaming buddy Neil told me that he had a couple of large 10mm Samurai armies in his attic somewhere. They were based for Warmaster Ancients but, with a bit of jiggery-pokery, translated nicely into two Sengoku Samurai armies for To The Strongest.

The sides, largely homogeneous, were as follows:

The Soft-top Box Samurai

  • Senior General

    • 3 x Mounted Samurai

  • General 1

    • 3 x Foot Samurai

  • General 2

    • 3 x Foot Samurai

  • General 3

    • 2 x Ashigaru Spearmen

    • 2 x Ashigaru Teppo

  • General 4

    • 2 x Ashigaru Spearmen

    • 2 x Ashigaru Teppo

The Hard-top Box Samurai

  • Senior General

    • 4 x Mounted Samurai

  • General 1

    • 6 x Foot Samurai

  • General 2

    • 1 x Foot Samurai

    • 3 x Mobs

  • General 3

    • 4 x Ashigaru Spearmen

    • 3 x Ashigaru Teppo

Mounted Samurai from the Soft-top Box Clan (the red markers are Heroes)

The Game

Neil and I each deployed one command at a time. I was playing the Soft-top Box Clan (i.e. the figures from the box with the soft top!) and deployed my mounted Samurai on my right, opposite Neil’s mounted Samurai; one of my Ashigaru commands in the middle, opposite Neil’s large Ashigaru command; and both units of Foot Samurai on the left, opposite Neil’s mob unit and unit of Foot Samurai. I kept one Ashigaru command in reserve behind my centre.

My plan was to hold the right and centre whilst my superior numbers on the left beat his right, and then swept on into the rest of his line from the flank.

The centre of my line (the teppo are behind pavises)

The left of my line

The key difference between our two set-ups were that, without a reserve, Neil’s line was stacked two deep in places. This would have a significant effect on the forthcoming action, as where he had a numerical advantage, he would have difficulty bringing these superior numbers to bear.

The action began on my right, where my three units of Mounted Samurai faced off against his four units of the same. I took advantage of some rocky terrain and tried to lure him into attacking me, but Neil was too canny to fall into that trap. I therefore bit the bullet and charged forward: his double-stacking meaning that I could fight two-vs-two rather than four-vs-three.

The action on the right unfolds

My initial charge met with mixed success. One unit of his cavalry were destroyed, but one of mine became disordered and was forced to retreat and rally. I renewed my attack, this time supported by a unit of Ashigaru spearmen and, eventually and largely due to the cards very much falling my way, his cavalry crumbled and were removed from the field. This would then leave the way clear for the CinC’s Mounted Samurai to get past his line and capture Neil’s left hand camp.

Meanwhile, on my left, I had pushed my Foot Samurai forward, intending to being superior numbers to bear on that end of Neil’s line. Unfortunately, the Yellow command got a bit tangled in the terrain, and I ended up with one unit destroyed, leaving two more units facing four units of his Foot samurai. This would usually spell disaster, but some how these two units refused to be beaten. Despite being disordered again and again, the brave Yellow Samurai rallied each time and, at the end of the game, were still very much in the battle.

This left me with four Ashigaru units facing Neil’s six Ashigaru units in the centre. Again, however, Neil’s stacked line meant that we each had four units in play and, again, the cards fell in my favour, and I quickly destroyed two of his units. I was then able to bring in my reserve force of four more Ashigaru units, guns fully loaded, and win the resultant eight-vs-four combat. Neil should have been able to support his Ashigaru with his command of peasant Mobs, but the fact that by this time my cavalry had broken through and was threatening his camps meant that he had had to withdraw them in order to defend his baseline.

Ashigaru action in the centre

Once Neil had started haemorrhaging victory coins, it was hard to stop, and eventually he ran out and was forced to retreat. Somehow I had managed to inflict a pretty hefty defeat on him: I had lost only four coins by the end of the game, Neil had lost twenty!

Post-Game Analysis

Although we both agreed that the cards had very much fallen my way, we also agreed that Neil had perhaps stacked his units too deeply to begin with: my rapid advances never giving him the chance to properly deploy. Significantly, I had run into difficulty on my left, where I had also stacked units deep, so it seems as if that is something to avoid.

Although I did seem to win by a lot, it never seemed to me as if I were winning, except right at the end. A good game, made interesting by the homogeneous forces involved.

New Ancient Britons!

I need to take a break from painting Hoplites, so thought I’d also start bringing my Ancient Britons up to scratch.

I’ve had Ancient Brits for as long as I have been wargaming: starting with an army for WRG 6th mostly made up with Airfix plastics but with a smattering of metal command figures; and then another, 15mm, force for Vis Bellica, which I had painted for me for the Society of Ancients “Battle of the Sambre” Day, for which we won best game of the day.

It’s only meet and right, therefore, that I adapt the 15mm troops for To The Strongest: which means painting chariots, light cavalry and warriors. And heroes, which is what I’ve started with.

This is a pack of Gaeseti Nobles from Xyston. Nice crisp, animated figures that paint up well. Which is lucky, as I’ve got a load of light cavalry to paint as well.

TFL Painting Challenge: Biggest Update Ever!

Well that will teach me to remind everyone that the Painting Challenge is entering its final phase!

A vast number of entries crashing into my Inbox, even including a first entry or two.

Excellent work, keep it up: still three weeks to go.

So, in no particular order, we have:

  • Lloyd with more 6mm goodies

  • Mark Luther has started a new F&I project based in the Sugar Islands (the project, not mark)

  • A fantastic Russian house and a mass of figures from Chris Cornwell

  • After taking a year off, Fred Bloggs returns with a vast number of very colourful 6mm Eldar

  • Carole sends in some rather nice ruined buildings and a couple more tanks

  • More Mr C from Ralph (I don’t know what they are either. Best not to ask: I don’t want to have to take a San. Check!)

  • Sapper fills out his SYW collection

  • Ed Bowen submits some bunnies, doggies and duckies…and some other things too

  • Mervyn is marching with the, er, Riders of Rohan

  • The most vastest, hugest entry from Steve Lampon: 28mm Gates of Antares, 28mm Gangs of Rome, lots of 6mm Yom Kippur figures, and some 28mm Byzantines I would sell my grandmother for

  • Jason Ralls returns with some French and German early war kit

  • And last, but by no means least, Joe McGinn slips in some US 15’s

As always, clicking on the name of the person will take you directly to their gallery (opens in a new window). I would highly recommend taking a look: there is some fantastic work on display.

Here’s a taster: today’s pictures…

CDS Arab-Israeli: Israeli AA Half-Tracks

A break from painting Hoplites to carve into the Arab-Israeli section of my lead mountain.

Those who pay attention will remember that I bought a whole load of kit in anticipation of playing a few games based on the 1973 Yom Kippur War rather than the 1967 Six Day War. The lists have been produced (available free in the CDS section of this website…although keep your eyes peeled as I’m about to update them with some extra info received from fellow Lardy Richard Naylor) and all that was needed was some of the new equipment available in 1973.

For the Israelis, this starts with a couple of units almost guaranteed never to get onto the table!

The first is a platoon of M3 TCM-20 Anti-Aircraft half-tracks:

These are very nice models: really easy to put together and paint. I sprayed them with GW Death Forest Green, washed in GW Agrax Earthshade, then highlighted and painted the crews and equipment. Only half of them have the aerial recognition “T” on the bonnet: I ran out of decals and will have to do the other two at a later date.

Okay, so maybe I’m being a bit harsh about the AA half-tracks never getting onto the table…but I’m almost certain that this next lot are fated to spend their lives “in the box”: jeeps with TOW launchers.

As their minimum range in CDS terms is about 6½’, they will either have to lurk right at the back of the table (I can manage 8’ at a push) or be some kind of table decoration. Perhaps I’ll play a Space Invaders scenario i.e. a mass of Egyptian tanks charging one or two Israeli TOW-mounting jeeps. Might be fun.

IABSM AAR: Lille

Time for another game of I Ain’t Been Shot, Mum! with John and Dave…but what to play? Dave has requested an early war encounter, so a quick look back through my library of scenarios and I settle on one of Richard Clarke’s games: Lille.

The premise is simple: Rommel’s Germans are advancing rapidly on Lille, aiming for the village of Lomme, whose capture will seal off the escape route of all English and French forces in the area. The Allies have realised what the Germans are up to, and have dispatched a small force to hold Lomme for as long as possible. The scene is set for an epic clash!

Click on the picture below to see all:

More new Hoplites

I’m continuing to build up my Hoplite Greek force for To The Strongest. My target is six units of Hoplites, with each unit being 48 figures strong. That’s 288 Hoplites in all!

I started with 96 Hoplites, added another 48 two weeks ago, and am now adding another 48 making 192 in all. So 96, or two more units to go.

This time, I chose to use Hoplites from Forged in Battle’s 15mm range. They come with shields and spears attached, and although the spears don’t look quite as good as the wire spears used with the Xyston lot, it did save an awful lot of time to have them ready-fitted.

So how do these compare with Xyston?

  • There’s less variety of pose in the FiB pack, but that’s not necessarily a bad thing as Hoplites are supposed to be in formation , so even-Stevens on that one.

  • As mentioned, the spears and shields are integral, so don’t look as good, but save an awful lot of work, so even-Stevens on that one too.

  • Details is comparable, although the hoplons themselves (the shields, darling, the shields) are a little small.

  • The FiB Hoplites are a shade easier to paint: the relief on the panoply is just slightly deeper

So, all-in-all, Xyston edge FiB in terms of quality of sculpt and final look, but the ease of integral spears and shields, and the fact that FiB are slightly easier to paint, more than makes up for it. I shall use both evenly from now on.

Right: time to start on the next 48 of the little blighters!