TFL Painting Challenge: A Large Update

A large update to the Painting Challenge after missing a week due to Market Larden.

To dive straight in, in no particular order we have:

  • Travis with a mix of figures: some WW2, some not

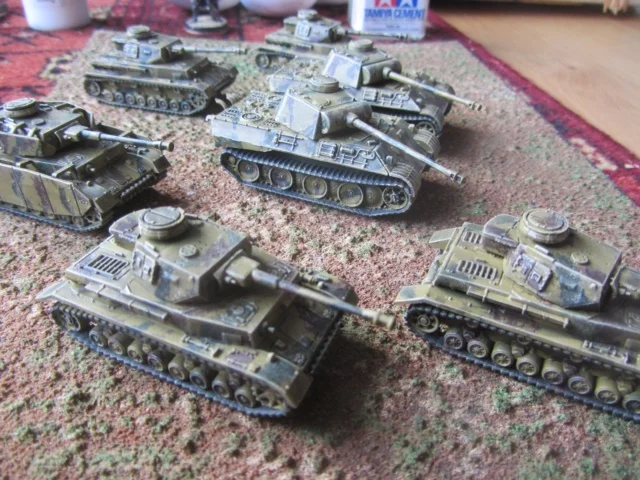
  • And the same is true for Mervyn: tanks and barbarians together

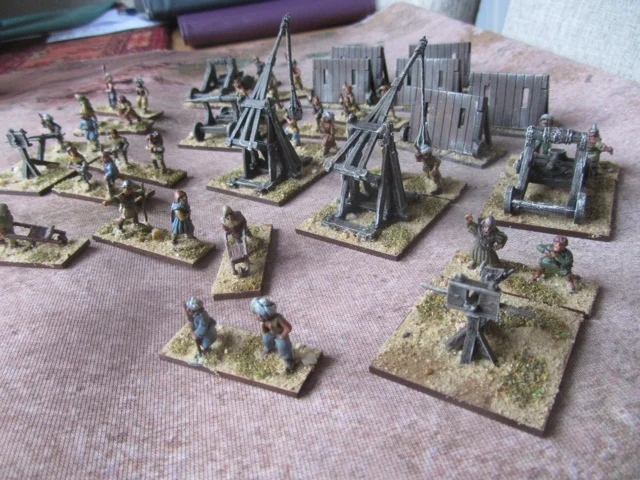
  • Stumpy is in the Ancients camp

  • Steve Burt is back in Natal

  • Carole clears some odds and ends

  • It’s off to the Western Desert with loads of Italians for Matt Slade

  • Andy Duffell is another mix of WW2 and fantasy…well, near future sci fi to be more precise

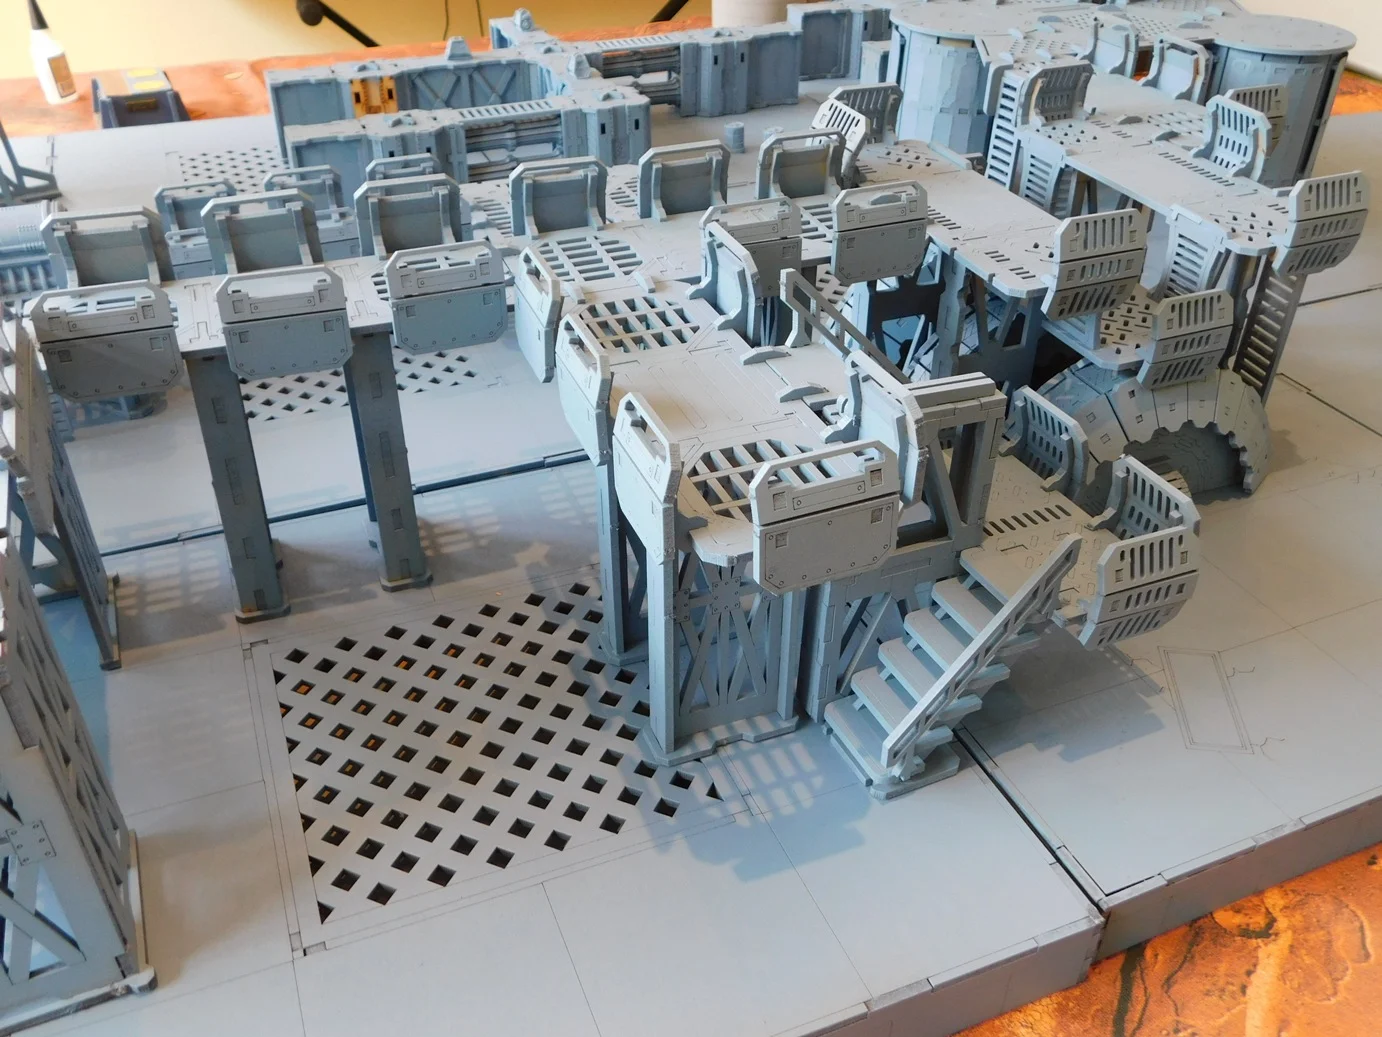
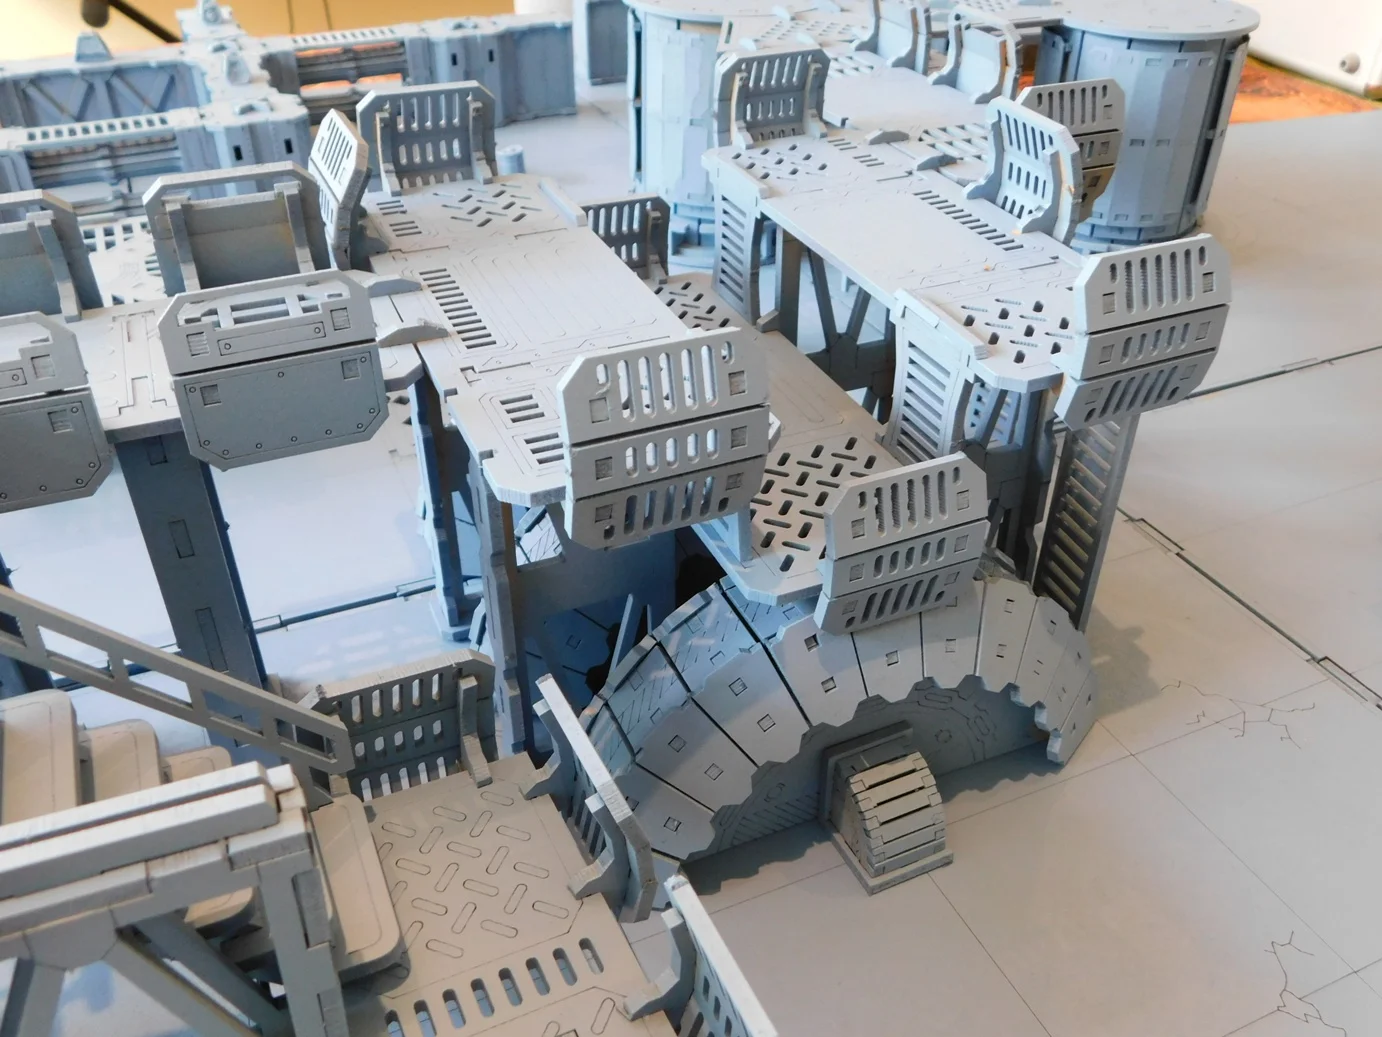
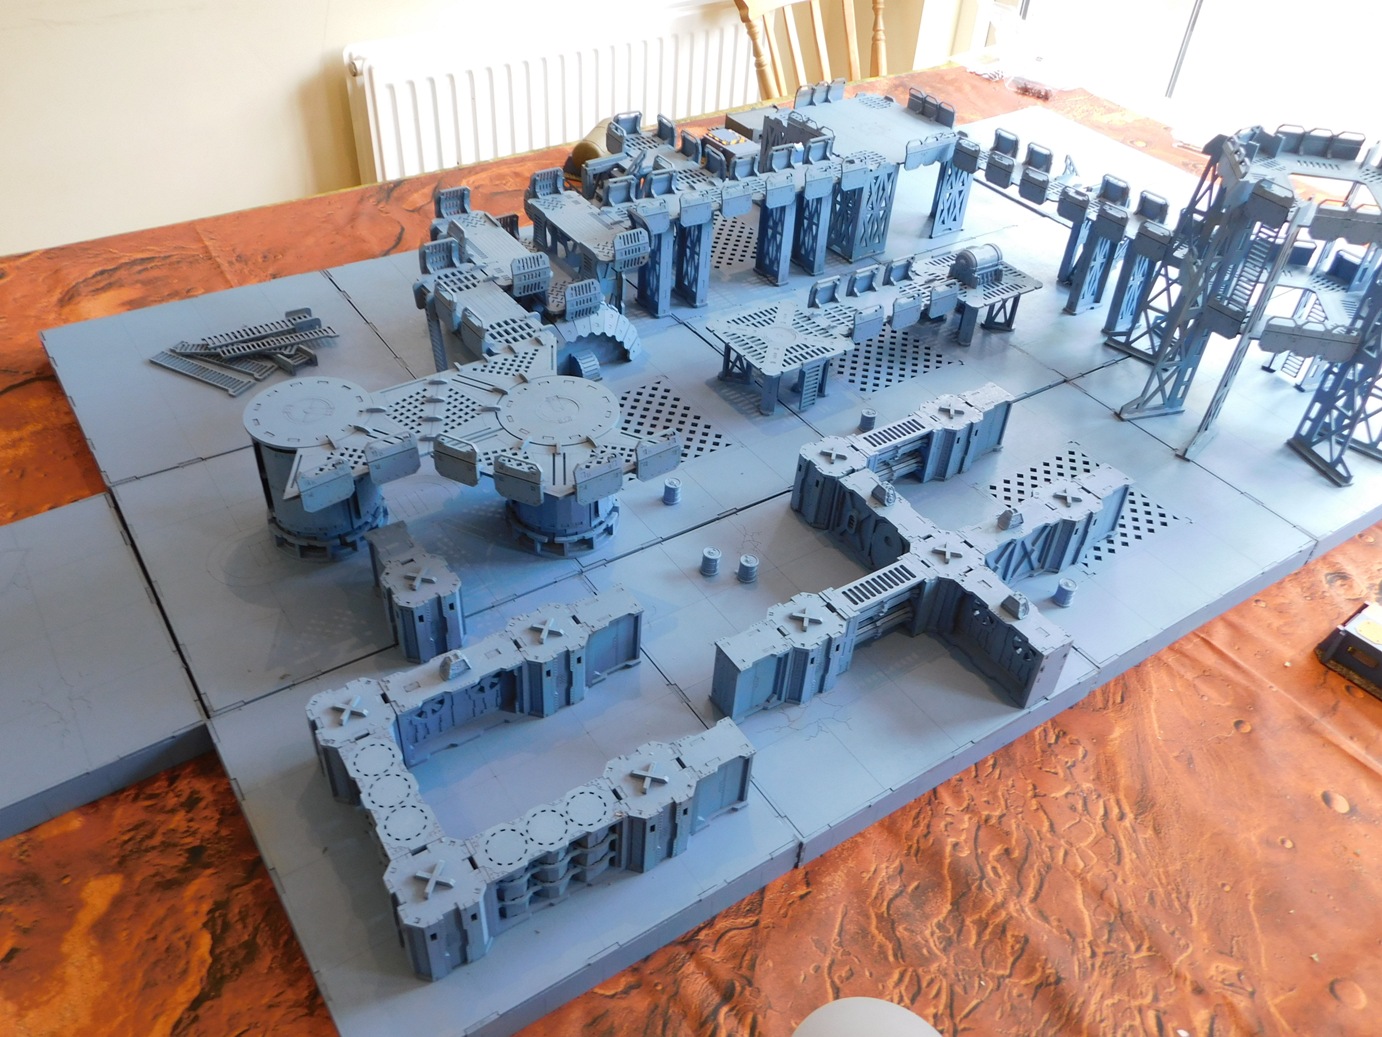
  • Loads of painted 15mm terrain from Chris Stoesen

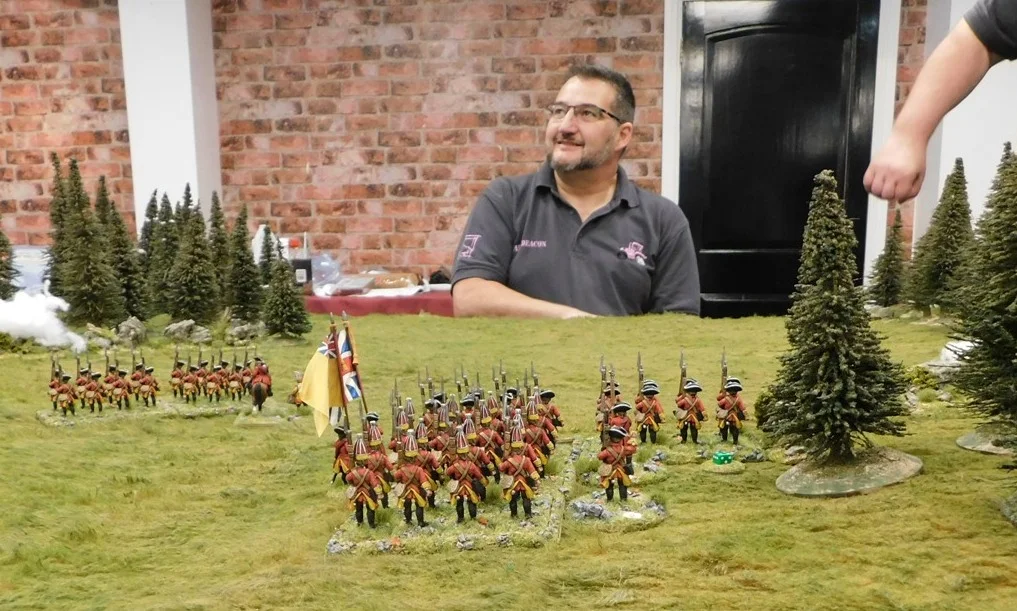
  • Andrew Helliwell is off to the American War of Independence

  • And, again, Derek has skeletons and tanks for us. What is it about the mix of WW2 and fantasy?

  • Finally, and having obviously forgotten his fantasy, Sapper has some nice WW2 British infantry with not a hint of Dungeons & Dragons about them!

As per usual, clicking on the name of the person in the list above takes you straight to their gallery (opens in a new window).

Today’s pictures are below:

AAR OML7 Game 2: IABSM: Recce vs Recce

My second game at this year’s Operation Market Larden (the Evesham Lardy day) was a rather exciting game of I Ain’t Been Shot, Mum. The scenario, written and umpired by Mike Whitaker, involved a clash between British and German reconnaissance forces somewhere in Italy in around 1943.

Click on the picture below to see all:

15cm Nebelwerfer Battery

Another unit almost certainly destined never to see the tabletop except as an objective for attack!

One of the new Late War box sets from Battlefront, the 15cm Nebelwerfer Battery consists of six plastic rocket launchers with three sprues of six crew each.

Very easy to build and paint up, and I like the extra ammo stowage you get to dress the bases. My only real problem is with the crews. The number of figure provided is fine: you get six figures per rocket launcher, but only four per launcher are actually suitable, the other two being obvious artillery- or anti-tank-men. That’s not the problem.

My gripe, and it is a small one, is that three of each set of kneeling crew members are wearing their full equipment: backpack, gas mask case, haversack, satchel etc. Now, fair enough, you don’t want to lose your stuff by putting it down somewhere and then forgetting it, but these are behind-the-lines artillerymen. I can’t see that they would go about loading their weapons with full pack on…but maybe I’m wrong, maybe they did. Anyone know? Anyhow, looks a bit weird to have all these heavily laden chaps servicing their guns.

But it’s a small gripe and don’t let it put you off buying. When it comes down to it, the set does exactly what it says on the tin. Now all I need to do is to get a table big enough to cope with their minimum range!

IABSM AAR: Sealion #06: The Road Inland

Tim Whitworth and friends recently played scenario #06 from the Operation Sealion scenario pack: The Raod Inland.

It is day S2 of the German invasion and the reconnaissance battalion of the Wehrmacht 26 Infantry Division is heading towards the sleepy village of Herstmonceaux. The reconnaissance unit is light in vehicles and most of the troops are mounted on bicycles ‘liberated’ from a sports shop in Pevensey.

So far British resistance has been patchy comprising of pockets of home guard and the occasional unit of regulars but the British are now frantically attempting to form a solid defensive line to the north of the landing beaches.

What will this day hold in store for Hauptmann Ralph Sturmer and his company? Click on the picture below to see all…

AAR OML7 Game 1: Chain of Command in Malaya

The first game that I played at this year’s Operation Market Larden was a game of Chain of Command set in Malaya 1941 put on in 28mm by Mark Backhouse.

The British, played by Matt Slade and I, were represented by a platoon of Argyll and Sutherland Highlanders. We were defending: our mission was to prevent any Japanese troops exiting the table on our side: Mark, in the picture above, is standing behind the British baseline. A sub-plot also involved us getting a senior officer to the knocked out ambulance to rescue certain vital supplies.

As mentioned, we had a full platoon of Scottish infantry at our disposal: three sections, a light mortar team and a Boys anti-tank rifle team led by lots of officers. In support, we chose a Lanchester armoured car (mainly because this theatre is about the only place you can use one) and a roadblock, which we used to prevent the Japanese bringing any tanks on from the side road on our right flank.

The Japs, played by Jeff Davis and Ian Gilbraith, had the opposite idea. Their aim was to capture two thirds of the table (horizontally) allowing them to exit troops off the British baseline. They also had a secondary mission: explore the two huts in search of rice supplies.

The Japanese also had a full platoon to field, but their sections were enormous: fourteen strong IIRC. In addition to their three regular rifle sections, they also had a grenade launcher squad with three Mk89 teams. In support, they had a Chi Ha tank: something we were not looking forward to facing.

Patrol Phase

The Patrol Phase happened quickly, with the Japanese ending up with their Jump Off Points largely on their left side of the table. We had two of our JOPs on that side of the table too, but as we’d had to protect out entire front instead of being able to schwerepunkt along one road, we had another behind the hut on our left hand side of the table.

The Main Game Begins

The dice really fell for the Japanese in the early stages of the game. I’m not quite sure of the mechanic, but something about them rolling lots of 6’s on their Command Dice twice in a row meant that they shot up the battlefield until there was a section in the jungle to our right, the grenade launchers behind the hut just in front of our positions, and another section right in front of us in front of the hut.

The Japanese opened fire, promising huge amounts of devastation on our lead section. Fortunately (me rolling lots and lots of very low dice) the potential for large numbers of deaths was never realised. In fact, our only casualty was a junior officer knocked down…who promptly got back up again. This did, however, cost us two Force Morale points: the officer was obviously deeply unpopular!

Now the dice swung our way, and we had the chance to pour fire into the Japanese squad out in the open: which we did, knocking their strength down by half. At the same time, our Lanchester appeared, and promptly shot up the Japanese squad to the right.

It was all going so well…then this happened:

The Chi Ha took a shot at the Lanchester, hit it, and almost knocked it right back off the table. One more of them and we’d have no Lanchester left, and a dwindling number of Force Morale points.

Our light mortar popped some smoke down on the road between the Chi Ha and our armoured car, which gave us a little time to breathe…but what to do? There were still lots of Japs on the table, albeit half of them were pretty bashed up, but we needed to do something quickly and decisively if we weren’t going to spend the next four years building railways!

There was nothing for it: we would have to go forward and take the fight to the Japanese!

Bursting from the undergrowth, one of our sections rushed across the road to the right shouting strange Scottish epithets as they closed with the enemy. There were more Japanese there than we expected (the figures were hiding in the scenery!) and we lost the first round of close combat. This boded ill, but then Mark reminded us that as we were Scottish, we could ignore a loss by a mere one man, and carry on fighting until we were properly wiped out!

Back in went the Argylls, and in another two rounds of fighting (the Japs weren’t giving up the ghost easily either) we killed every enemy solider except one senior leader, who fled the field not to be seen again until 1966, when he finally emerged from the jungle not knowing the war had ended in ‘45!

The loss of so many of their men was too much for the already battered Japanese to survive. With a Force Morale of zero, they melted away back the way they’d come. Another successful Argyll ambush: time to fall back and do it all again tomorrow!

Aftermath

A cracking game of CoC, and one after which I am actually starting to remember the rules. I don’t think I’m switching from gaming companies in 15mm (IABSM, CDS, Q13) but I shall definitely play CoC again when I can.

Thanks to mark, Matt, Jeff and Ian for making it such a great game. Here are a few more piccies:

Operation Market Larden 7

Another fantastic Lardy Games Day: this time up in Evesham at Market Larden 7.

There were about forty Lardies present, playing a selection of beautifully terrained and figured games that are easily the equal of any demonstration game seen anywhere else in the world.

I had a very good OML7: got to the hotel in time to have a full breakfast, an excellent game of Chain of Command set in Malaya, then lunch, then an equally excellent game of I Ain’t Been Shot, Mum set in Italy, then a few drinks before the usual curry, and then more drinks. Polish that off with another full breakfast this morning, a good trip home, and the perfect day’s gaming has occurred!

I’ll do separate reports on the two games I played in myself, but here are photos of most of the games on show (I think I missed the Bag the Hun game off my picture taking for some reason):

Colossal thanks to Ade Deacon for organising everything as efficiently as ever.

M18 Hellcat Tank Destroyers

I’m still working my way through all the stuff I bought in the Battlefront sale. The next box set pulled out of the pile was a platoon of M18 Hellcat Tank Destroyers.

These are lovely pieces of kit: the traditional resin and metal mix rather than plastic, and well worth the money. They go together very easily indeed, and even my usual bugbear of fitting the crew in to the turret compartment was easily solved with a pair of clippers!

I built two of the M18s without a muzzle brake (left hand picture above) and two with the post-1944 muzzle brake (right hand picture above).

Painting them was easy. I began with a quick spray of a slightly darker shade of green: more a British colour than an American one. Once that was properly dry, I painted all the things that wouldn’t be green at the end of the process: the crew, the tools, the stowage etc. Then I washed the whole vehicle in Agrax Earthshade and, when dry, highlighted everything. The main vehicle body was heavily dry-brushed with brown velvet: this gave me the contrast I was after with the darker and washed green below. The tracks are my usual mix of a steel colour with a flesh wash.

To make sure the crew stood out, I actually painted them in a very light green uniform: not quite accurate, but when washed gave a nice effect. You can’t see it very well in the picture, but the crew member on the left (as you look at the picture) is actually giving someone the finger. Just one of the vagaries of casting, but a nice touch!

One note, the box set does come with some extra stowage and a decal sheet. The extra stowage is great, and the small stars on the turret and the vehicle number are just right, but the aerial recognition stars (the ones within the circle that go on top of the back of the turret) are way too big. I had to use left over decals from another set and, because the top of the turret has got all sorts of knobbly bits on it, loads of decal softener to get a nice fit.

These get a highly recommended from me, which is actually a shame as I’ve just realised that the reason they were in the sale is that Battlefront are relaunching (today actually!) everything late war, so this box set probably isn’t available any more! Shame.

Q13: List of 15mm Sci Fi Figure Manufacturers

I like to keep this site as updated and useful as possible, so spent a little time yesterday updating the list of manufacturers of 15mm sci-fi figures.

Sad that so many now seem to be moribund or out of business, which just goes to prove my maxim that if you see some figures that you like, you should buy them, as you never know how long they will be available for.

For example, I still regret not buying some of the Combat Wombat range as dropships for my Aphids…but you live and learn and it’s a mistake I won’t make again. Food? Who needs food when there are figures to buy!

What is also interesting is how many of the cottage-industry manufacturers’ are no longer available from the individuals who started them, but have been absorbed into being part of a larger manufacturer or distributor’s offering. Ral Partha Europe, for example, are now the only place you can get what was the Critical Mass range, and the Spriggan range, and more. Is this a good thing or a bad thing? Well at least the figures are still available and not just KIA.

To end on a high note, however, I was pleased to add Nuclear Shrimp as a new manufacturer to the list. They are based in Greece and produce a range of 15mm sci-fi figures under the Black Earth banner: a post-apocalyptic range of human defenders (the United Earth Federation) and Brute attackers (huge mutant humans looking like Mr Hyde from the dreadfully disappointing League of Extraordinary Gentlemen movie.

I’m loving the Brutes and have already sacrificed next week’s lunches to buy them!

I was initially a bit worried about their 15mm credentials (scale creep!) but the very nice chaps at the Shrimp and the 15mm SciFi Facebook group provided some comparison shots that convinced me that my fears were groundless. Check them out here.

Q13: Salute Bargain Finally Finished

Some of you may recall that at Salute I splashed out on a laser cut mdf industrial set up on special offer from Troll Trader. This was a huge layout for the bargain price of only £100 including p&p. I’ve been gradually building it over the last six weeks and have finally finished it.

This is a legendary set up, meant for 28mm troops, but absolutely ideal for sci-fi “15mm” figures which, as we all know, tend to be more 18-20mm.

I’ve always wanted to play an industrial hive battle kind of game, and now I can. In total, I now have the sixteen base boards (that alone used up about a can and a half of spray paint); a couple of small platforms connected by a walkway; the huge platform that looks like the outside of an oil well; a powerplant piece; a couple of big, cylindrical tanks connected by a top walkway; a landing pad; two staircases; two sets of corridor connectors; twenty-four individual bits that join together to form the “iron labyrinth”; and a pile of spare ladders.

The build was arduous: not just because of the sheer volume of things to be built, but also because some of the components were, simply, difficult to build. I’m not really a terrain-building person, so often don’t take the proper time and trouble to prepare and get everything just right: so checking and sanding every slot to make sure its component slides in smoothly just isn’t my cup of tea. Smash the two bits together and use a bit of strength to pop the slots into place doesn’t work with every bit of this complex, especially not the industrial labyrinth sections that caused me more grief than anything else.

Having built the thing, I was going to leave it as plain mdf, but a simple spray of grey paint does make it look more, well, industrial, and will make a beautiful backdrop to my brightly coloured sci-fi figures. I suppose I should take the trouble to dry-brush it all now, to give it some variety and depth but, tbh, that seems like a lot of hard work for something that already looks very acceptable. I might have a game, take some piccies, see how they turn out, and then decide on the dry-brushing then. Or wash then dry-brush if I really want to go to town.

Here’s a gallery of the entire thing: very good value for £100, so Troll Trader (from whom I’ve always had good, if not incredible, bargains at Salute) go straight to the top of my Christmas card list.

Next step is to dress the table with the rest of my sci-fi terrain, buildings etc

TFL Painting Challenge: Half Year Update

Well we’re half way through the year now, and perhaps time to see how everyone is doing: the Scorecard is updated, but a few worthy mentions are due before we get onto today’s entries.

No-one has hit the 2,000 point mark yet, but we do have:

1,500 points: Lloyd “the hat” Bowler; Chris Cornwell and Matt Slade;

1,000 points: Carole Flint and Sapper

500 points: Richard Clarke; John de terre neuve; Mervyn Douglas; Andy Duffell; John Emmett; John Haines; Andrew Helliwell; Travis Hiett; Mark Luther; Joe McGinn; and Chris Stoesen

Well done to them, and well done to the rest of you too just for entering and getting some submissions in. Remember: it’s not a competition, it’s way to encourage us all to paint more and better.

Contributing to the point above, today’s entries are:

  • Andy Duffell with some WW2 figures and then some rudey-nudeys! Don’t worry, Andy, I’m sure, being Lardies, that we’ve seen it all before!

  • Some Baluchis from Steve Burt

  • Late Romans from Carole

  • Travis has some more winter-kit German WW2 Grenadiers

  • A first (and earlier than normal) entry for the year from Fred Bloggs: Epic!

  • Chris Stoesen sends in a mixture, including a very nice gaming mat for which he received lots of points

  • More Sugar from Mr Luther

  • Sapper has been watching Eurovision with Edward III

  • The Hat has a huge entry: almost 600 6mm figures and some rather nice 1/300 landing craft and loads

  • A variety of lovely WW2 figures from John Emmett

  • There are some nice Italian Wars troops from Mr Cornwell

  • And last, but by no means least, some Indian Mutiny Highlanders from Joe McGinn

As usual, clicking on the name of the person in the list above will take you straight to their gallery (opens in a new window).

Here are today’s pictures:

A Late Entry today: Belgians from John Emmett

More Celts

One thing about playing the To The Strongest rules for Ancients in 15mm is that you need an awful lot of figures, especially if playing an army whose units are mostly “deep”.

I’m playing on a 15cm grid, with a normal unit represented by two Vis Bellica bases i.e. two bases 6cm wide and 3cm deep next to each other, frontage 12cm. Already that’s double the number of bases that you’d need for a game of VB.

Now add the fact that one of my collections is Ancient British/Gallic (or indeed anyone vaguely Celtic) and that their units are deep and therefore four bases in all (so a unit has frontage 12cm and depth 6cm) and you can see that I needed to quadruple the number of bases that I used in VB to play TTS.

Well, not quite, as I used to play very big games of VB, but the point is that my Celts needed reinforcements. I’d already painted the chariots/light cavalry I needed, and one warband, but couldn’t face painting another. So I got someone else to do it for me!

Here’s a lovely bunch of Celts painted by friend John. Can’t wait for them to take the field!

IABSM AAR: Pegasus Bridge Playtest

This year is the 75th anniversary of the successful assault on Pegasus Bridge by glider infantry of the 2nd Battalion, the Oxfordshire and Buckinghamshire Light Infantry, British 6th Airborne Division, commanded by Major John Howard. The successful taking of the bridges played an important role in limiting the effectiveness of a German counter-attack in the days and weeks following the Normandy invasion.

The Soldiers of Oxfordshire Museum (SOFO) is putting on an exhibition to celebrate the anniversary, and it looks as if a few of us might be able to run a demo game of IABSM one weekend at the museum to help bring the event to life for the general public.

All the running for this is being done by friend Dave, so all I had to do recently was to take part in a playtest of the game to be run. Click on the picture below to see all…

TFL Painting Challenge

Another big update for the Challenge this week, so let’s jump right in and see what’s what:

  • Derek has spent a month basing and re-basing figures

  • There’s a variety of entries from Travis

  • Mr Luther continues his building programme, and adds a few pirates for variety

  • A combination of big dragoons and tiny infantry from Sapper

  • Steve Burt has the Moors in

  • John Haines is preparing to become the Swamp Fox

  • Romans and peasants re-based by Stumpy

  • More Condottieri from Carole

  • Soviet partisans from Mr Duffell

  • More boats from the Hat

  • Joe McGinn sends in some infantry for Through the Mud & Blood

  • Mervyn is Under Siege

  • Mr Helliwell has been busy

  • And last, but not least, Chris Kay sends in some more figures for Star Wars

As usual, clicking on the names of the people in the list above will take you straight to their gallery (opens in a new window).

Here are today’s pictures:


CoC: Taking the Gembloux Gap

Although we don’t usually write about CoC on this website (now there’s a sentence that deserves re-writing!) we do always try to feature the new releases for that system, particularly as many of them can provide ideas for IABSM.

So here’s news of the latest pint-sized campaign for Chain of Command: Taking the Gembloux Gap. Here’s the blurb:

A twenty-eight page PDF, Taking the Gembloux Gap contains an overview of the events of May 1940. as the German panzers rushed across Belgium, to be met by French troops advancing to assist their neighbours as part of ‘Plan D’.  If the German armour can break through at Glembloux, the flank of the entire B.E.F. is turned and the road to the sea lies open.   This campaign focusses on the critical actions of the 15th of May as the French 110e Regiment d’Infanterie attempts to stem the tie of 3 Panzer Division spearheaded by 3 Schützen Regiment.  This campaign is designed to be used with the Blitzkrieg 1940 Handbook.

The campaign is a total of five game tables with the duration running between five and nine games.  Briefings are provided for both sides, along with measurable objectives, period maps, force and support option listings and everything you need to play this campaign through to its conclusion.

Like all of our Pint-Sized campaigns, this PDF is available for the price of a pint in our local pub.  We’re sure that you’ll agree, that is great wargaming value!

Buy it here.

IABSM AAR: Sochaczew

Always nice to see people using my support material to play their games, so here’s an after action report from Tim Whitworth and the Like a Stonewall wargamers using the Sochaczew scenario that I wrote for the TwoFatLardies Summer Special 2017.

Set in 1939, Polish troops are desperately defending the town as the German infantry and Panzers sweep in. Click on the picture below to see what happened…

TTS AAR: The Sasanids Ride Out!

The final game in my recent set with Neil was my Sasanid Persians versus, again, the Pyrrhics.

This promised to be quite interesting: an army composed of extra heavy cavalry and horse archers against a mostly spear and pike-armed force.

In the event, however, it turned out to be quite a mundane battle. My horse archers quickly got around his flanks and started shooing anything that moved. In the centre, I held back until his heavy foot advanced past a line of hills running down the centre of the battlefield, leaving only one unit each side to guard their flanks.

As the two main lines came together, the single unit of heavy clibanari that I had put with each horse-archer command was just coming into play, pinning his flank units in place as the lighter cavalry shot at and charged their flanks.

With his flanks crumbling, his main line getting nowhere, and horse-archer nipping at his Hoplites’ heels, Pyrrhus decided that discretion was the better part of valour and surrendered!

A workmanlike victory for the Sasanids.